
Customization Guide
This document presents three elements of customization that can be done with S-Filer Portal. The top left logo, a custom message to the login page and the EULA and acknowledgment page.
Company logos
Top left
This will enable you to add a logo in the top left part of the application.
To do so you will need to access the theme folder you are using with S-Filer. This is usually located on the gateway installation. For example, the theme would be located here for an installation on the C drive on windows:
C:\Program Files\Okiok Data\sfiler-gateway\gateway\webapps\sfiler-gui-ajax\themes
You now see multiple theme folders. The default installation would be with sfiler. So go in that folder and you will see an images folder. Copy your logo image in that folder and name it title_top_left.png
Once you are done, you can refresh the login page in S-Filer Portal web application and you should see your logo on the top left of the application's page. If you do not see it, you may need to refresh the cache of your internet browser and S-Filer gateway.
Top of login box
This will enable you to add a logo right over the login box.
Follow the steps of 2.1 to reach the correct folder.
Copy your logo image in that folder and name it logo-login.png
Once you are done, you can refresh the login page in S-Filer Portal web application and you should see your logo right over the login box. If you do not see it, you may need to refresh the cache of your internet browser and S-Filer gateway.
Customizing the theme of your application
Login
To customize your application, you will need a text editor and be knowledgeable with HTML and CSS.
In order to modify your custom theme, you can use the files provided in the theme folder. Under the CSS folder of your theme you have access to login.css, logout.css and main.css.
The most important CSS selector classes for the login page are:
- mainbody: enables you to change the white background to another color.
- Change background-color to a new color to do so
- core-navbar: can be used to modify the top navigation bar.
- Change background-color to a new color to do so
Main application section
Repeat the above actions in main.css in order to modify the post login pages
- If you want to change the color of all links in the application:
- a: set the color to change all colors of the application.
- To change all title colors
- h1, h2, h3, h4, h5: set the color to change all colors of the application.
- To change all buttons
- .btn-primary: set the color to change all colors of the application.
Example
Here is an example of changing some rules to obtain a red theme:
Add these lines to main.css:
a{color:darkred;}
a:hover{color:#ff0000;}
h1,h2,h3,h4,h5{color:darkred}
.btn-primary{background-color:darkred;border:#530000;}
.btn-primary:hover{background-color:red}
The above will give you the following result:
Setting welcome message in login page
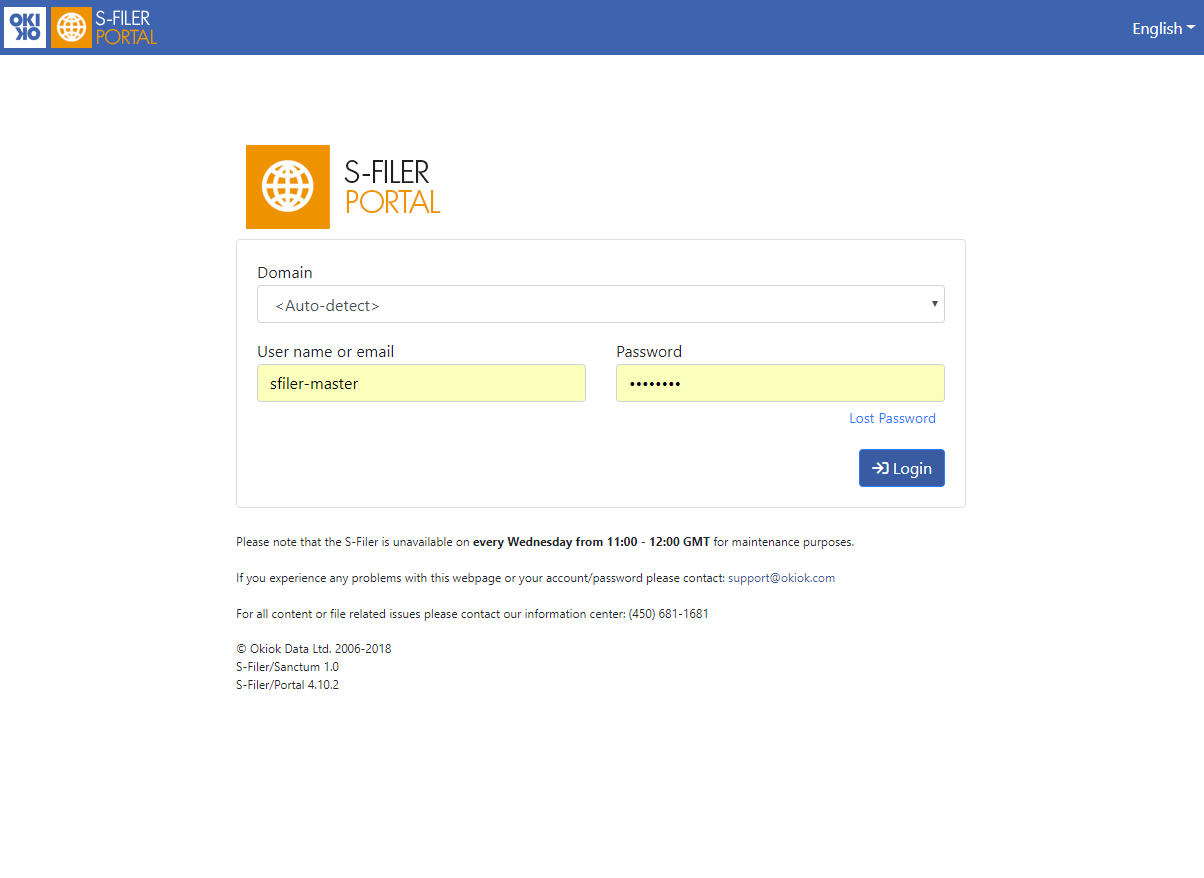
The following images shows the login page with a maintenance schedule added on the bottom of the page.
To set a welcome message in the login page, like the maintenance schedule presented above, the war file containing the sfiler GUI needs to be extracted and modified. .
You need to reach the folder which contains the message.jsp file. It is located in /themes/okiok/messages.jsp. By default, message.jsp contains a simple div declaration:
<div></div>
In order to set a message, you need to replace the JSP's content with the following example:
 <%@ page contentType="text/html; charset=UTF-8" pageEncoding="UTF-8" session="false"%>
 <%@ taglib prefix="s" uri="/struts-tags"%>
 <div class="container">
   <div class="row justify-content-md-center">
     <div class="col-12">
       <div class="login-bottom-section">
         Please note that the S-Filer is unavailable on <b>every Wednesday
         from 11:00 - 12:00 GMT<b for maintenance purposes.<br/><br/>

         If you experience any problems with this webpage or your
         account/password please contact: <a href="mailto:support@okiok.com">support@okiok.com</a>
         <br/><br/>
         For all content or file related issues please contact our information
         center: (450) 681-1681
       </div>
     </div>
   </div>
 </div>
JSP page section description
These 2 first lines are mandatory:
<%@ page contentType="text/html; charset=UTF-8" pageEncoding="UTF-8"%>
<%@ taglib prefix="s" uri="/struts-tags"%>
You then need to add the custom message div:
<div id="login-bottom-section " >
  ...
</div>
Finally, the content of your message must be set inside the condition, or inside the div if only one language is supported
 Please note that the S-Filer is unavailable on <b>every Wednesday from 11:00
 - 12:00 GMT</b for maintenance purposes.</br></br>

 If you experience any problems with this webpage or your account/password
 please contact: <a href="mailto:support@okiok.com">support@okiok.com</a>

 </br></br>

 For all content or file related issues please contact our information
 center: (450) 681-1681
If you need to adapt the CSS of this message, you may modify the CSS called login.css located in the S-Filer portal's theme that is currently in use.
Example: /themes/sfiler/css/login.css
Setting the EULA and acknowledgment page in S-Filer Portal
This section explains how to set the end user license agreement page as well as the Acknowledgment page.
Note
This section describes how to set the global settings for the EULA and Acknowledgment pages. To personalize the pages for specific populations, see Configuring multiple license pages.
The End user license agreement (eula) page is presented to each individual user only once, usually after the first password change, and must be accepted before proceeding further in the application. Once the user as read the license agreement and if he approves to abide by its rules, he only needs to press the yes button at the bottom of the EULA text and he will not be presented this page in his future usage of S-Filer Portal.
The Acknowledgment page is presented to the user after each login as an intermediary page. This page may contain information that the administration deems important for the user to know before proceeding further in the application. The user only needs to press the yes button on the bottom right if he has acknowledged the page's content and wishes to go further in the S-Filer Portal application.
Instructions
First you need to access the web component basic configuration. Click on your web component in the left hand tree, and then click on Configuration followed by Features. In this panel you will need to set 2 drop down menus to Yes to activate Acknowledgment and License agreement.
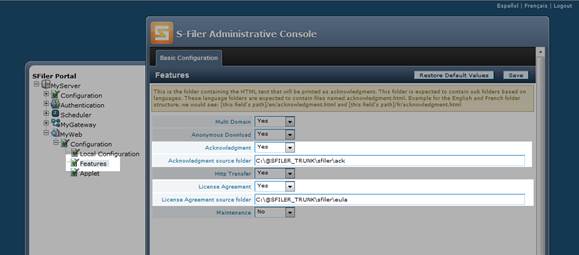
Once the drop downs are set to yes, you will have 2 more fields to set which are the location of where you will store your html files that will be used by the EULA page and Acknowledgment page (Acknowledgment source folder and License Agreement source folder).
This folder needs to be on the machine that will host the gateway/web interface combination. You also need to provide an absolute path.
Under these folders, you need to build a sub structure which comprises 3 folders; en (English), fr (French) and es (Spanish). Each of these folders must contain a file called acknowledgment.html or license.html depending on which structure you are in.
In this panel you will need to set 2 drop down menus to Yes to activate Acknowledgment and License agreement.
- eula
- en
- license.html
- fr
- license.html
- es
- license.html
- en
- ack
- en
- acknowledgment.html
- fr
- acknowledgment.html
- es
- acknowledgment.html
- en
In the creation of your html pages, it is necessary to put your HTML and CSS in the above html documents. The only way to support images is to host the images on another web server and refer to them in you html pages with an absolute path. You can do the same thing for javascripts and css documents.