Configuration guide of the email server with OAuth2
Note
OAuth 2.0 (Open Authorization) is a protocol designed to enable an application to access services provided by other applications on behalf of a user.
OAuth2 authentication involves three parts:
- Service provider: the application that hosts the service to be used. In our case, this is an SMTP server hosted by an application external to S-Filer Portal (for example, Microsoft 365 or GMail).
- Service user: Application that wants to use the provider's service. In our case, this is S-Filer Portal.
- Authorized user: This is a user authorized to use the provider's service, and who will be impersonated by the application wishing to use this service.
Implementing OAuth2 authentication with the email server requires some steps to take place in the application providing the service and others to take place in the S-Filer Portal administrative console.
Configure the service provider
The configuration required to enable OAuth2 authentication with the email server differs from one service provider to another. The following subsections provide detailed instructions for each of the providers we tested in S-Filer Portal.
Microsoft
To be able to use the Microsoft SMTP server, you need to configure it in several applications, and you need to have an administrator account in your Microsoft tenant.
Microsoft Azure
The following steps are performed in the Azure portal and require the necessary permissions to add a new "Enterprise Application".
Step 1 - Azure portal login
Log in to the Azure portal using your browser and login credentials.
Step 2 - Recover the tenant ID
The tenant ID is an identifier that will be required below in step 3 of the configuration with the Powershell command line interface and in step 4 of the S-Filer Portal configuration in the OAuth2 tab.
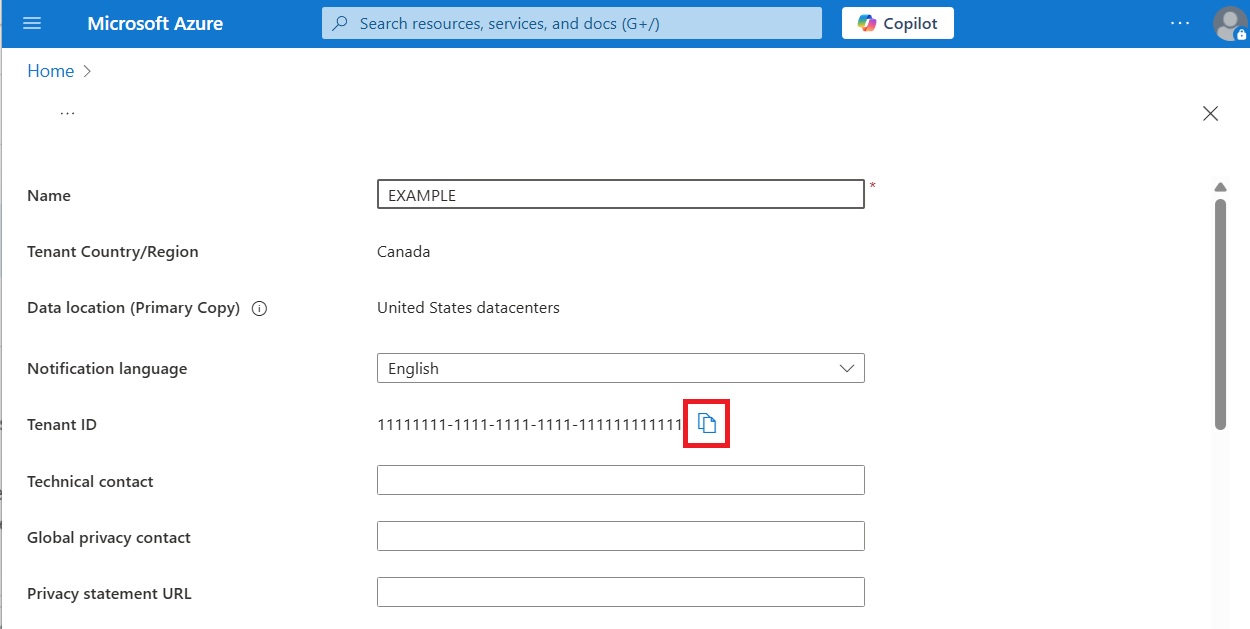
To retrieve it, use the search bar on the Azure Portal home page to find the Tenant properties service. Once in the main screen of this service, copy the value of the Tenant ID field.
Step 3 - Authorized user creation
It is necessary to create a user in Azure who will have the necessary permissions to send emails applicatively via SMTP. The S-Filer Portal server will then use this user to connect to the SMTP server when it needs to send emails. The email address of this authorized user will be the one that appears as the sender address in emails sent by S-Filer Portal.
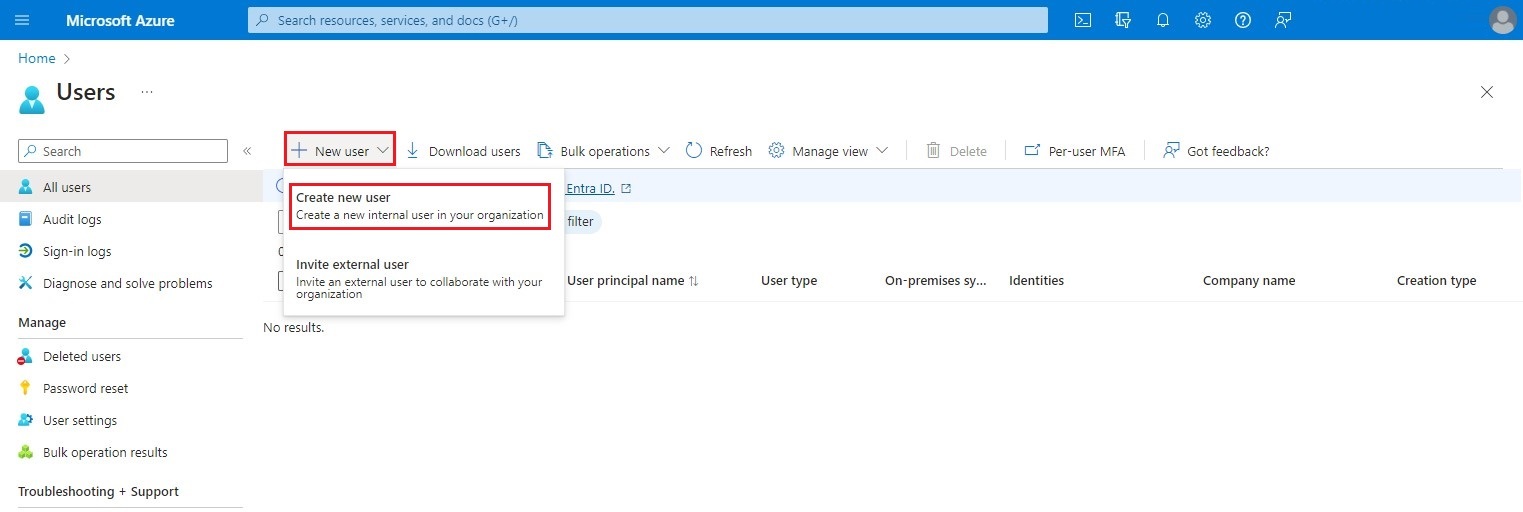
Use the search bar on the Azure Portal home page to find the Users service. Once in the Users screen, click on the New user button in the top bar, then choose the Create a user option to create a new user.
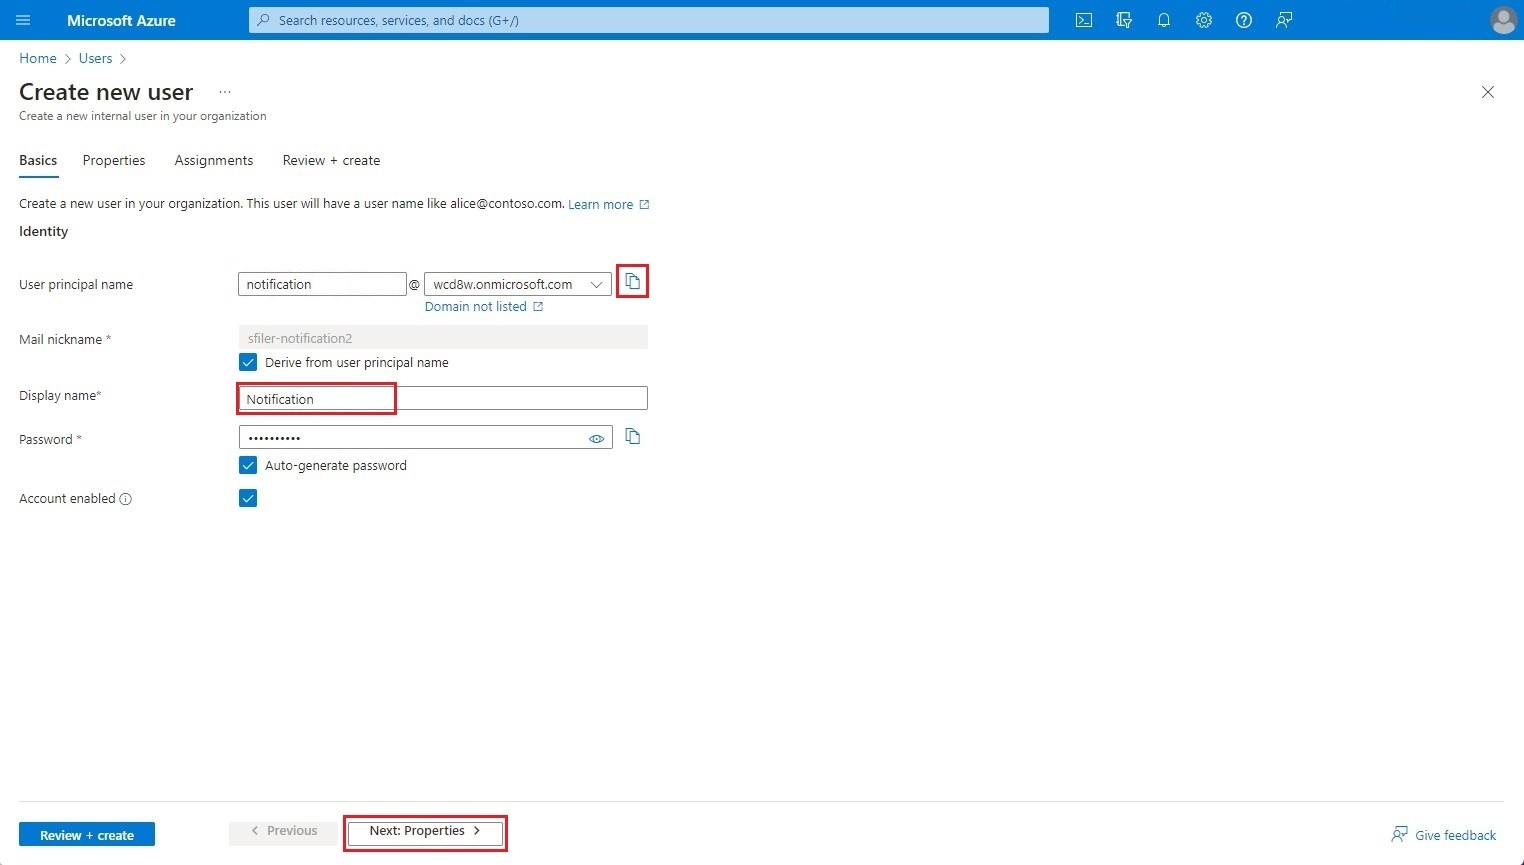
Enter the required fields User principal name and Display name.
Copy the value of the User principal name field, which will be required below in step 7 of the Azure configuration, step 5 of the Powershell command line interface configuration, and step 4 of the S-Filer Portal configuration in the OAuth2 tab.
Click on Next: Properties.
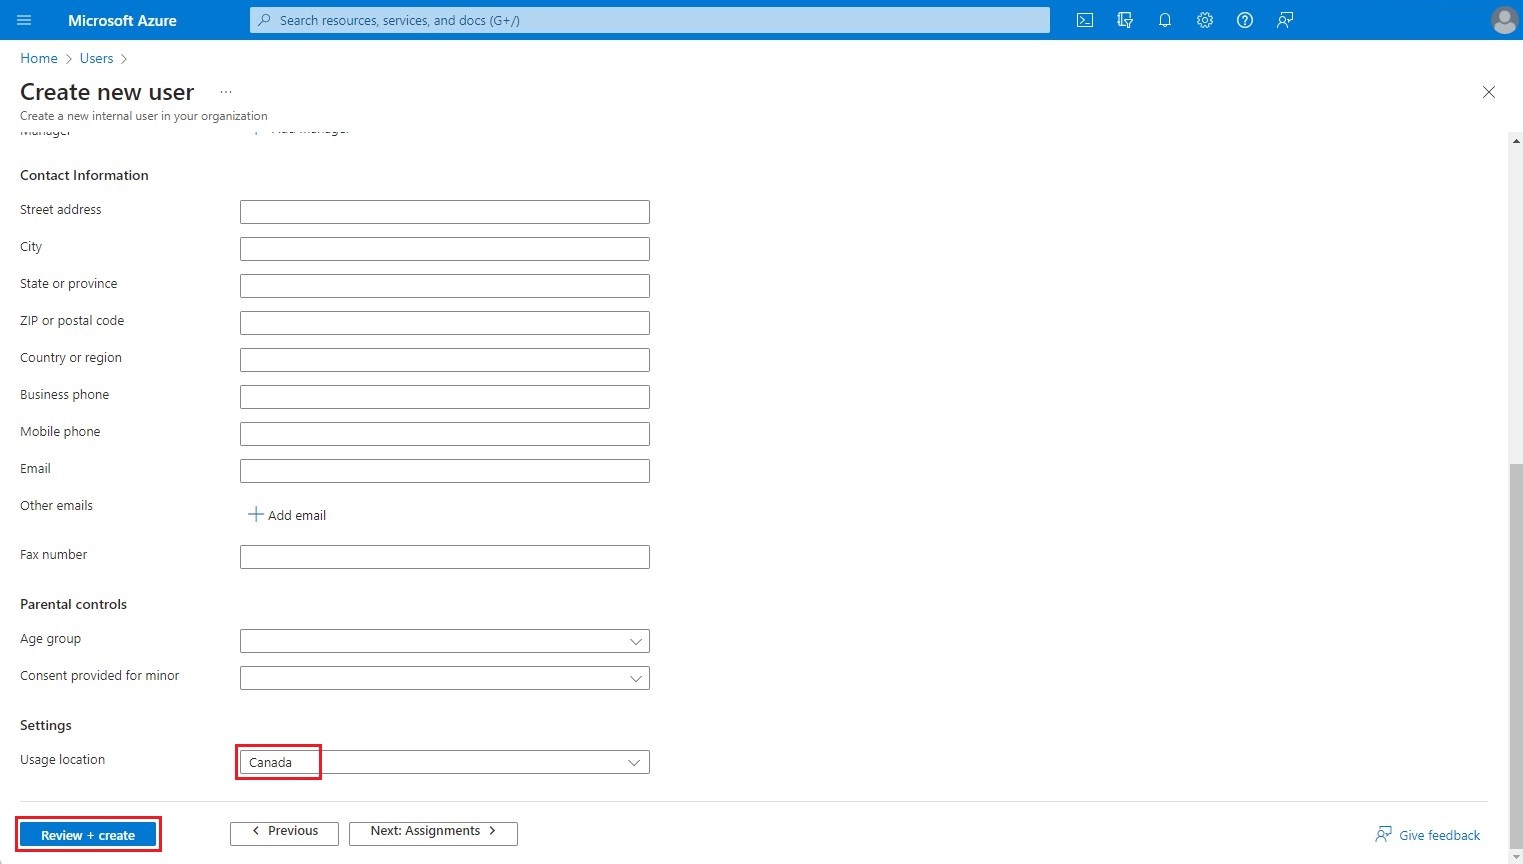
Fill in the Usage location parameter, then click on Review + create.
Click on Create to create the authorized user.
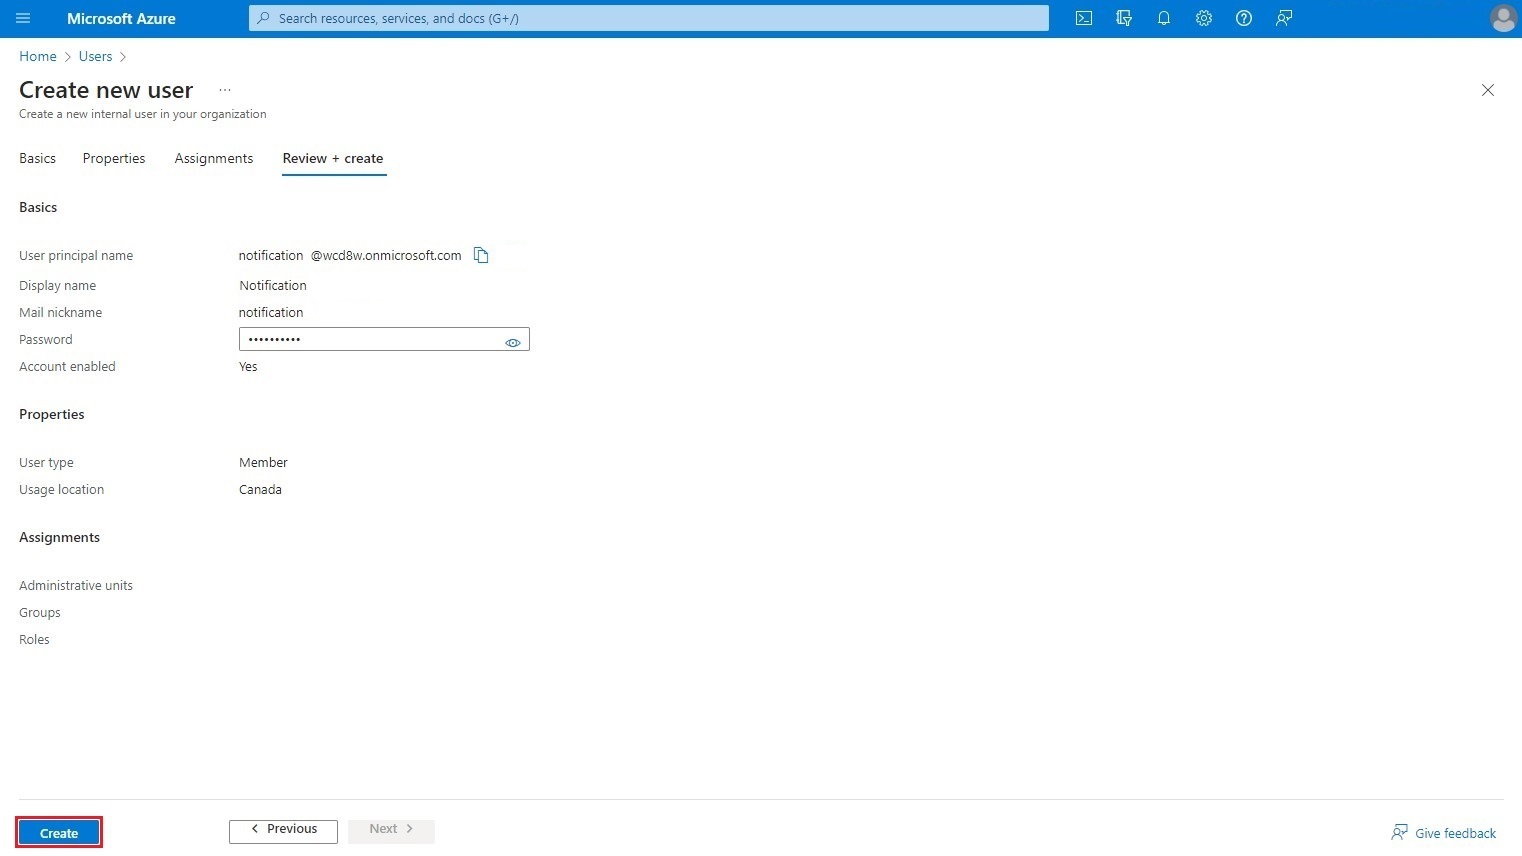
You will be redirected to the user list. Use the search box to find your authorized user and click on it.

Next, you need to assign a Microsoft 365 license to your authorized user. Click on Licenses in the left-hand menu, then on Assignments.
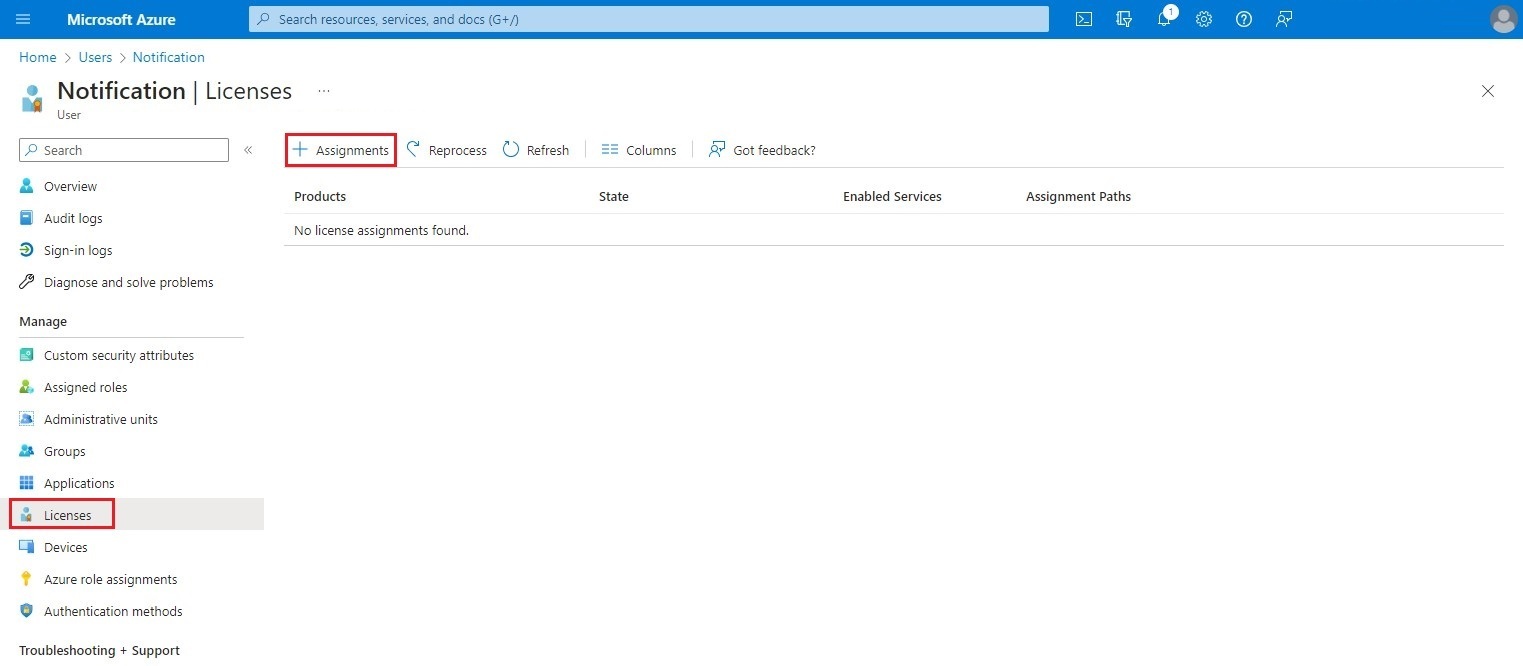
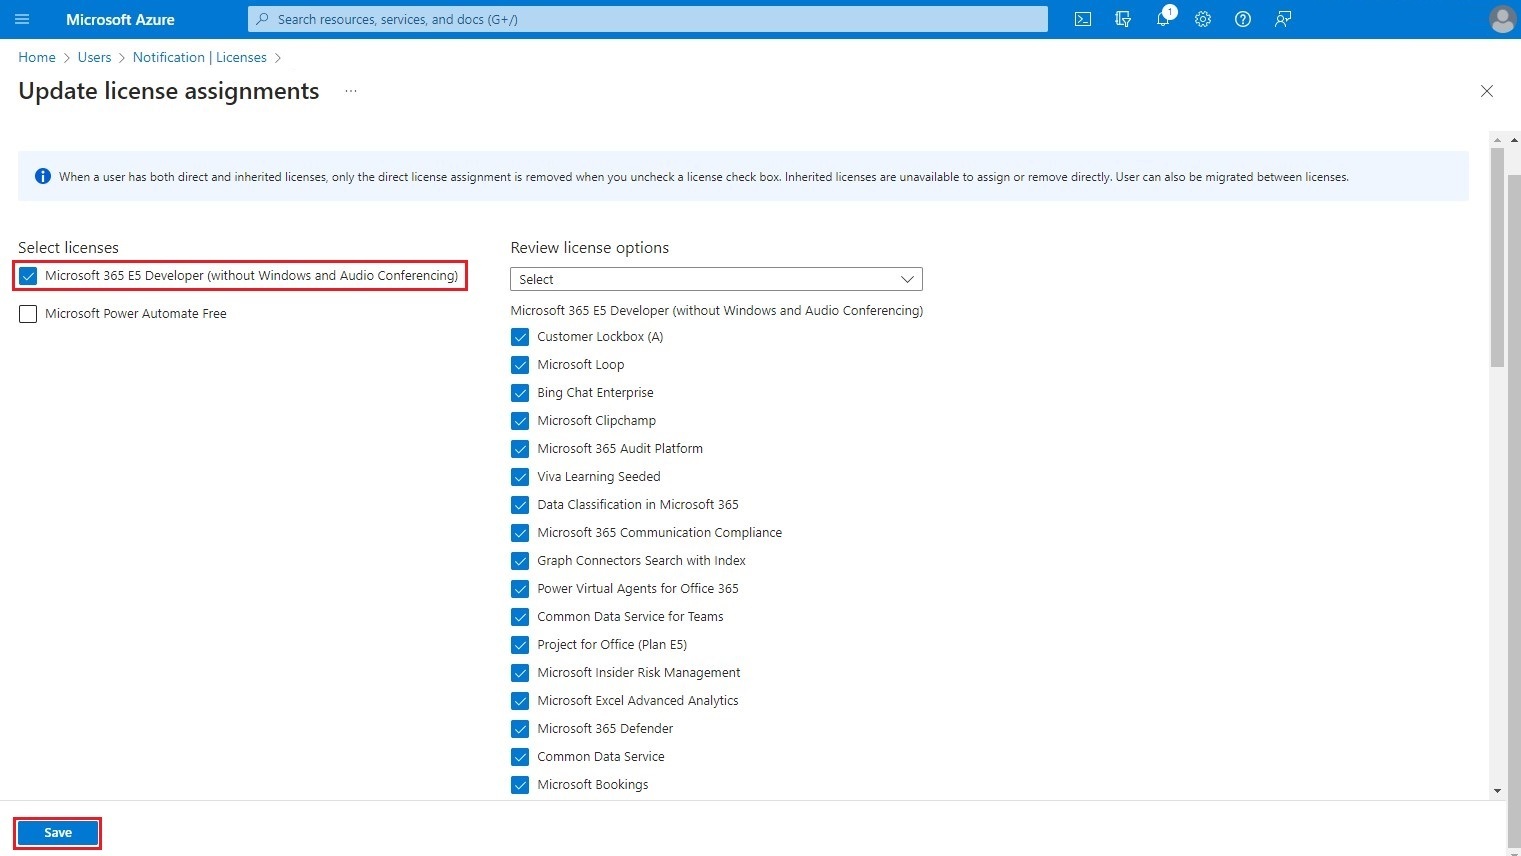
Select a Microsoft 365 license and click on Save.
Step 4 - Creation of a new "Enterprise Application"
Use the search bar on the Azure Portal home page to find the Enterprise Application service. Once in the Enterprise Application screen, use the New application button in the top bar to create a new application.
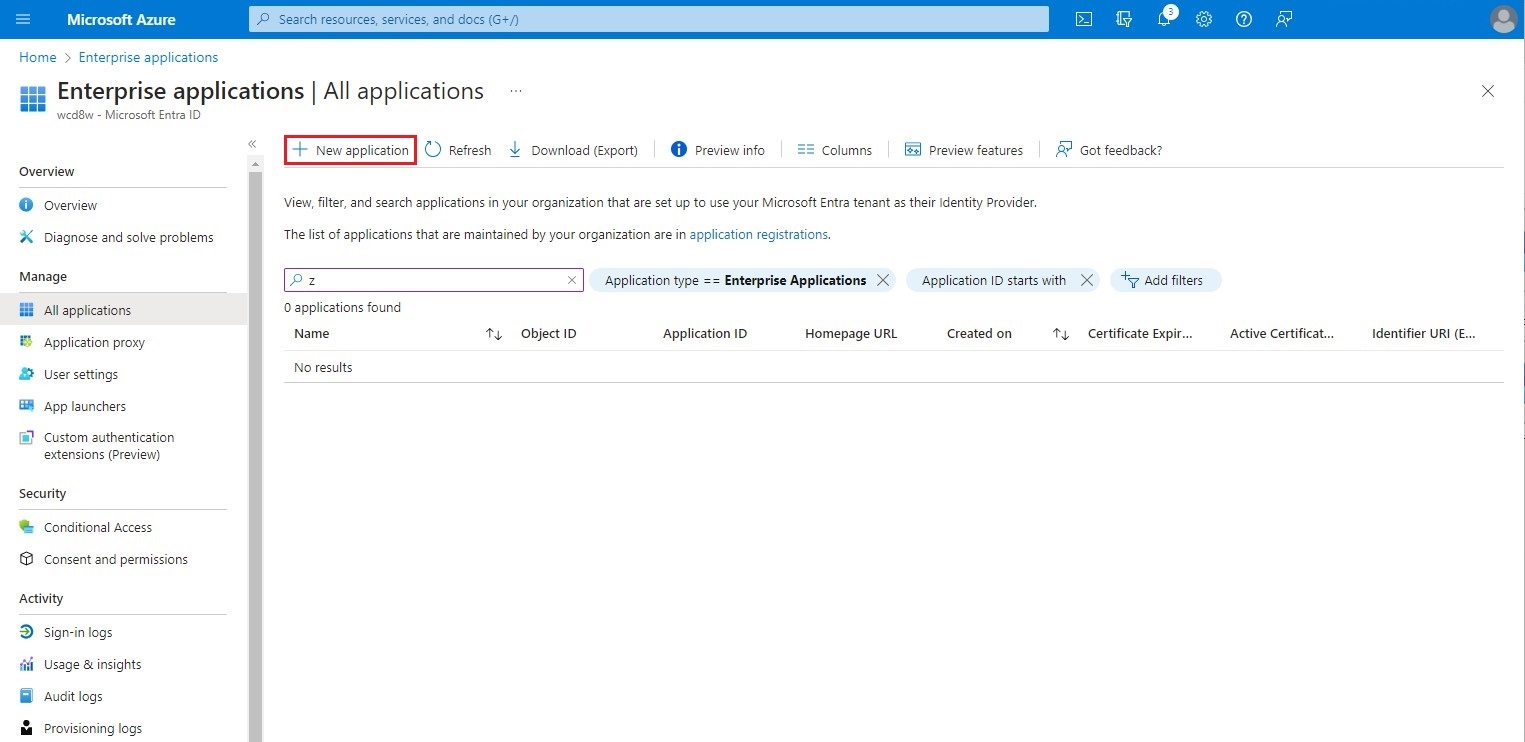
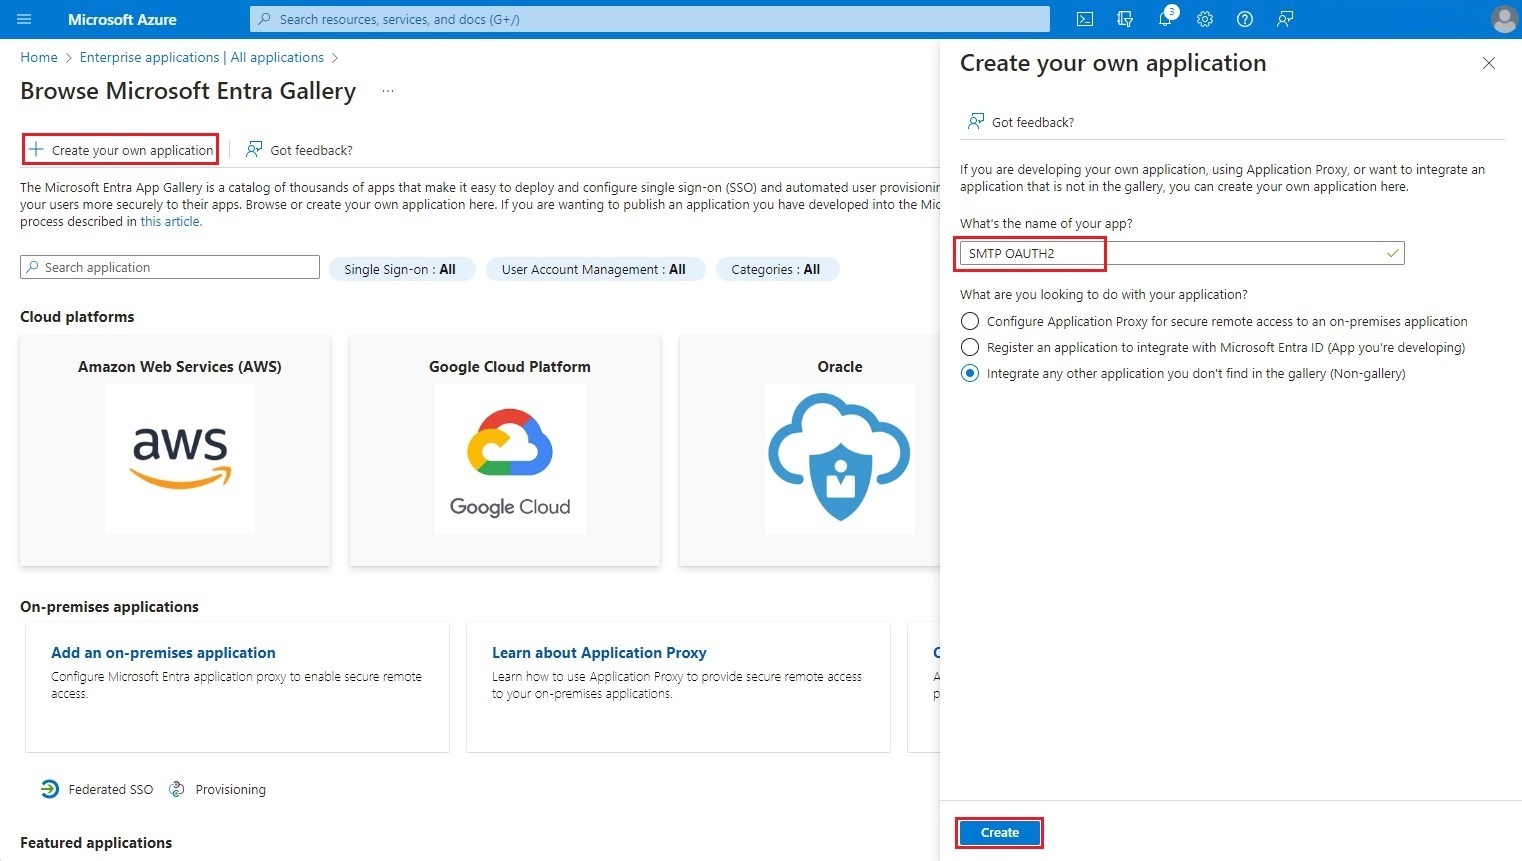
When the new page is presented, click on the Create your own application button, then enter a name identifying the OAuth2 SMTP application for S-Filer Portal. Click on Create.
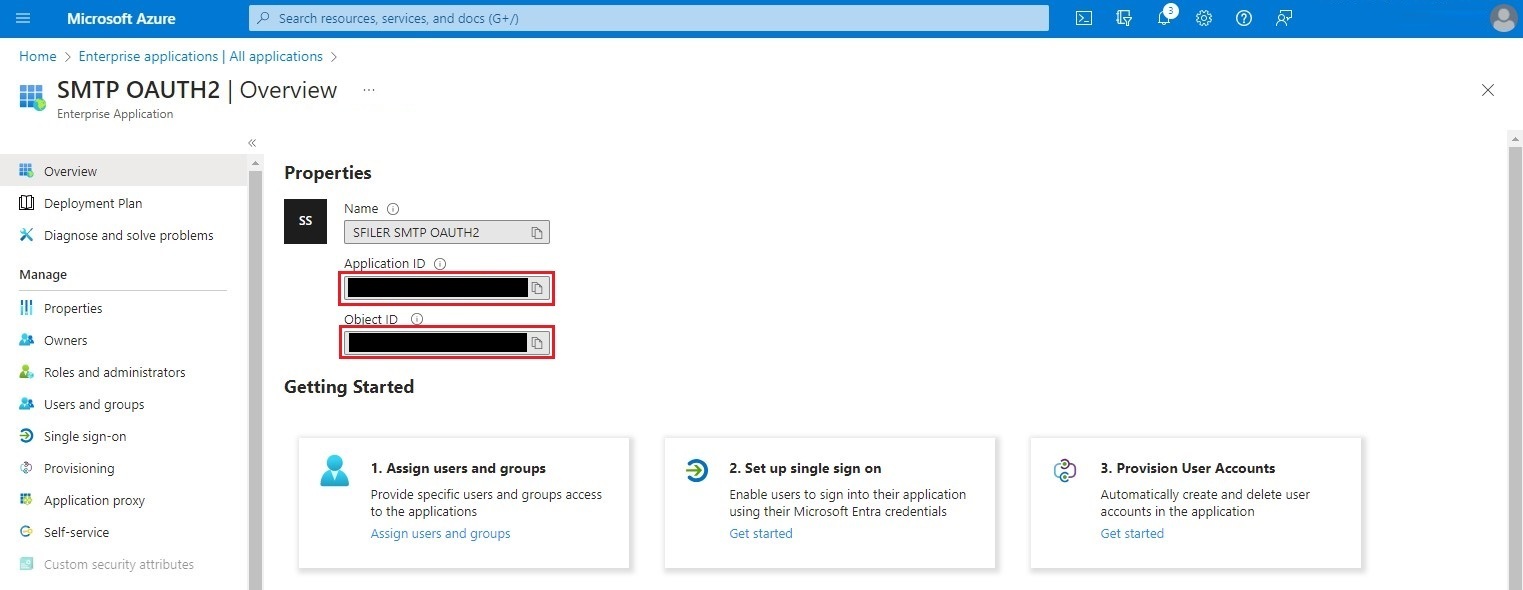
You will then be taken to the main page of your new enterprise application.
Copy the value of the Application ID field. It will be needed later in step 4 configuration with the Powershell command line interface and in step 4 configuration of S-Filer Portal in the OAuth2 tab.
Copy the value of the Object ID field. It will be needed later in step 4 and step 5 of the Powershell command line interface configuration.
Step 5 - API authorization
The following steps are required to enable your enterprise application to send email via SMTP as an application.
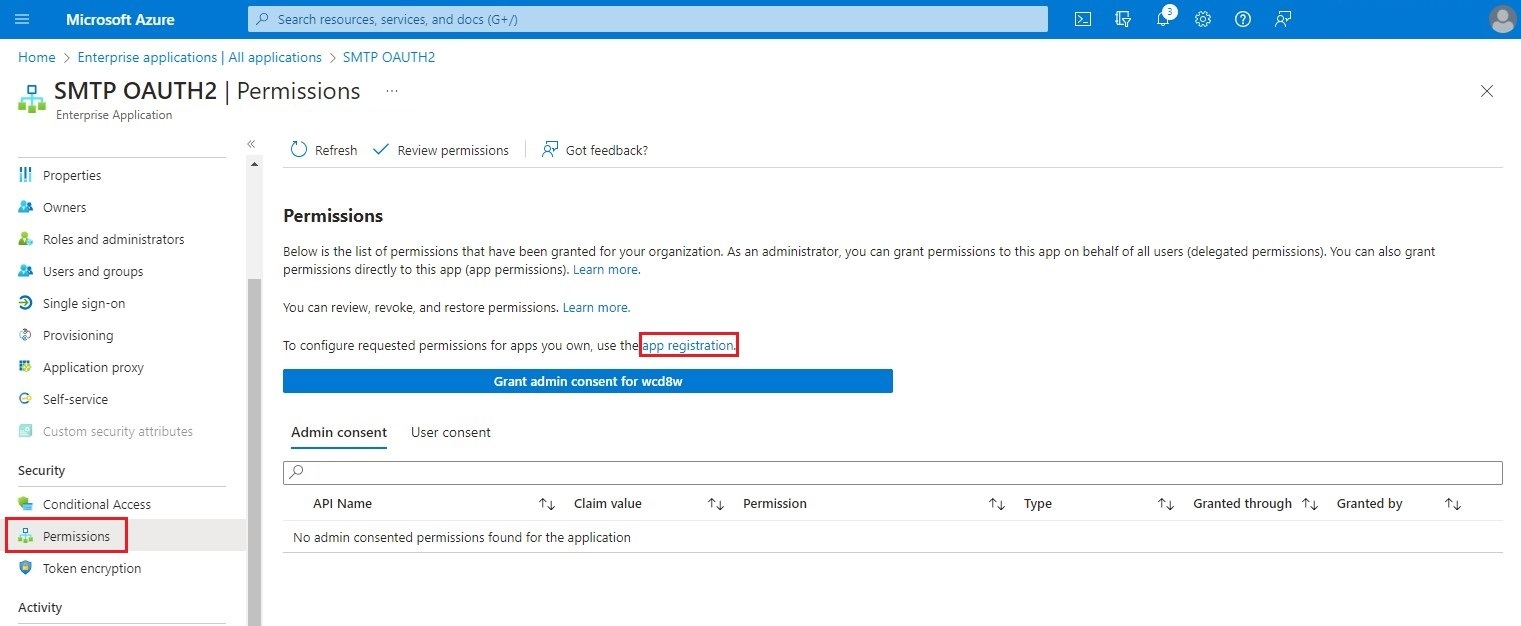
Select Permissions from the left-hand menu, then click on the App registration link.
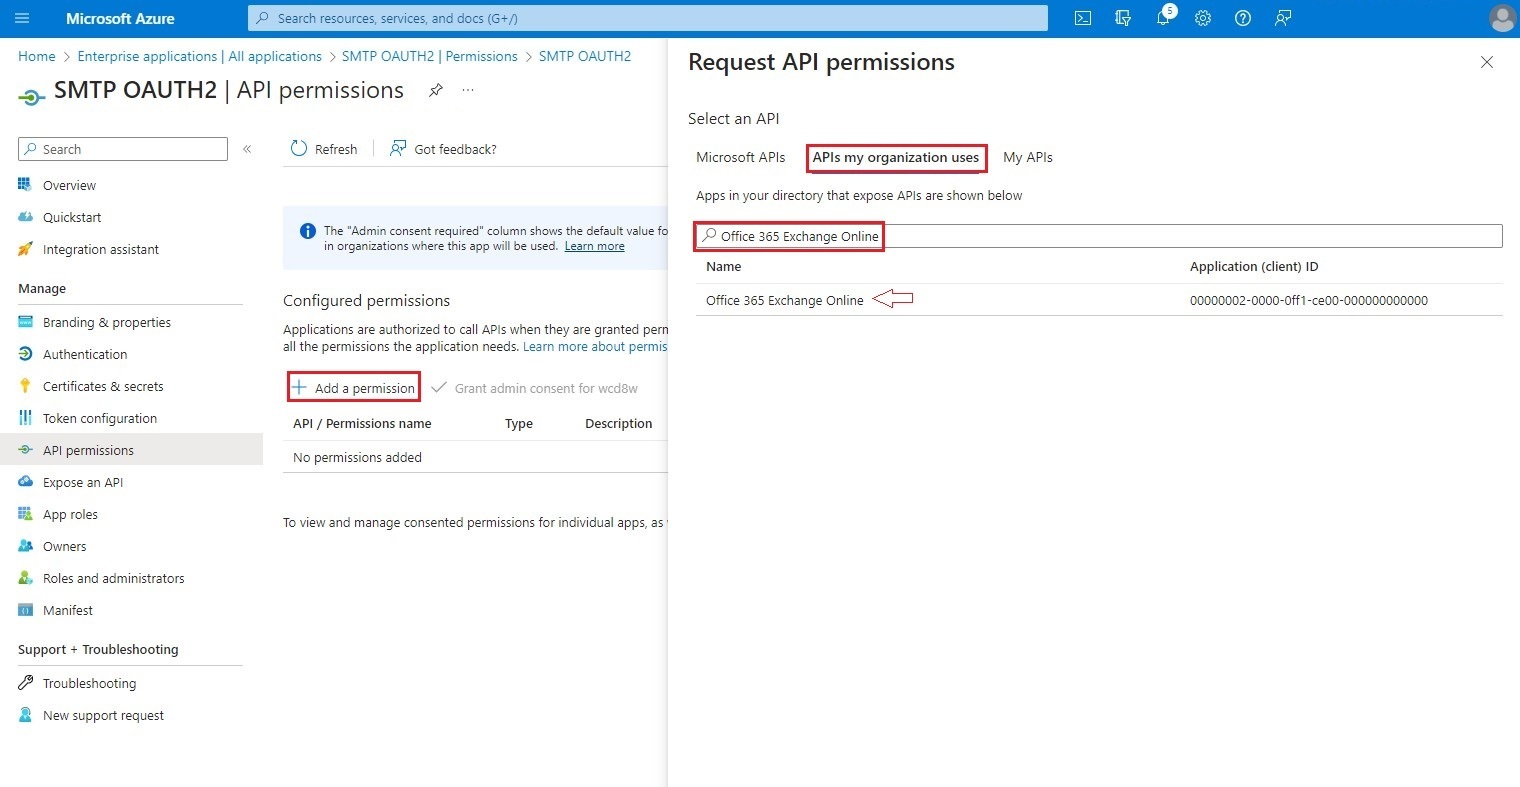
This will take you to the Authorized APIs screen, where you will click on API permissions. In the Request API permissions box that will open on the right of the screen, click on APIs my organization uses. In the search box, enter Office 365 Exchange Online and select the only API that will appear in the list.
In the next screen, click on Application permissions.
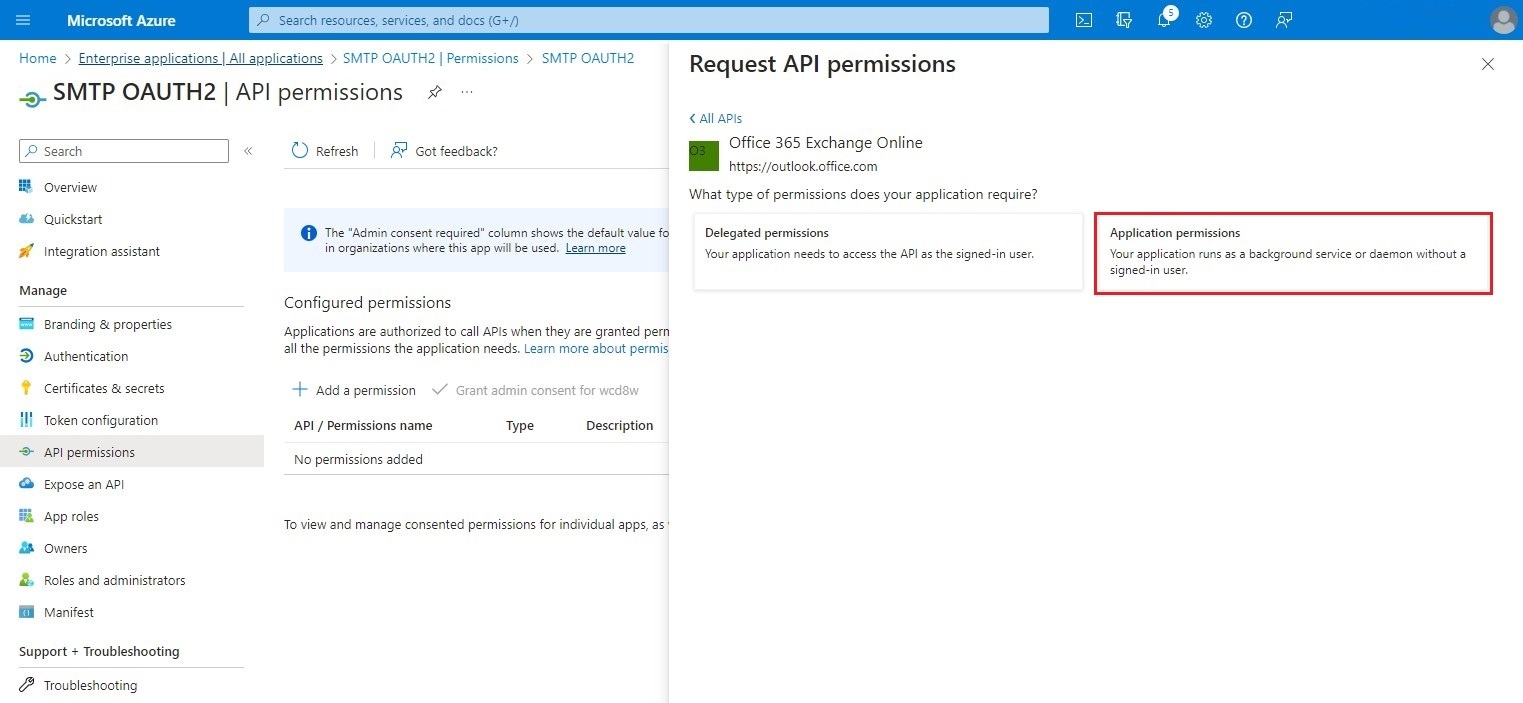
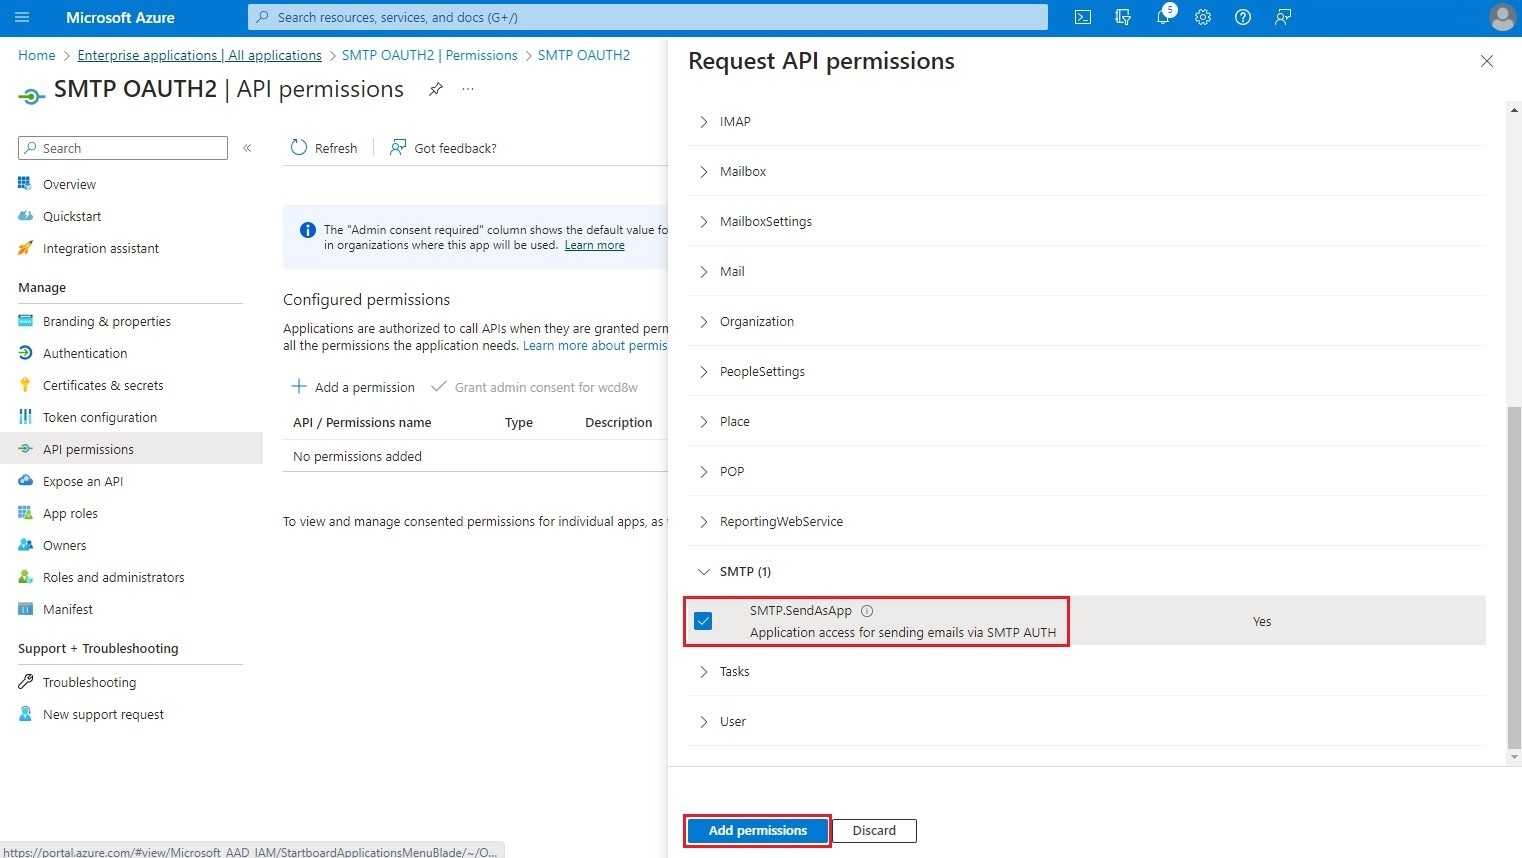
Select the following item:
- SMTP.SendAsApp
Click on Add permissions.
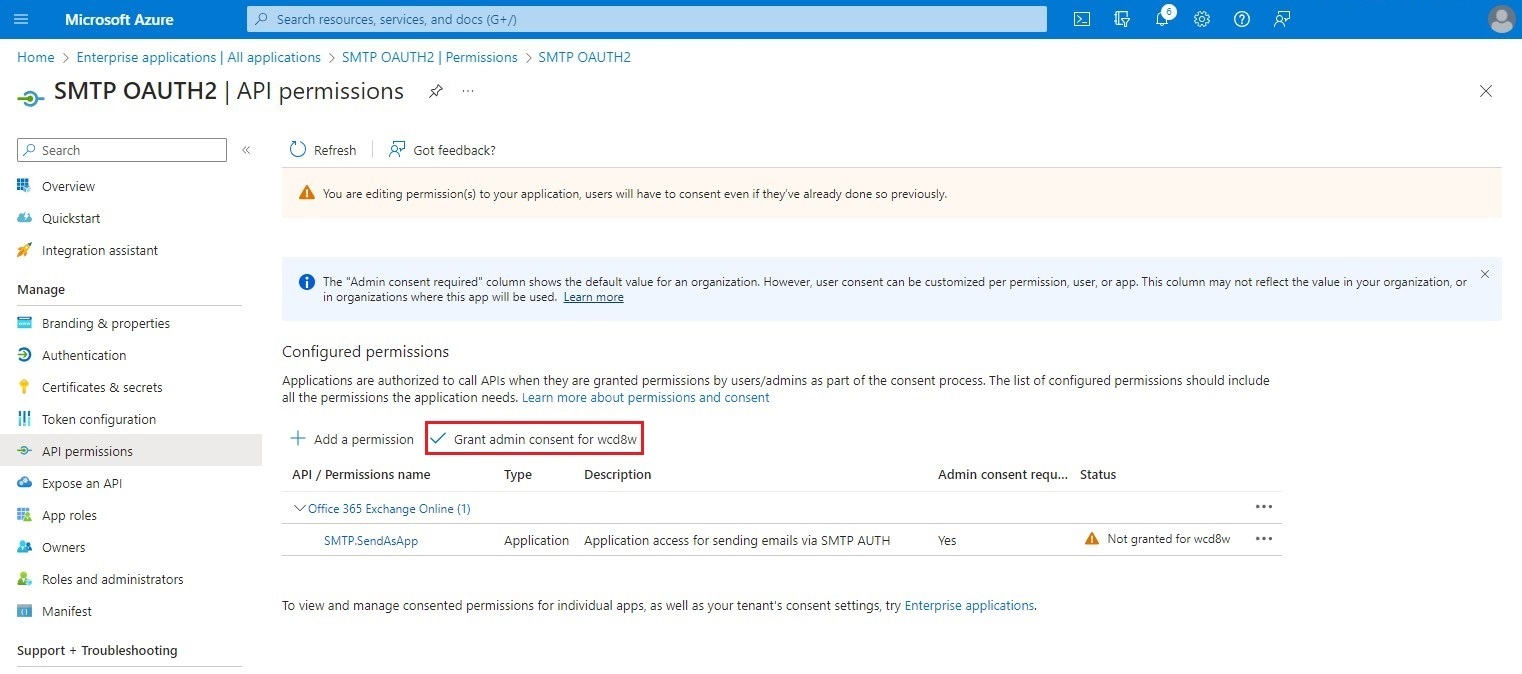
Once the permission has been added, click on Grant admin consent for [Tenant ID].
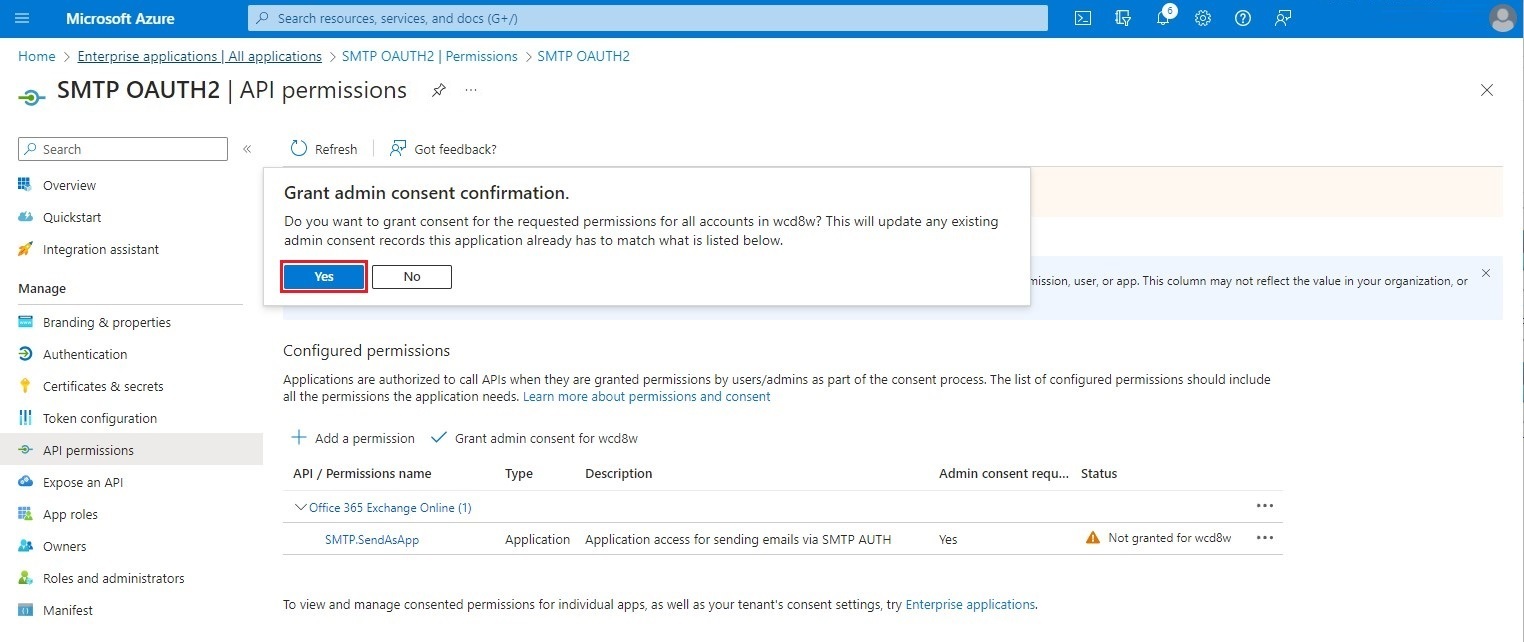
Finally, click Yes to confirm administrator consent.
Step 6 - Creating a secret
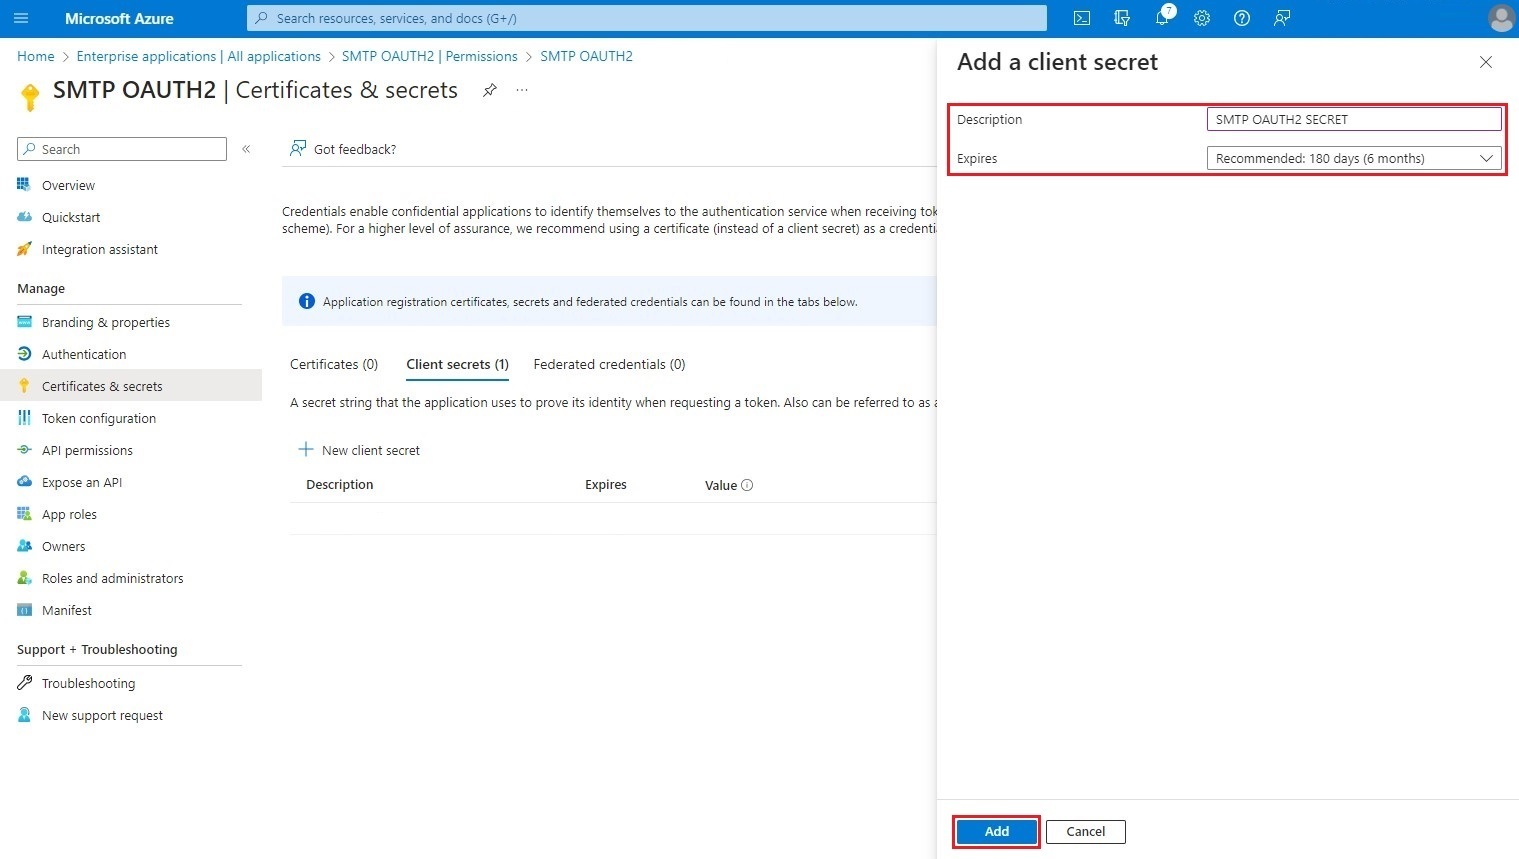
This step consists in creating a secret. To do so, click on Certificates & secrets on the left of the menu. Go to the Client secrets tab and click on New client secret.

In the box that opens, enter the Description and Expires and click on Add.
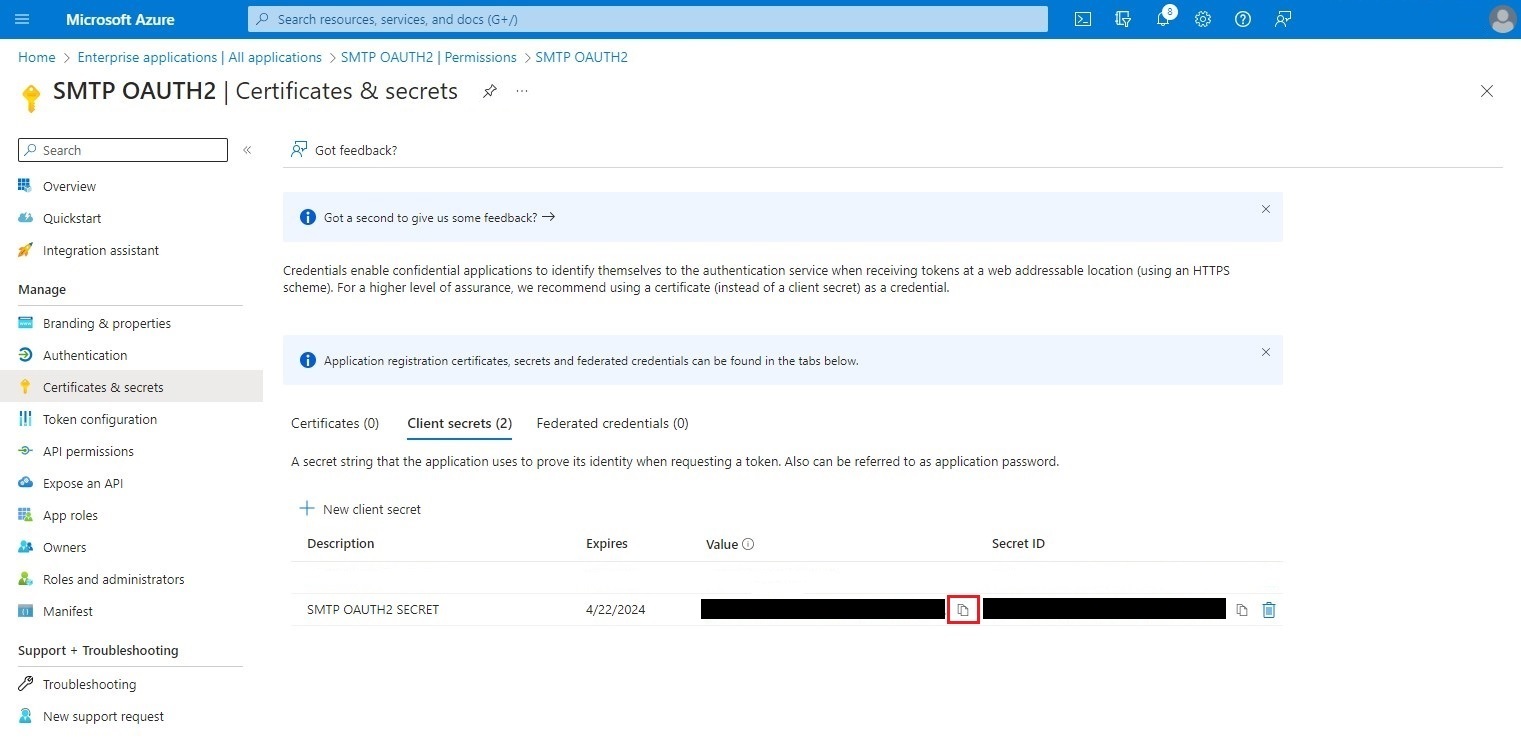
Copy the secret value. It will be needed later in step 4 of S-Filer Portal configuration in the OAuth2 tab.
Step 7 - Authorized user assignment
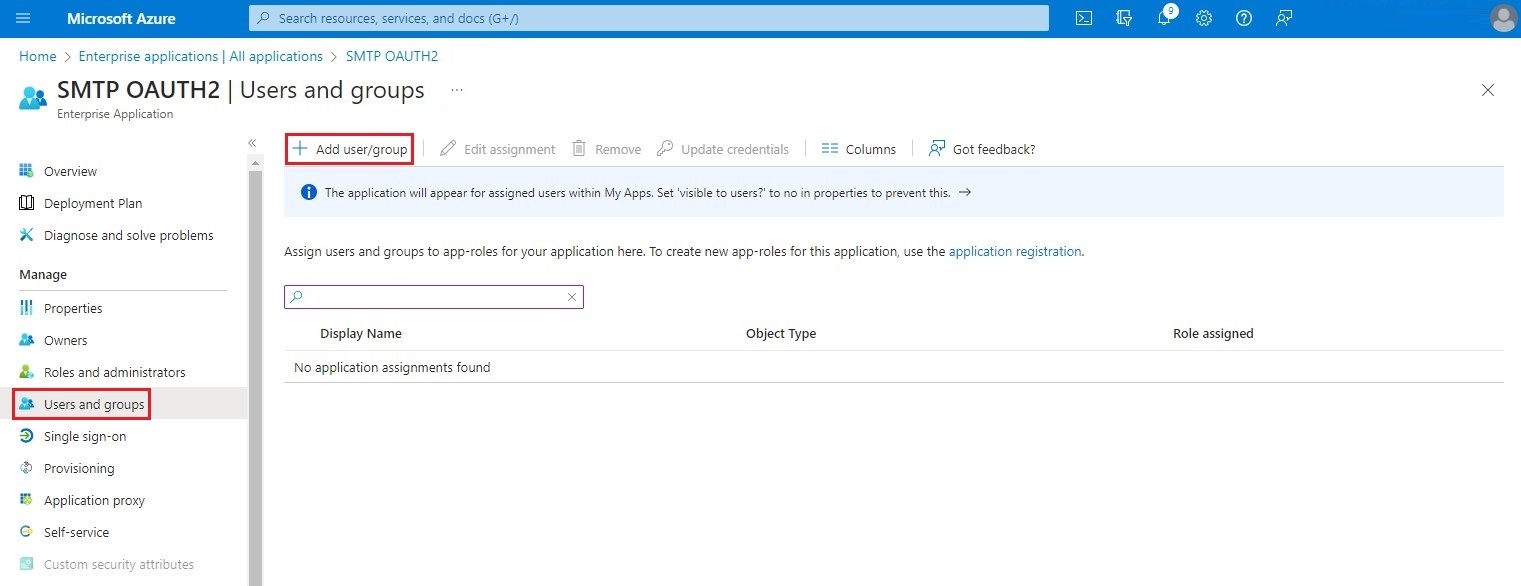
This step involves assigning the authorized user created in step 3 to the Enterprise Application. To do this, select Users and groups from the left-hand menu and click on Add user/group.
Select Users and groups and in the box that will open on the right of the screen, enter the User principal name of your authorized user in the search box. Check your authorized user in the list and click Select.
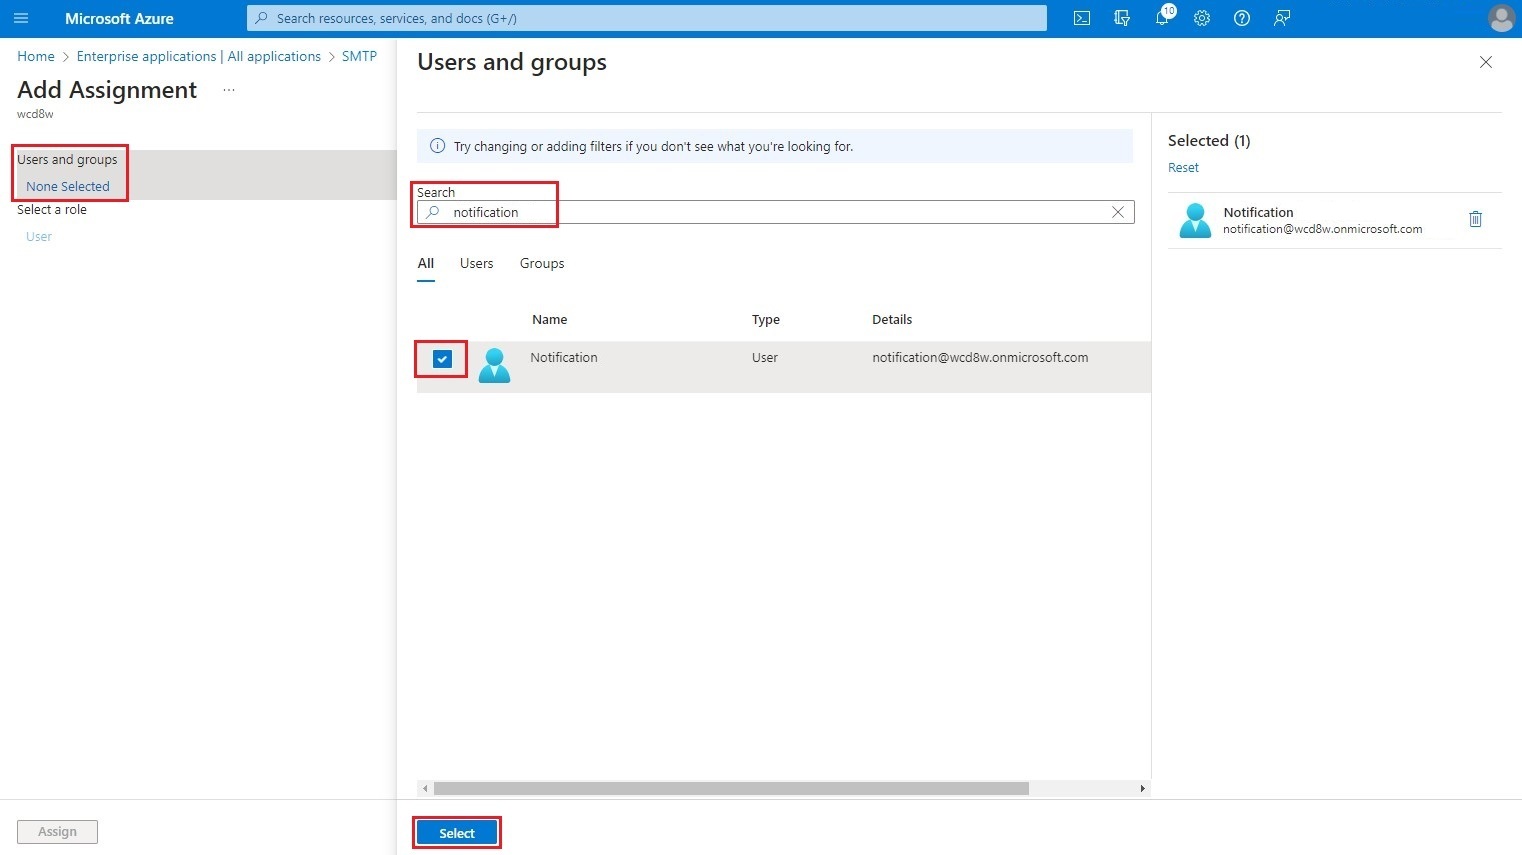
To confirm the assignment, click on the Assign button.
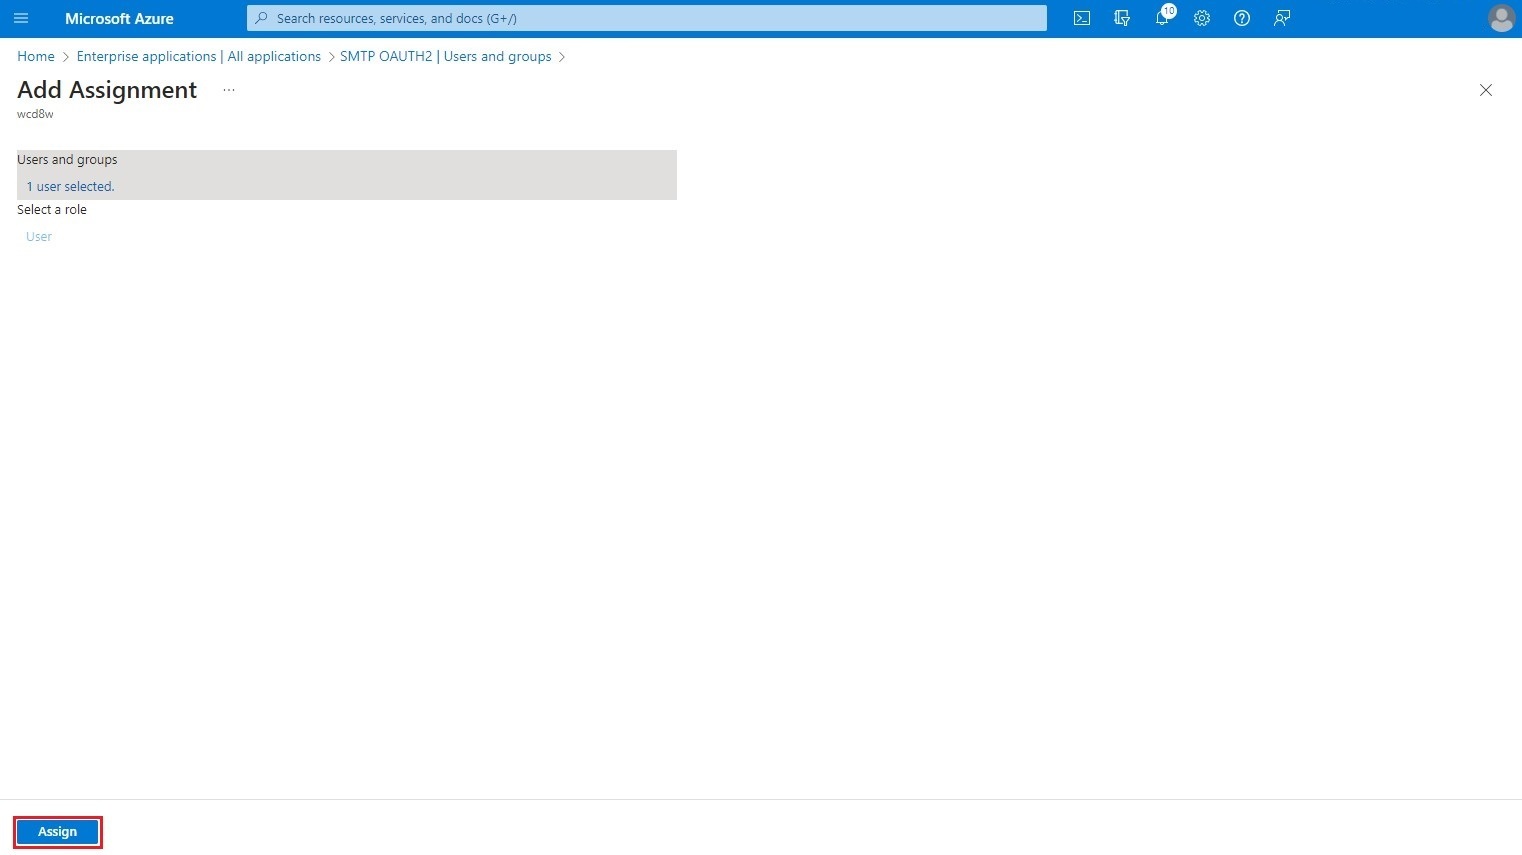
You have now completed the configurations that must be done in the Azure portal.
Microsoft 365 admin center
The following steps are performed in the Microsoft 365 admin center and require you to have the necessary permissions to modify user mailbox settings.
Step 1 - Microsoft 365 admin center login
Log in to the Microsoft 365 admin center using your browser and login credentials.
Step 2 - SMTP protocol activation
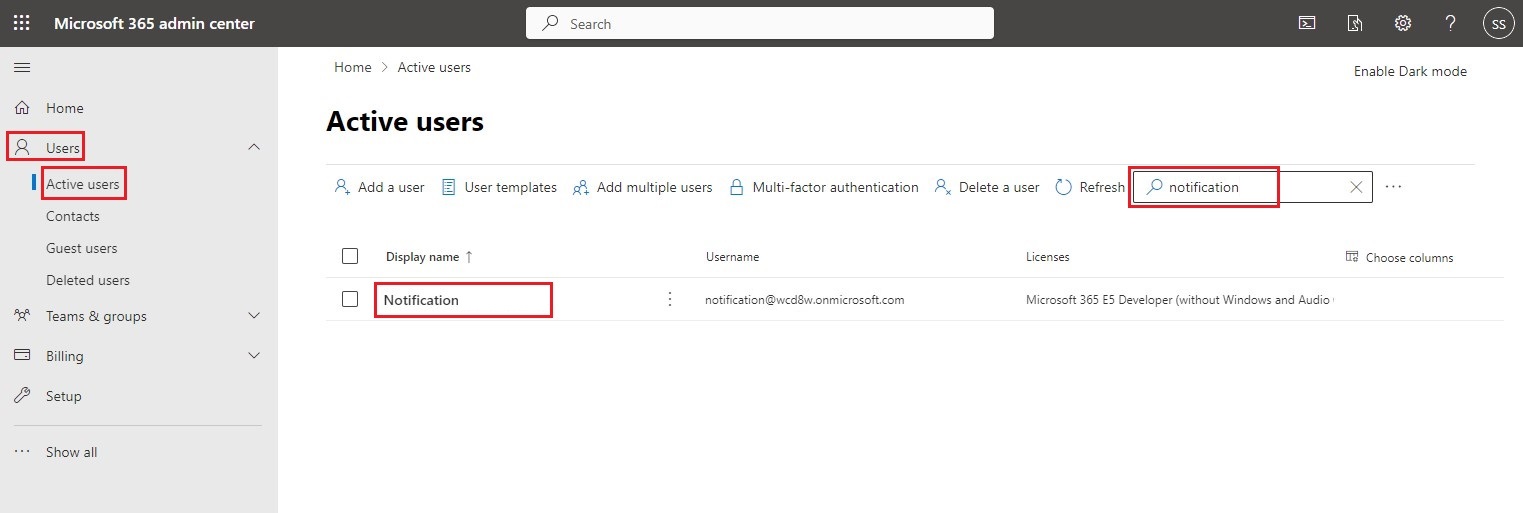
In the left-hand menu, open the Users drop-down list, click on the Active users link, search for your authorized user and finally, select it from the list.
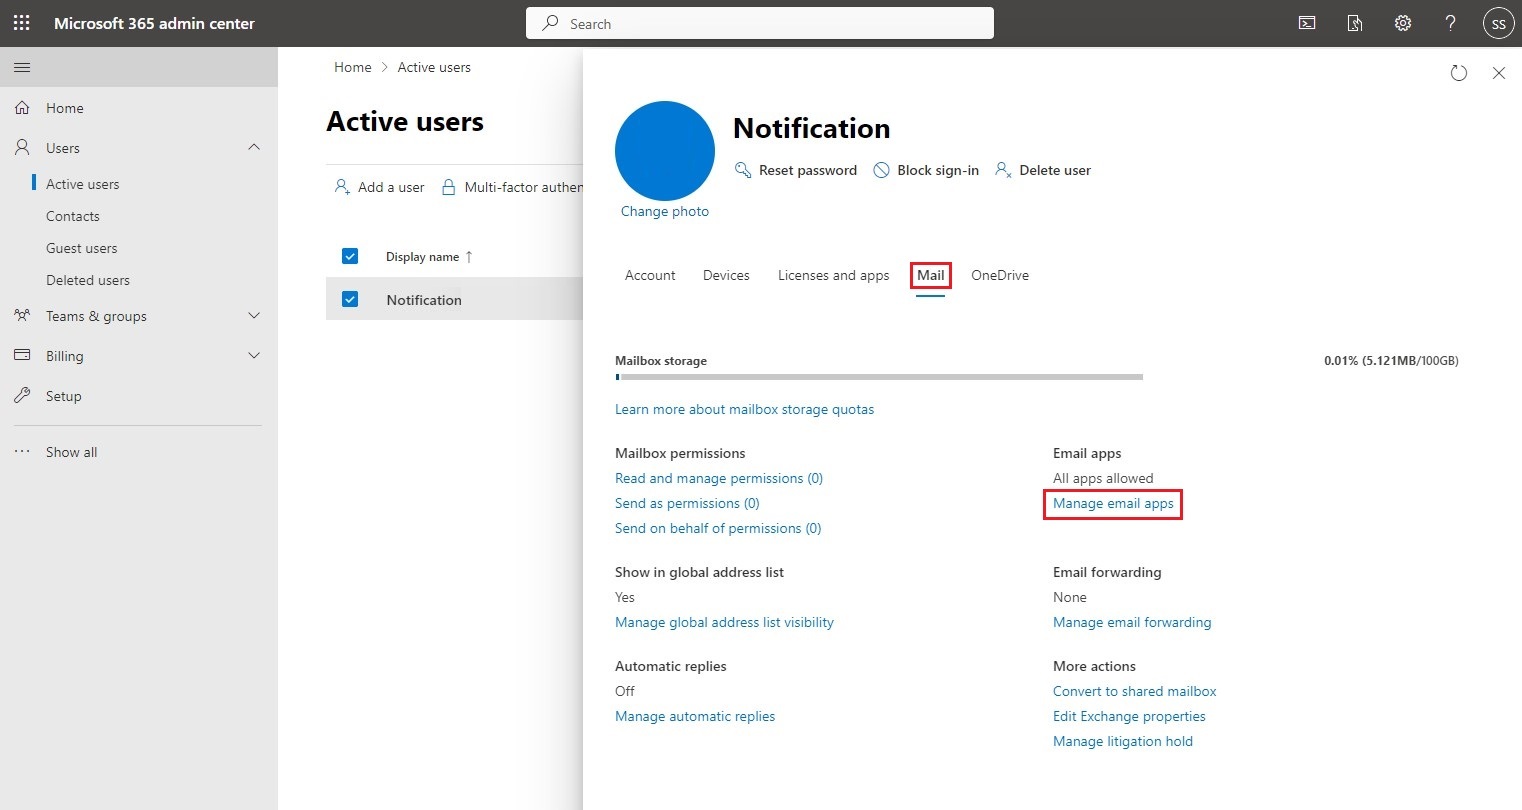
In the box that opens on the right of the screen, select the Mail tab and click on the Manage email apps link.
Activate the Authenticated SMTP application and click on Save changes.
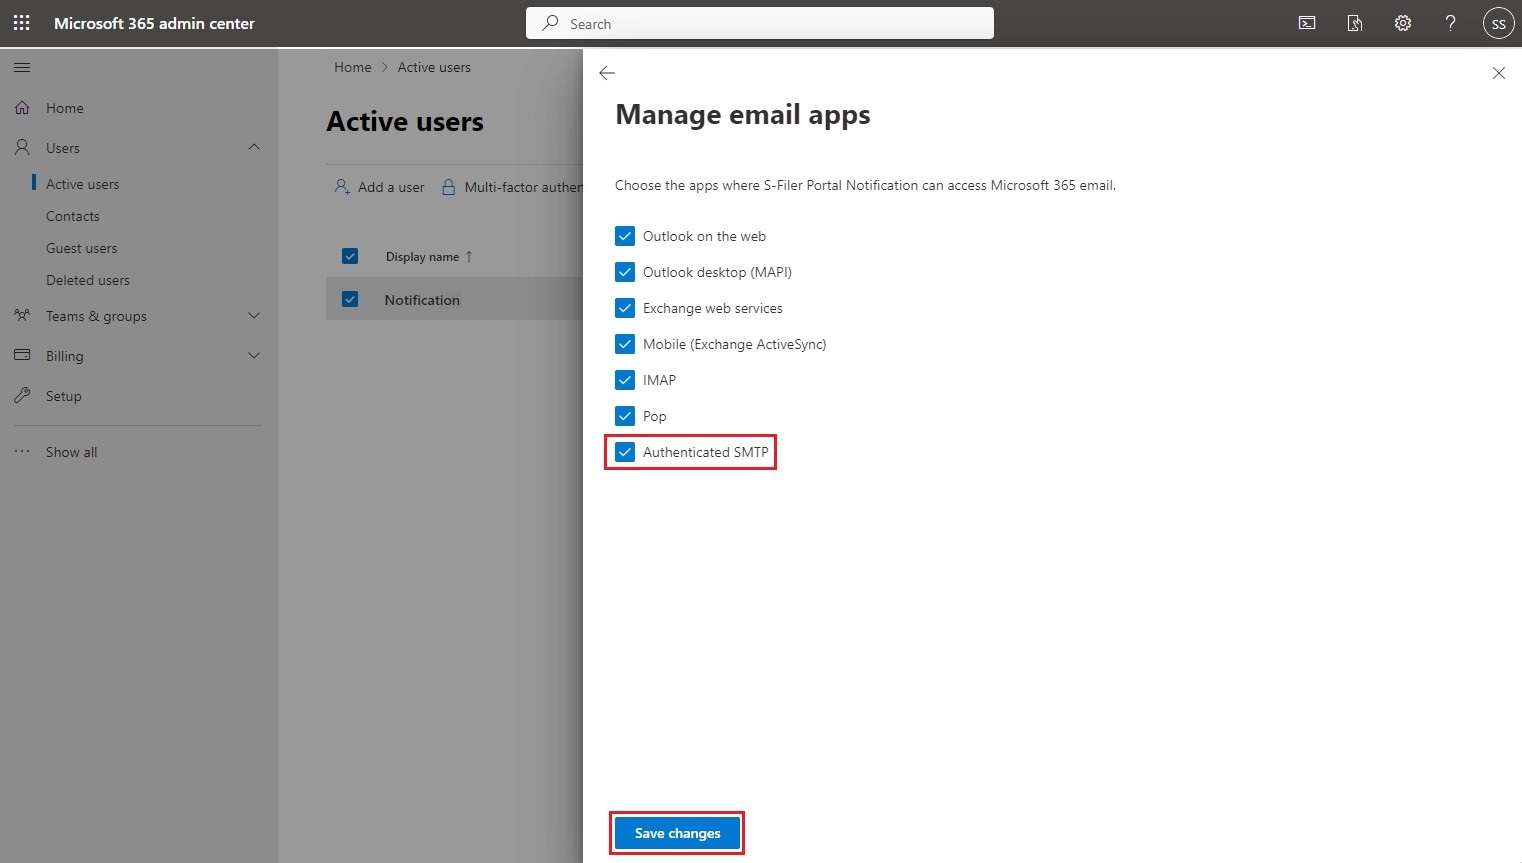
You have now completed the configurations that must be done in the Microsoft 365 admin center.
Powershell command line interface
It is necessary to allow the enterprise application to access the mailbox of the authorized user, otherwise sending e-mails will not work. It is not possible to perform this step in other Microsoft applications, so you need to use the ExchangeOnlineManagement module in the PowerShell command line interface.
More details on the ExchangeOnlineManagement module can be found on the Microsoft official website.
The following steps must be performed in the Powershell console as an administrator.
Step 1 - Install the ExchangeOnlineManagement module
Install-Module -Name ExchangeOnlineManagement
Step 2 - Import the module in the PowerShell session
Import-Module ExchangeOnlineManagement
Step 3 - Connect to your Azure tenant
Connect-ExchangeOnline -Organization [Tenant_ID]
The Tenant_ID parameter corresponds to the value found in step 2 of the Azure configuration. A window will then appear to authenticate you in Azure. You must be logged in as a user with administrative rights.
Step 4 - Create a new "Service Principal"
New-ServicePrincipal -AppId [Application_ID] -ObjectID [Objet_ID]
The Application_ID parameter corresponds to the Application ID" of the enterprise application created in step 4 of the Azure configuration.
The Object_ID parameter corresponds to the Object ID of the enterprise application created in step 4 of the Azure configuration.
Step 5 - Allow the application to access the authorized user's mailbox
Add-MailboxPermission -Identity "[User_Name]" -User [Objet_ID] -AccessRights FullAccess
The User_Name parameter corresponds to the User principal name of the authorized user created in step 3 of the Azure configuration.
The Object_ID parameter corresponds to the Object ID of the enterprise application created in step 4 of the Azure configuration.
Step - Disconnect from your Azure tenant
Disconnect-ExchangeOnline
You have now completed the configurations that must be done in the Powershell command line interface.
Configure S-Filer Portal
The following steps take place in the S-Filer Portal administrative console.
See also
Please refer to the email configuration documentation for a full description of all configuration fields.
Step 1 - Connection to the S-Filer Portal administrative console
Log into the S-Filer Portal administrative console using your login credentials. Open the section identified by the name of your S-Filer Portal server, open the Configuration section and click on Email.
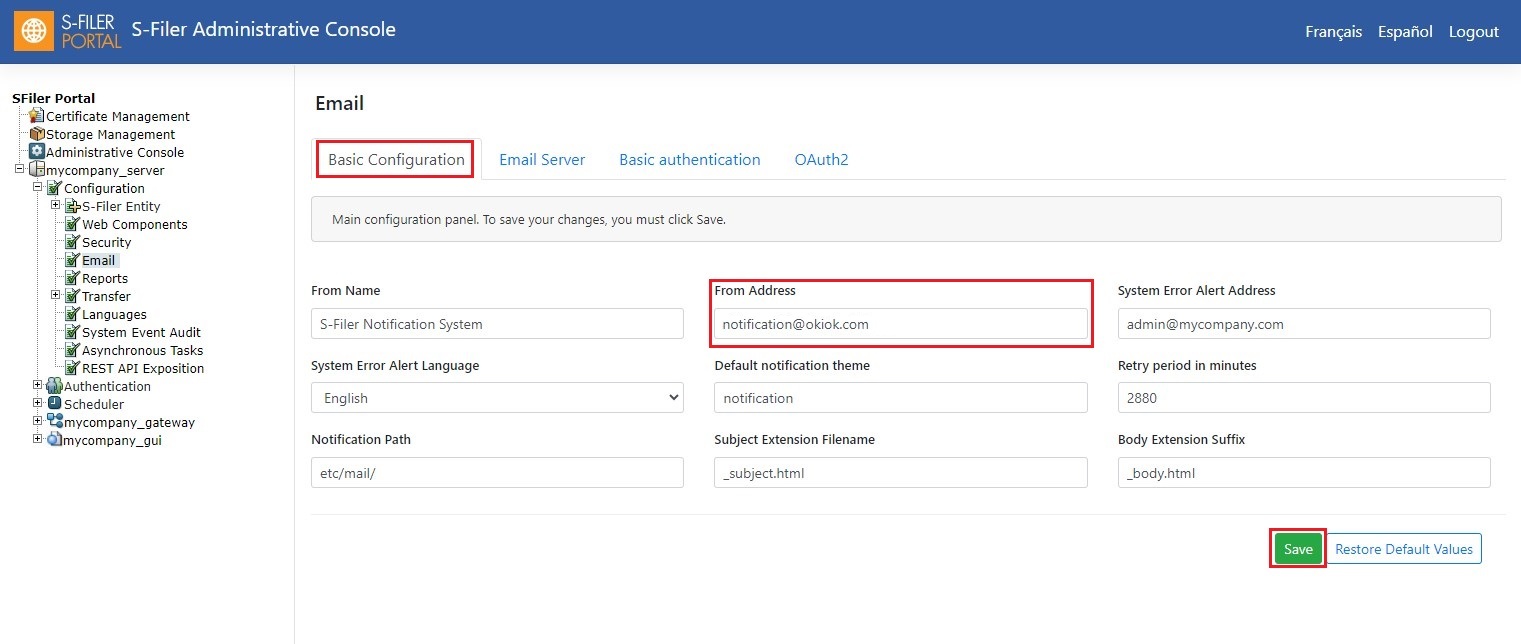
Step 2 - Basic Configuration
Go to the Basic Configuration tab.
In the From Address parameter, enter the User principal name of the authorized user created in in step 3 of the Azure configuration and click on Save.
Step 3 - Email Server
Go to the Email server tab and enter the following values for the various parameters:
- Email Protocol:
smtp - Use SSL: No
- Use STARTTLS: Yes
- IP adress / Hostname:
smtp.office365.com - Port:
587
Then click on Save.

Step 4 - OAuth2
Go to the OAuth2 tab and enter the following values for the various parameters:
- Enable: Yes
- Authentication token URL:
https://login.microsoftonline.com/[TENANT_ID]/oauth2/v2.0/token, where the TENANT_ID parameter corresponds to the Tenant ID retrieved in step 2 of the Azure configuration - Client identifier: Application ID of the enterprise application created in step 4 of the Azure configuration
- Client secret: Secret created in step 6 of the Azure configuration
- Scopes :
https://outlook.office.com/.default - User name: User principal name of the authorized user created in step 3 of the Azure configuration
Then click on Save.

Step 5 - Restarting the S-Filer Portal server
To make the changes effective, the S-Filer Portal server must be restarted.
