Introduction
Foreword
Who Is This Guide For?
These guides are a complete reference guide intended for system integrators, administrators, and operators. It also contains information for the people who must approve and review identities, entitlements, and roles such as managers and asset owners.
The guide explain how to set up and operate the RAC/M Identity solution and describes the tasks operators, approvers and certifiers may need to perform.
Related Documentation
System integrators and administrators should read the RAC/M Identity Planning for Deployment Guide, which gives an overview of the planning required before setting up the RAC/M system.
Integrators should also read the RAC/M Identity Technical Reference Guide that describes the built-in functions and primitives available in RAC/M for configuring formatters, collectors, file managers and modules for processing identities and entitlements information specific to their organization.
The RAC/M Identity Sample Scenario provides a concrete example of the steps required to set up and configure an actual working implementation.
Conventions Used in this Guide
This guide uses the following formatting conventions:
- Bold: Indicates a field, a button, a menu, etc., from the RAC/M interface.
- Italics: Indicates text that you must select from a list.
Courier: Indicates text you must enter into a field. This type of text also represents the name of a configuration file as well as the configuration properties contained within it.
This guide also uses the following:
Note
Indicates a note.
See Also
Indicates a cross-reference, or another section of the guide you should read. For example, Conventions Used in this Guide.
Example
Indicates an example.
Important
Indicates important information.
Note
To make the text easier to read, the term entitlements when by itself, is used as a general term to represent all accesses, permissions, access rights, physical accesses as well as any physical asset that a user has been granted in scope of the IAM initiative.
Introduction to RAC/M Identity
This chapter describes RAC/M Identity, its architecture, and the basic concepts you need to know to get started.
Note
The examples used in this document are purely fictional.
Screen captures may differ slightly from your software version as we are constantly making improvements to RAC/M Identity.
RAC/M Identity Editions
RAC/M Identity comes in two editions - Premium and Governance.
Premium Edition
The Premium edition includes all capabilities and features to implement a full fledged corporate IAM service that supports the full spectrum of Identity Governance and Administration (IGA) use cases including governance, self-service, advanced integration and fully automated provisionning.
Governance Edition
The Governance edition includes the capabilities and features required for quickly enhancing IAM governance maturity. It provides a low cost, entry-level solution for organizations that need to focus on IAM governance first. The Governance edition can be upgraded a Premium edition at any time thus providing a natural upgrade path.
In this manual, topics apply to both editions unless specifically indicated.
Deployment Models
RAC/M Identity as a Service
RAC/M Identity is available as a Software as a Service (SaaS) solution. This is a fully managed, highly available implementation of the RAC/M Identity solution deployed in a customer dedicated Microsoft Azure tenant. This provides maximum value to customers by avoiding the requirement for setting up and maintaining the hardware and software infrastructure.
On premises deployment
RAC/M Identity can also be deployed on your premises or in your private Microsoft Azure tenant. In this case, you are responsible for managing and maintaining the hardware and keeping the software up to date. Please refer to the RAC/M Identity Planning Guide and RAC/M Identity Installation Guide for information on installing RAC/M Identity on your premises or private tenant.
Managed Services
RAC/M Identity is also available as a fully managed solution providing a very high level of service. This allows customers to focus on their business while avoiding not only the requirements for setting up and managing the hardware and software, but also the need to hire, train and maintain a team for operating the solution.
The managed services version builds on the SaaS version with operational services provided by OKIOK.
Managed services customers only need to become familiar with the general concepts and capabilities of RAC/M Identity described in this manual. They do not need to become familiar with the technical details described in the refrence guides.
RAC/M Identity Implementation Flow
Implementing RAC/M Identity requires a series of steps grouped into phases.
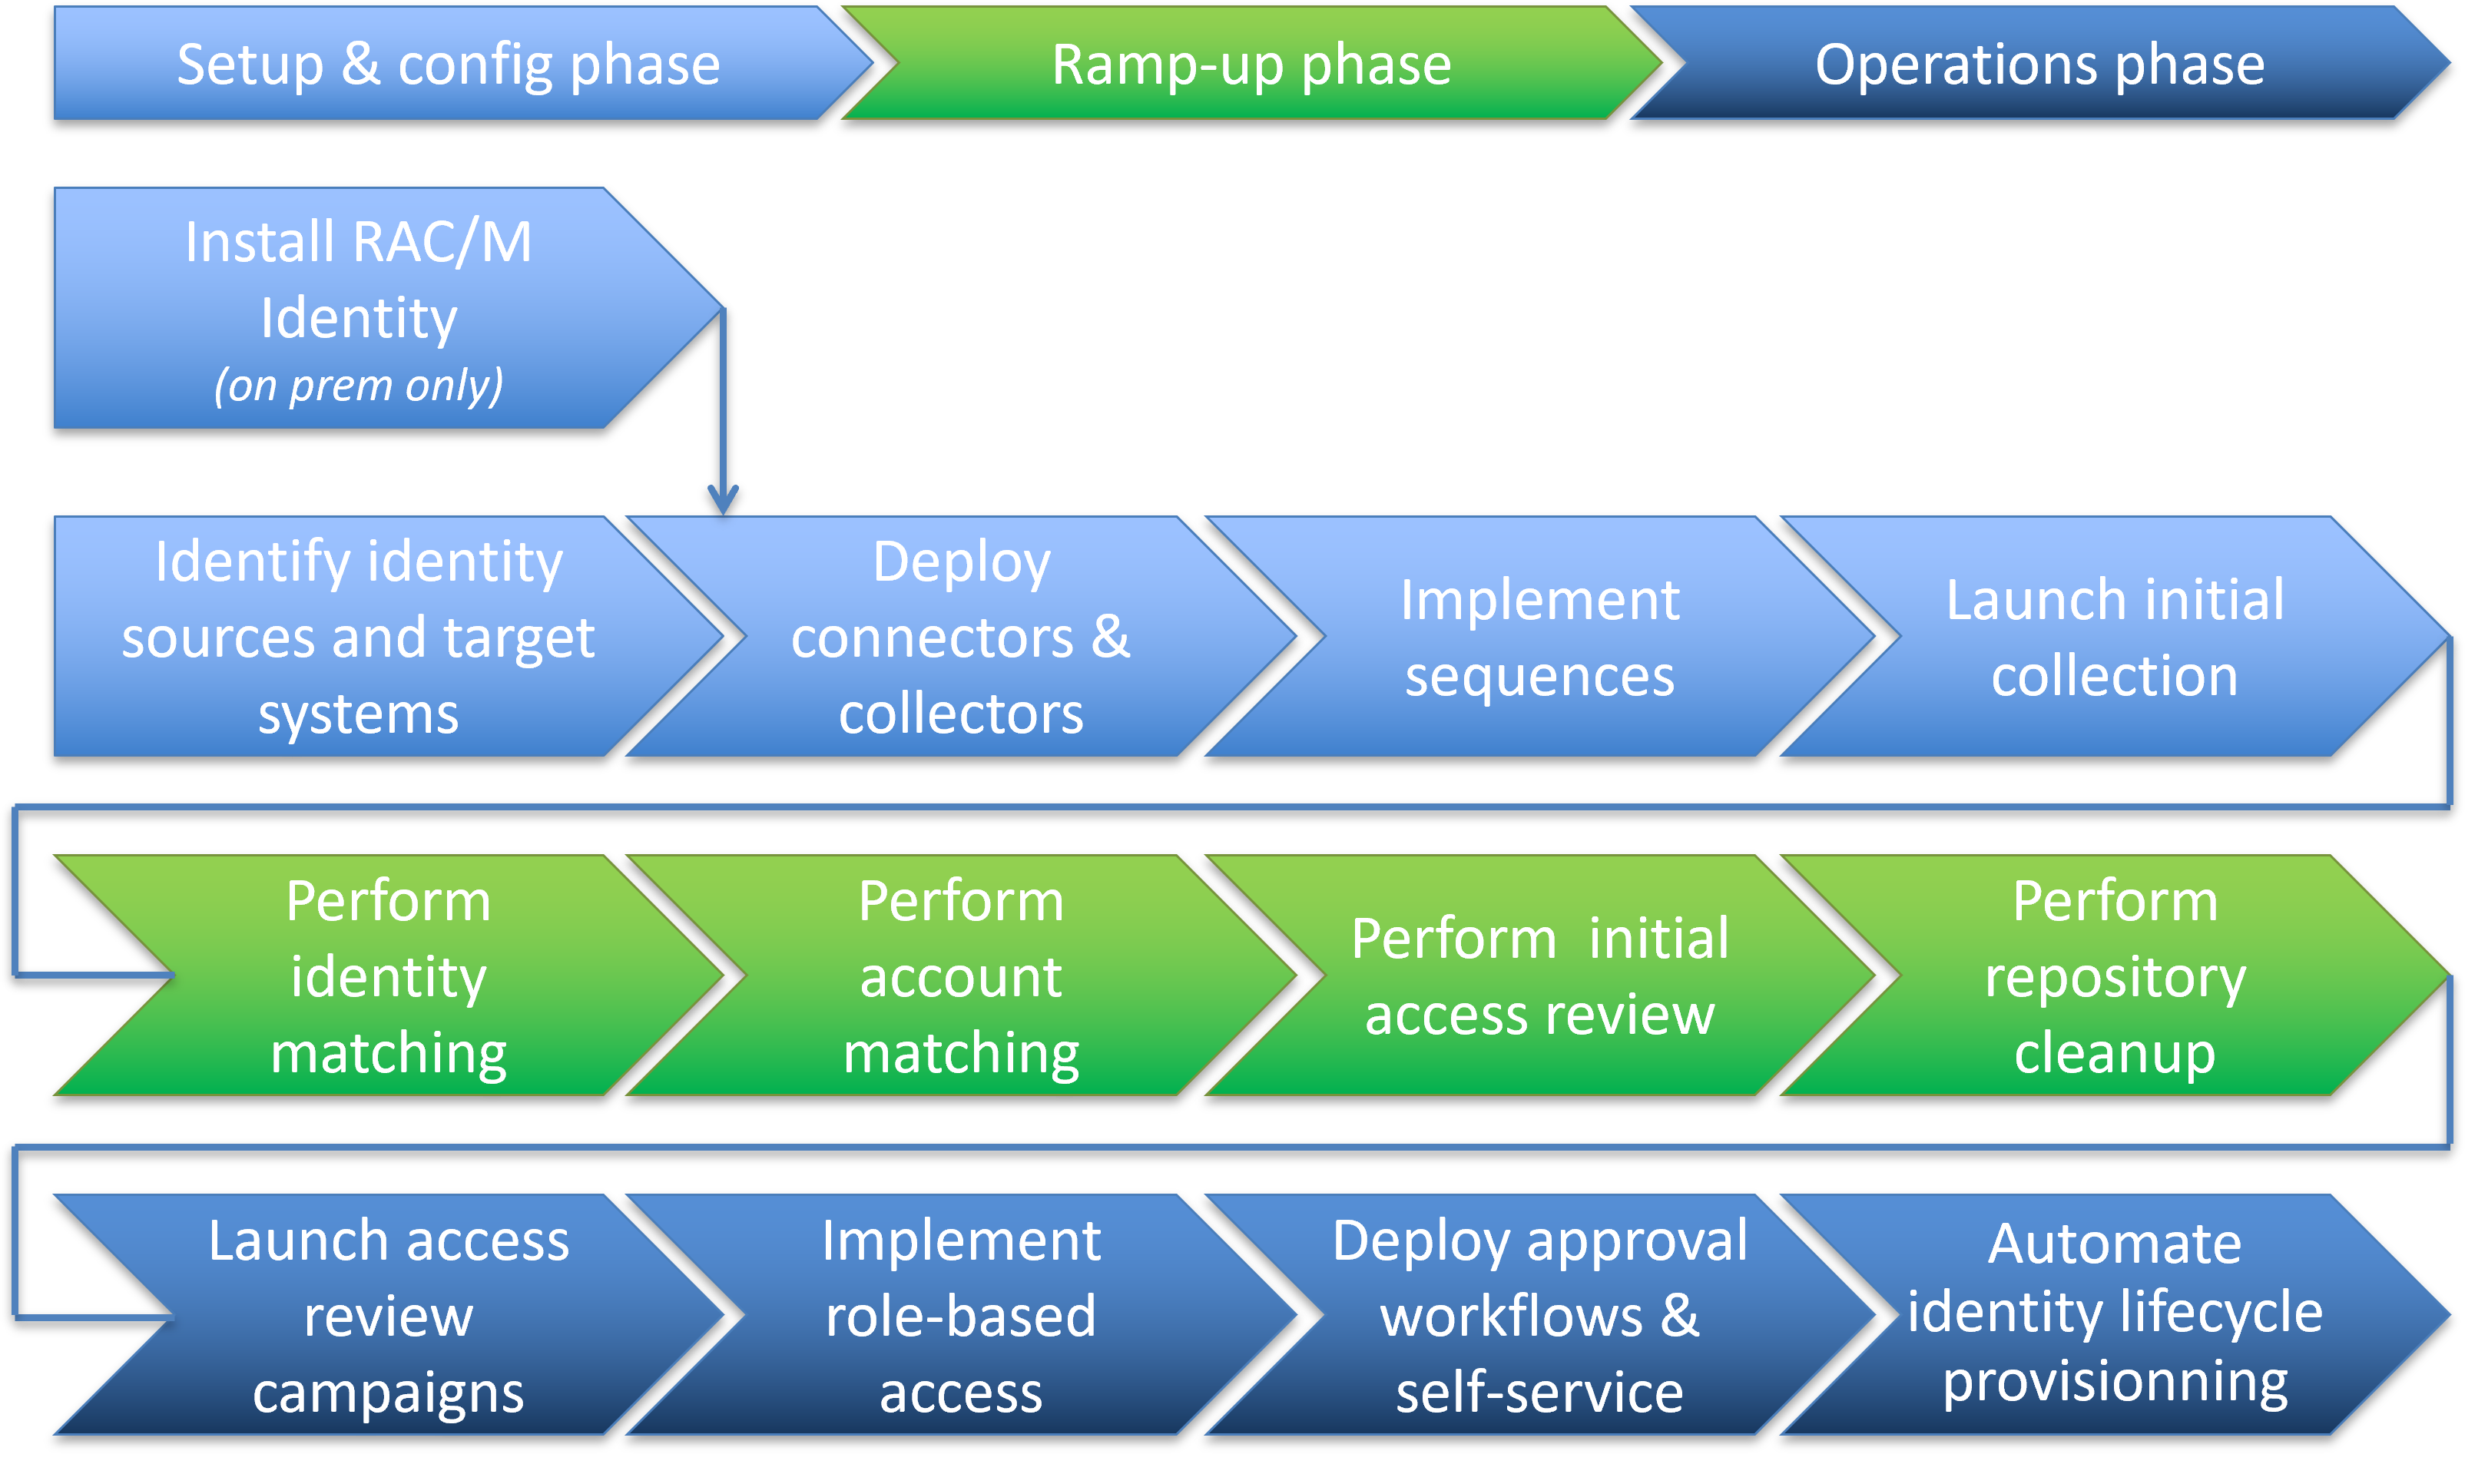
At this point, it is assumed that you have access to a running instance of RAC/M Identity. This is the case if you are using RAC/M Identity as a Service or if you are accessing an instance already deployed on your premises or private cloud tenant.
Note
For information about installing RAC/M Identity on your premises or private cloud tenant, please refer to the RAC/M Identity Planning Guide and RAC/M Identity Installation Guide.
Note
Most of the steps depicted above apply to both editions. Some advanced functionalities like self-service and automated provisionning only apply to the Premium edition.
The steps for configuring RAC/M Identity are further explained in this document.
Introduction to the RAC/M Identity Architecture
RAC/M Identity is based on a modular architecture organized as distinct functional blocks. This approach allows you to implement functionality gradually as required.
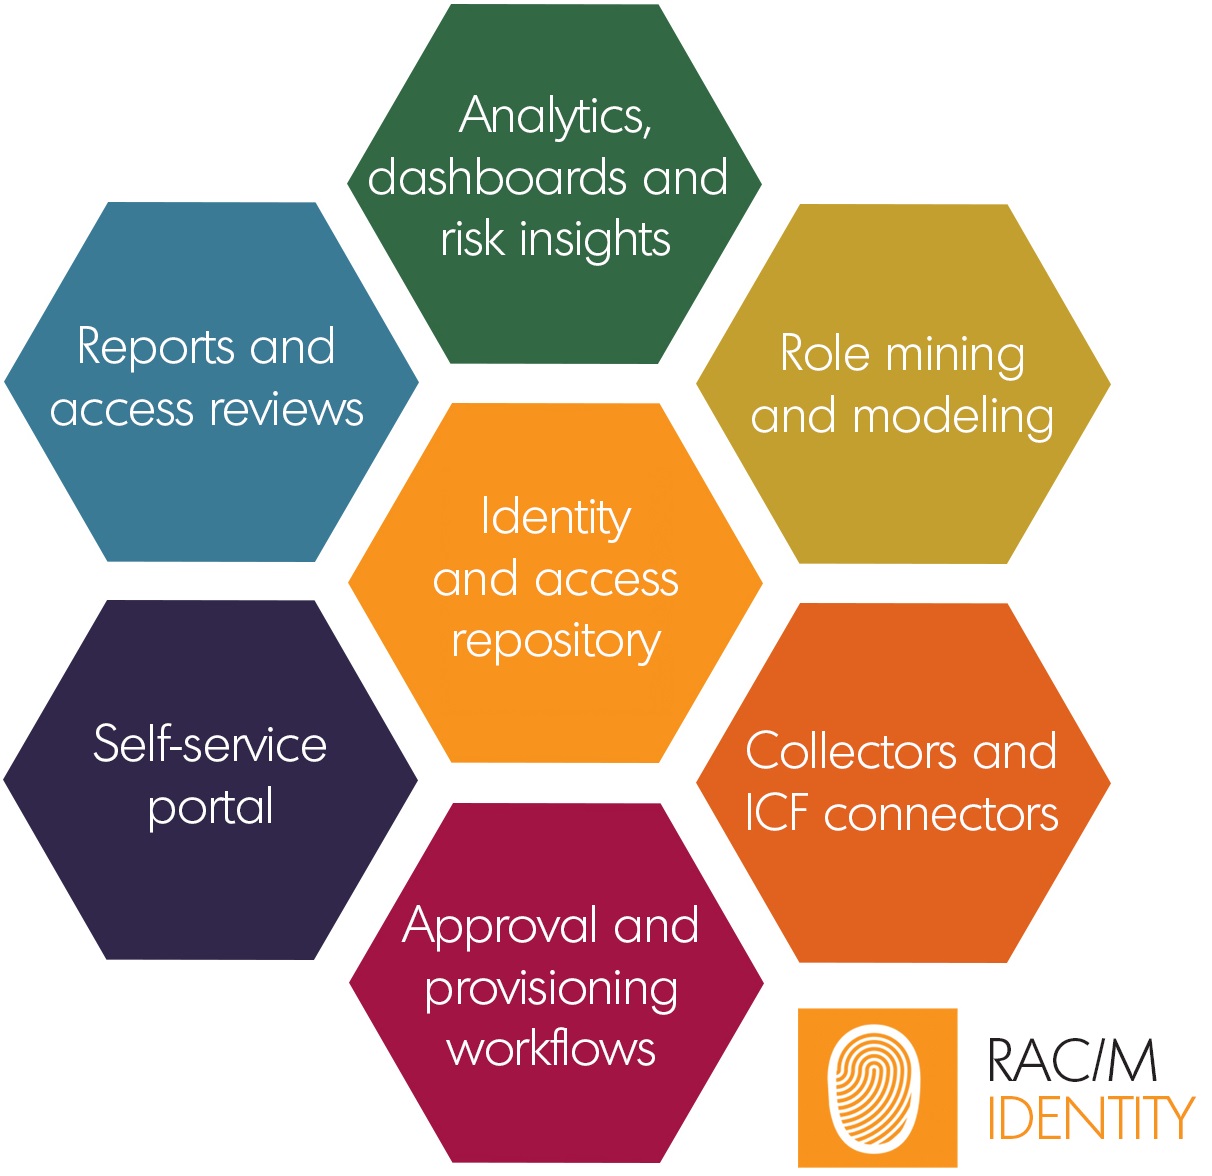
Identity and Access Repository
The repository is the cornerstone of the solution. It is represented here in the middle of the diagram because all other components depend on it.
It is implemented as an SQL database where all data about people, profiles, privileges, access levels, etc. is stored. This database pairs identities and entitlements to provide you with a comprehensive view of who has access to what within your IT systems and, optionally, to what physical locations they may have access and what assets they may hold, even as people come and go, move within the organization and their responsibilities change.
Typically, this database is updated at least daily, by getting fresh data from all sources that have been connected to RAC/M Identity via collectors and connectors.
The repository is maintained in continuous synchronisation with all connected systems by automated processing.
Analytics, Dashboards, and Risk Insights
Advanced analytics capabilities in RAC/M Identity are used by the automated processing functions for detecting and reporting anomalies and risky situations such as orphaned accounts (accounts that are not linked to anyone currently active or working within the organization) and making sure that active and inactive accounts are properly accounted for. The results of each analysis run are documented as Risk Insights.
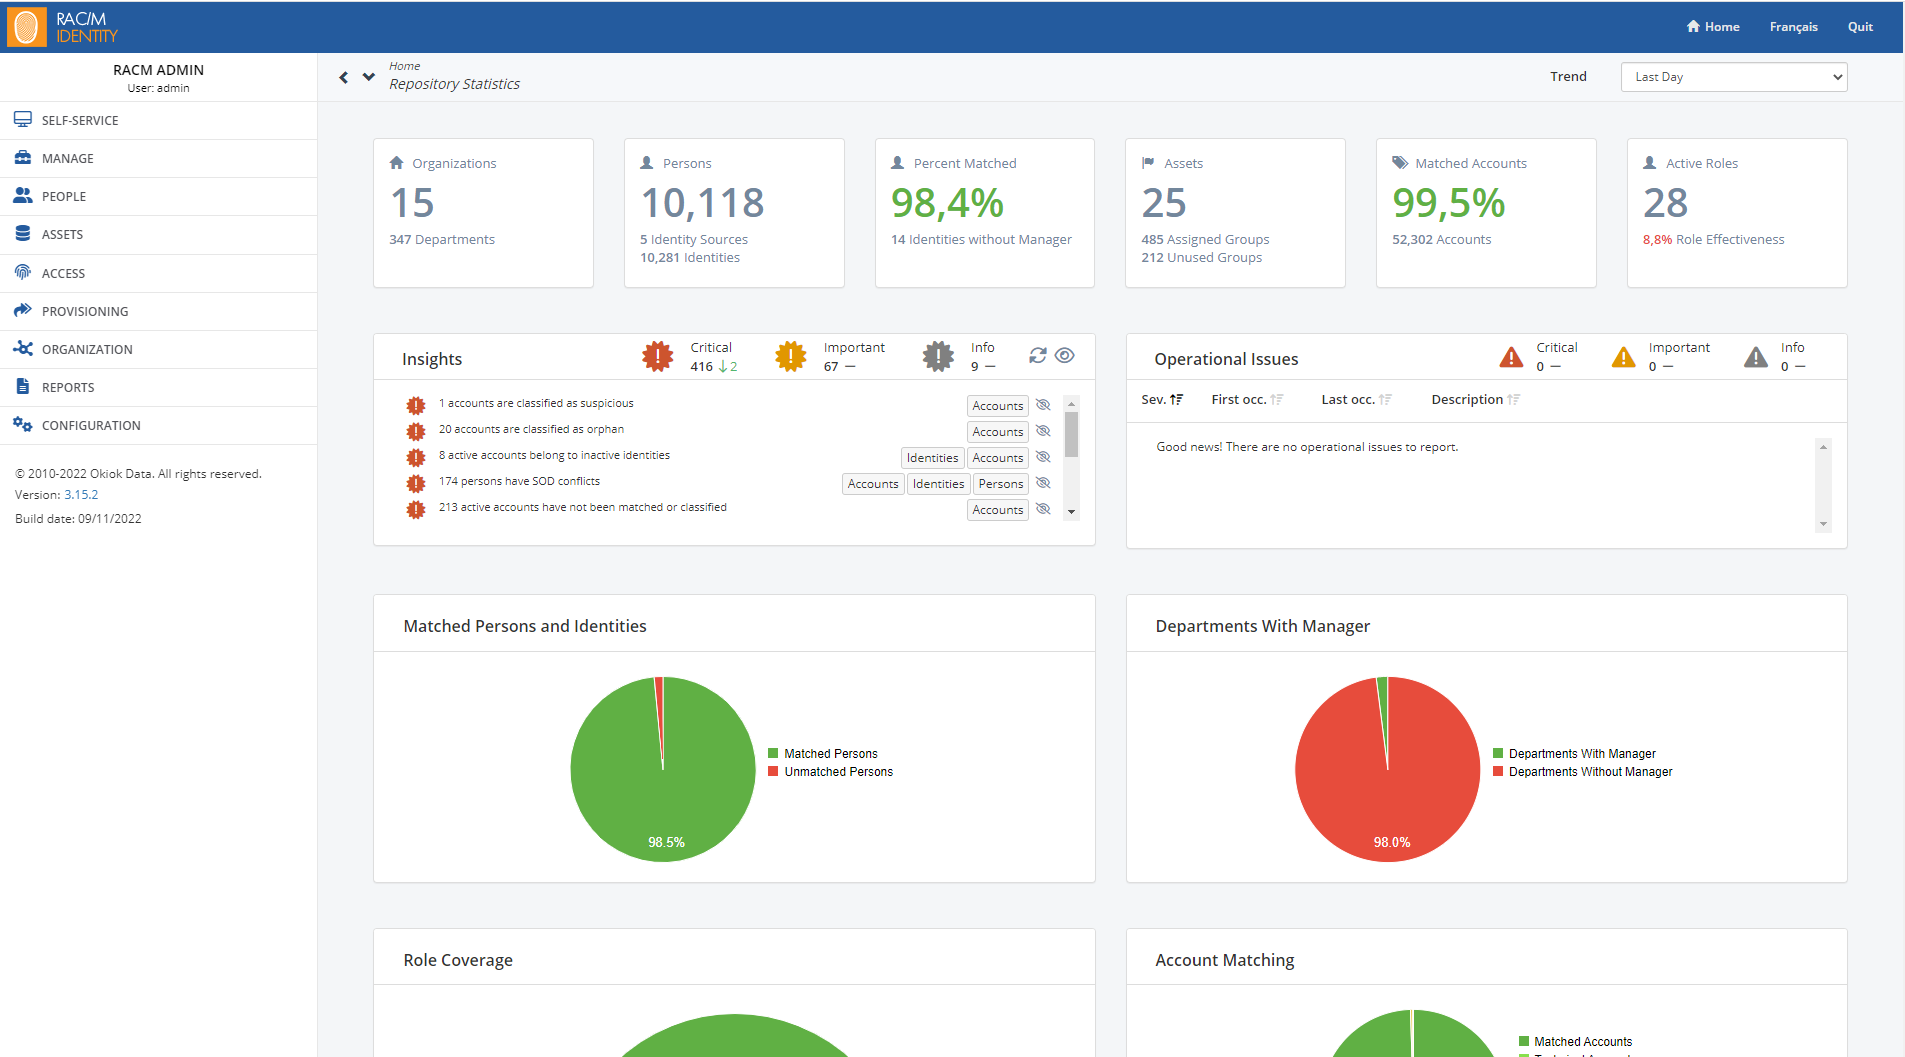
Comprehensive statistics about the IAM repository such as the number of people, identities, departments and managers, roles, and accounts along with the latests Risk Insights are displayed in a dashboard on the Home page of RAC/M Identity. The dashboard also displays Operational issues such as errors that occurred during the processing of data. The dashboard allows you to see at a glance important information about your RAC/M Identity implementation to help you plan your next activities.
Role Mining and Modeling
RAC/M Identity supports a flexible role and rule based access model that includes the best features from the RBAC and ABAC models. It includes powerful role mining capabilities that leverage the advanced analytics features presented earlier.
Role mining for business roles is performed by defining rules based on criteria like the values of any relevant attributes such as departments, titles, jobs, etc., that you determine. These rules allow you to specify subsets of identities and assets to be analyzed by applying the rules to determine common entitlements that can be assigned as a whole to the corresponding business role, thus greatly simplifying access management operations.
Example of role mining
If RAC/M Identity determines that all doctors in the oncology department have access to the biopsy results system, the oncology floor in the building, and the laboratories, then a role can be created for them. Therefore, when new doctors are hired, they can be assigned this role and get all associated entitlements at once.
The role modeling process is used to manually configure roles, accesses and other entitlements. Crafting roles manually allows role architects and subject matter experts (SMEs) to precisely determine the set of entitlements that each role should have.
Note
In order to make informed decisions about what entitlements are required, it is highly recommended that role modeling activities be performed with the full support and cooperation of SMEs familiar with the business as well as with technical details of the applications and IT systems supporting the business.
Role mining is the “bottom-up” approach where existing entitlements are analyzed based on the hypothesis that they are a good starting point for defining business roles. On the other hand, role modeling is the “top-down” approach where roles are manually defined and tuned. Successful role definition strategies typically combine both approaches.
Once a preliminary version has been completed, roles can be fine-tuned, optimized, and made active.
Collectors and ICF Connectors
Collectors and ICF connectors are the mechanisms used to interface to your informational assets such as IT systems, applications, databases, HR systems, physical access control systems, etc. They provide for reliable and automated gathering of information to populate the RAC/M Identity repository. Collectors and connectors are easily adapted and configured to integrate any forseeable system or application.
Identity Connector Framework (ICF) connectors are flexible open-source components based on a widely used industry standard that provide bidirectional connectivity to data sources such as systems, applications and databases. They are highly flexible and can be configured to integrate virtually any application or system.
ICF Connectors are required for automated provisionning of identities and entitlements.
Collectors are used to import information from CSV files and from ICF connectors. Importing data from CSV files is useful for systems for which ICF connectors are not desired or not available and for systems for which you only need to read data.
Note
The use of collectors to import from CSV files requires some automation such as scripting to make sure that the files are periodically generated and sent to the RAC/M Identity server.
Collectors and connectors provide RAC/M Identity with the flexibility to integrate seamlessly with any client environment.
Approval and Provisioning Workflows (Premium edition)
Approval and Provisioning workflows allow you to implement a formal process for requesting, approving and provisionning access requests.
Approval workflows enforce the steps that may be required to obtain formal approval of an access request, such as access to an application, before the request can be fulfilled. Approval workflows can be configured to require approval by any of the requester’s manager, the asset owner, or by a designated approver. Approval workflows can be defined based on the sensitivity of specific assets and entitlements.
Provisioning workflows implement the sequence of actions taken when changes need to be made to IT assets. Provisioning workflows support the creation, modification, and deletion of accounts and entitlements through flexible and powerful fulfillment strategies.
Once approved, requests and changes may be fulfilled by sending structured emails or opening tickets for systems that are not fully integrated or by directly provisionning the changes in systems integrated using ICF connectors.
Self-Service Portal (Premium edition)
The Self-service portal is the main interface for users, managers, asset owners and reviewers to initiate and approve requests and to perform access reviews.
The self-service portal included with RAC/M Identity is designed to optimize the user experience by adopting the logos and colors of your organization and presenting only the features and functionalities relevant to users based on their respective responsibilities and skill level.
A limited version of the self-service portal is provided in the Governance edition to support access review campaigns.
Reports and Access Reviews
Reports and access reviews provide deep visibility into the RAC/M Identity repository. This allows you to view and report on many interesting aspects of the RAC/M Identity implementation such as entitlements held by some users, similarities between roles, anomalies and risky situations and much more.
While RAC/M Identity contains a comprehensive catalog of standard reports, custom reports and queries can be created as required. Database skills are helpful in understanding the RAC/M Identity data model when generating custom reports and queries. See Creating Custom Reports with JasperSoft Studio for a step-by-step guide.
Access reviews allow you to easily launch and manage access review campaigns (also known as recertification campaigns), which provide a robust framework for formally reviewing entitlements held by users to make sure they are still required.
Campaigns include a scope, a start and end date, and escalation workflows and can be defined to review identities, accesses, roles, business functions, and business rules violations such as separation of duty (SOD) violations. These entitlements can be reviewed by managers, asset owners, or any arbitrary reviewers.
Campaigns can be designed to focus on specific subsets or categories of items to review and can take place as often as your organization needs to meet its compliance requirements.
Logging On for the First Time
This section presents instructions to log on to RAC/M Identity for the first time, change the default password, and log off.
Note
This procedure walks you through the steps for logging on using the built-in super admin default account. This is only used for initial setup and configuration of RAC/M Identity. Authentication for day to day operations will be carried out using advanced authentication mechanisms, typically using Single Sign-On with an on premises Active Directory or using federated identity and multi-factor authentication (MFA) with a SAML identity provider.
To log on to RAC/M Identity for the first time:
Open a Web browser and enter the URL for RAC/M Identity.
The URL will have the following format:
https://hostname[:port number].The RAC/M Identity login page opens.
Note
If you do not know the URL to access RAC/M Identity, please refer to your IT support help desk.
In the Login ID text box, type Admin.
In the Password text box, type the default password.
Click Login.
The RAC/M session opens.
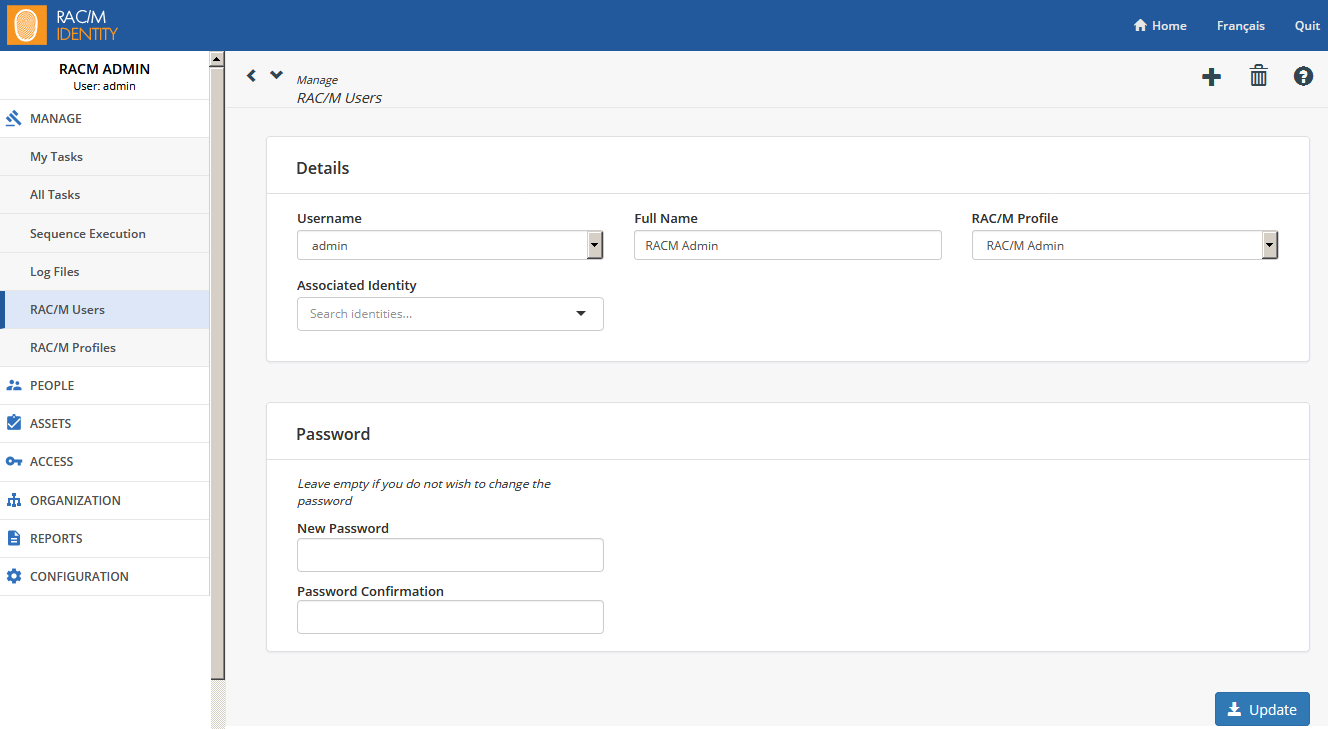
To change the default password:
- On the Menu Bar, click MANAGE.
- On the MANAGE menu, click RAC/M Users.
- Select the Admin user
- Under Password, in the New Password text box, type the new password.
- In the Password Confirmation text box, retype the new password.
- Click Update.
The default password for the administrator account has been changed.
Important
Although this password is only used for the initial setup of RAC/M Identity, it is important that you select a high quality password that is at least 16 characters long to provide sufficient protection during the setup and configuration process.
It will be possible (and recommended) to disable the use of the built-in passwords once an authentication provider is configured.
To log off from RAC/M:
- At the top-right corner of the main page, click the Quit button.
The RAC/M Identity User Interface
The RAC/M Identity user interface displayed after logging on depends on the RAC/M Identity profile of the user.
Users with administrative privileges will see the management console, while regular users as well as those who must approve access requests and perform access reviews will see a simplified view of the self-service portal with custom functionality, tailored to their responsibilities.
This section presents a description of the RAC/M Identity management console.
The management console interface is made up of four main sections.
Menu Bar
The Menu Bar is located on the left side of the display.
- SELF-SERVICE: to perform IAM operations such as issue access requests, approve requests and perform access review campaigns.
- MANAGE: to manage queued tasks, automated processing, local RAC/M Identity users, RAC/M Identity profiles and passwords.
- PEOPLE: to manage people and identities; match identities to people, accounts to identities, accounts to audit events and approve account matching.
- ASSETS: to manage information systems, applications and physical assets, their grouping, approval workflows, delegation groups, and accounts.
- ACCESS: to launch review campaigns; perform role modeling, mining, revision, optimization, and activation; define Separation of Duties (SOD) policies and business functions; track accounts and roles.
- PROVISIONING: to view the state of past and current provisioning requests.
- ORGANIZATION: to manage your organization’s structure.
- REPORTS: to generate and view standard and custom reports.
- CONFIGURATION: to configure the building blocks, rules and policies used for creating and managing the custom business logic and automated processing.
Main Toolbar
The Main Toolbar is located at the top of the interface.
- The Home button opens the Home page. The main window consists of a dashboard that provides a view of the overall state of RAC/M Identity with detailed statistics along with up-to-date risk insights and operational indicators.
- The Français/English button changes the interface language.
- The Quit button ends your RAC/M session.
Secondary Toolbar
The Secondary toolbar varies depending on the page displayed. Typically you will find:
- The
 button allows you to go back the previous page. It works like the back button on your Web browser.
 - The
 button allows you to view your browsing history.
 - The
 button opens additional information about the current task.
 - The
 button allows you to add a new object such as a person, a collector, an account, etc., to the current page. This button is displayed only when the page allows you to add an object.
 - The
 button allows you to delete the selected object from the current page. This button is displayed only when the page allows you to delete an object.
Main Window
The Main window can containt two types of pages: Selection pages and Details pages.
Selection pages are essentially lists of objects. They usually display browsing and search functionalities above the list as well as contextual buttons below the list.
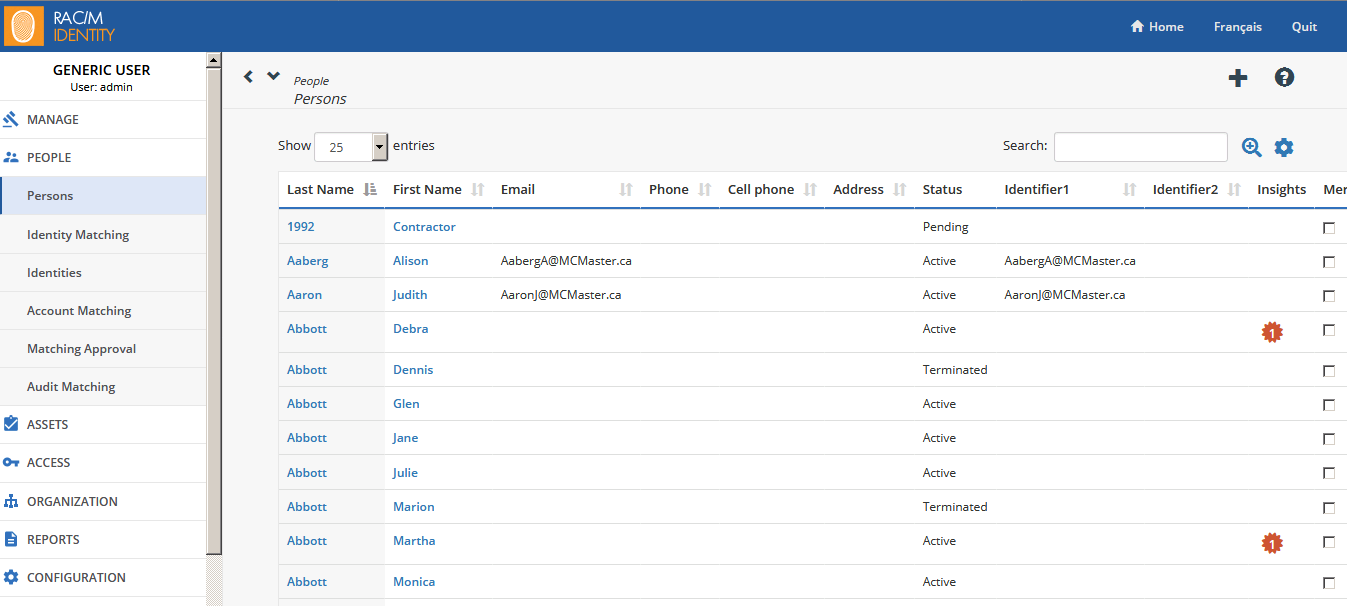
The Search field allows you to perform a basic search in the main data fields.
The  button allows you to add filters to column headers.
The  button allows you to customize what columns are displayed.
Details pages display a detailed view of the selected object. They can display buttons that allow you to create, update, delete, or clone objects. Details pages can also display drop-down lists that enable you to create links between objects.
Basic Tasks
This chapter presents tasks that are regularly performed by all RAC/M Identity users with administrative rights.
Common tasks, such as creating, updating and deleting an object, are always performed the same way.
Browsing Lists
To browse through the pages of a long list spanning several pages, use the buttons located at the bottom of the page: 
Performing a Search in a Selection Page
To perform a simple search in a Selection page (such as, Persons, Identities, Asset Groupings, Accounts, Groups, Delegation Groups, etc.), simply type a name, keyword, or character sequence in the Search text box. The search will return all entries that contain the keyword or character sequence anywhere in the main fields.
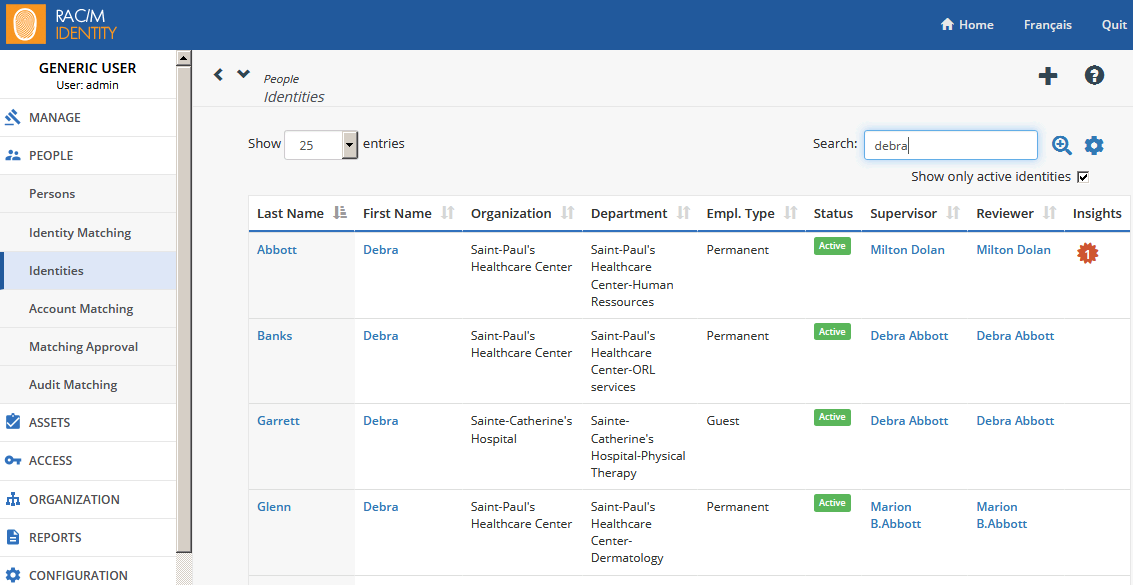
Many pages include checkboxes to filter the displayed results. For example, the Identities page allows you to display only active identities by selecting the Show only active identities check box. This is useful to hide inactive or terminated identities.
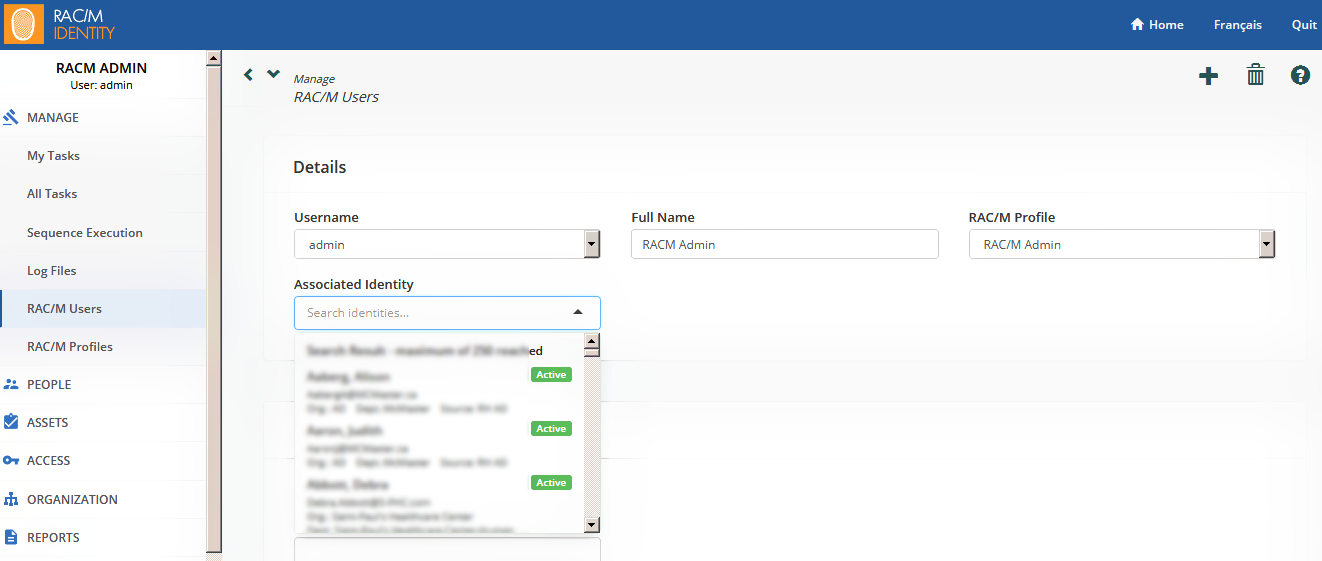
Performing a Search in a Details Page
To perform a search in a Details page, click in a searchable field and either open a drop down list or type a few letters of the name of the object you are looking for. All corresponding items appear in the drop down list. You can now select the desired item.
Updating an Object
Whenever you modify an object in a Details page, you can save your modifications by clicking the Update button located at the bottom-right corner of the page.
Exporting an Object
The definition of many complex objects such as modules, blocks, and sequences can be exported and saved to disk by clicking the Export button at the bottom of the page. A .dat file containing the parameters and metadata of the object is created. A dialog box opens to ask you whether you want to save it or open it with your preferred software tool.

Note
When you choose to save the .dat file, RAC/M Identity sends it to a default download directory; for example, C:> Users> Name> Downloads.
Importing an Object
Existing .dat files for objects such as modules, blocks and sequences can be imported in RAC/M Identity. Open an object page and click the Import button at the bottom of the page.
A dialog box opens to ask you to select the directory of the .dat file to import. Select the file and click Open.
The object is imported into RAC/M Identity.
Cloning an Object
You can clone existing complex objects such as modules, blocks, and sequences to simplify the creation of similar new objects by clicking the Clone button at the bottom of the page.
A new object will be created with the same values as the original object except for the fields that must be unique, which will be blanked.
Under Details, in the Name field, type the name of the new object, adjust the Description field and click the Save button at the bottom of the page.
Deleting an Object
An object can be deleted from a Details page. In the selection page, select the item to be deleted from the list. Once in the details page, click the button located at the top-right corner of the page. A confirmation message opens.
Note
Some objects cannot be deleted if they are associated with another object (for example, a person cannot be deleted if it is associated with an identity). In this case, you need to unlink all dependent objects before deleting it. If an object cannot be deleted, an error message appears at the top of the page.