User Guide
Understanding the RAC/M Identity Self Service Portal
In this chapter, you will learn how to use the integrated self-service portal to request new access to resources or to modify or delete existing access, change your access rights through group or role membership, respond to approval requests if you are an approver, and perform access or role reviews if you are designated to do so.
About the self-service portal
RAC/M Identity provides a comprehensive and customizable self-service portal that allows users to initiate requests to report the arrival, transfer or departure of individuals, represented by identities internal or external to the enterprise. In addition, the portal allows users to make and approve requests to add or remove access, either directly or through roles, for the requestor or for a third party.
The portal also allows you to make these requests for impersonal accounts or machine identities.
Finally, the portal also allows designated certifiers to execute the access and role review campaigns assigned to them.
Design principle
An important design principle of the self-service portal is the simplification of the presentation and operation to optimize the user experience. The goal is for users to be able to use the portal without prior training.
To this end, the presentation is uncluttered, so that only the permitted buttons and functions are available and only relevant information is displayed. This concept was developed and refined in partnership with OKIOK customers until the objectives of user-friendliness were achieved.
The self-service portal is based on a responsive interface that allows use from mobile devices such as smartphones and tablets that support a compatible web browser such as Safari and Chrome.
Requests initiated through the self-service portal are validated to determine if they violate business rules such as segregation of duties and a message is displayed to the requester if they do. The requestor can choose to correct the request or initiate it anyway. If a request containing a rule violation is initiated, it will automatically be picked up by the approval flow so that the condition is resolved before the approval and provisioning steps are performed.
The home page
To reach the home page, navigate to the login page in your browser. If you do not know the URL of the self-service portal, please contact your IT support department.
The URL may look like this: https://yourorganisation.racmidentity.com/
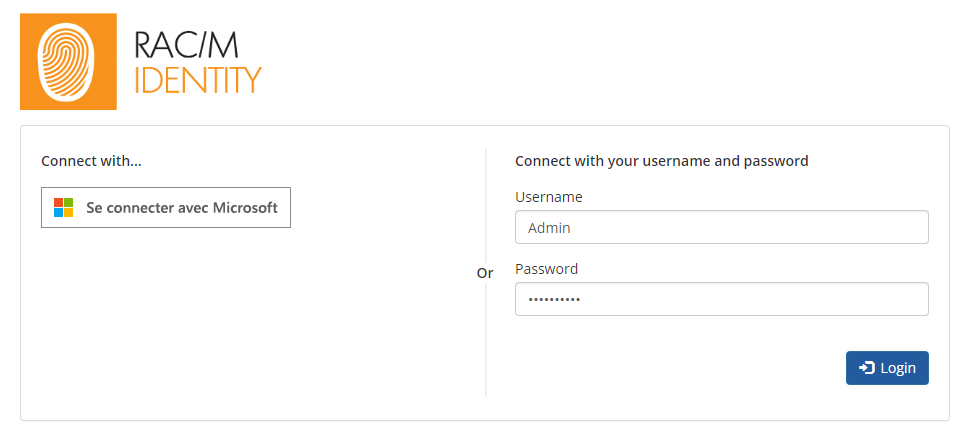
Click the Connect with Microsoft button to connect with federated authentication credentials with Microsoft365. Click the appropriate button to log in with another federated authentication source if there are others displayed.
Note
The use of a local login and password is usually reserved for those involved in the initial implementation of the solution and is generally not required for day-to-day operations.
On the home page, the tiles on the left side display the available requests according to the portal configuration and user profile, while the central area is divided into three zones. The top area displays the list of pending tasks, the middle area displays the list of current requests, while the bottom area displays the current access review campaigns.
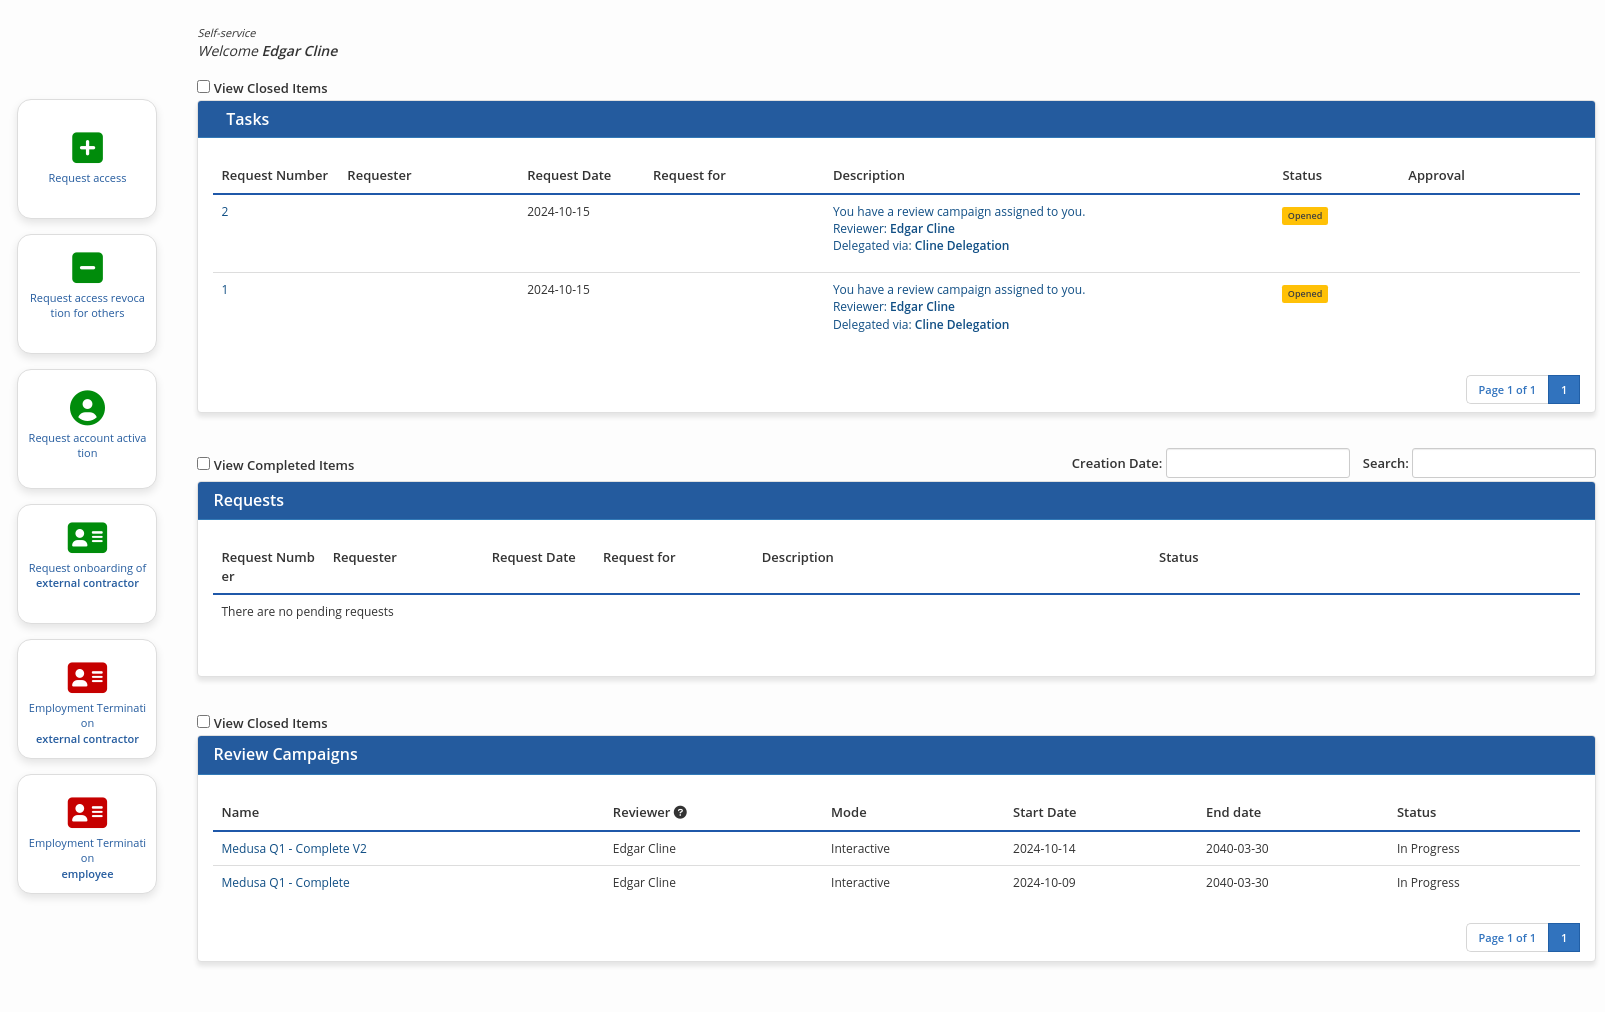
Here is a description of some of the available functions.
Note
The nomenclature, the colors and the order of the tiles and fields are customizable for each customer. The following labels are used as examples.
Note
In the following text, the term "Requester" refers to the person using the self-service portal to make an application, while the term "Subject" refers to the person for whom the application is made. If a person is making a request for themselves, they are both the requester and the subject.
The term Request refers to the access request made by the requester using the self-service portal. A Request may contain multiple Subrequests to add or remove specific roles or access. In particular, a request containing one or more roles may generate multiple separate subrequests to add or remove rights in multiple assets using separate approval and provisioning flows.
Self-service functions
Access request
The access request tile allows you to request to add access to an existing identity or to an impersonal account. It can also be used to report the transfer or lateral move of an identity.
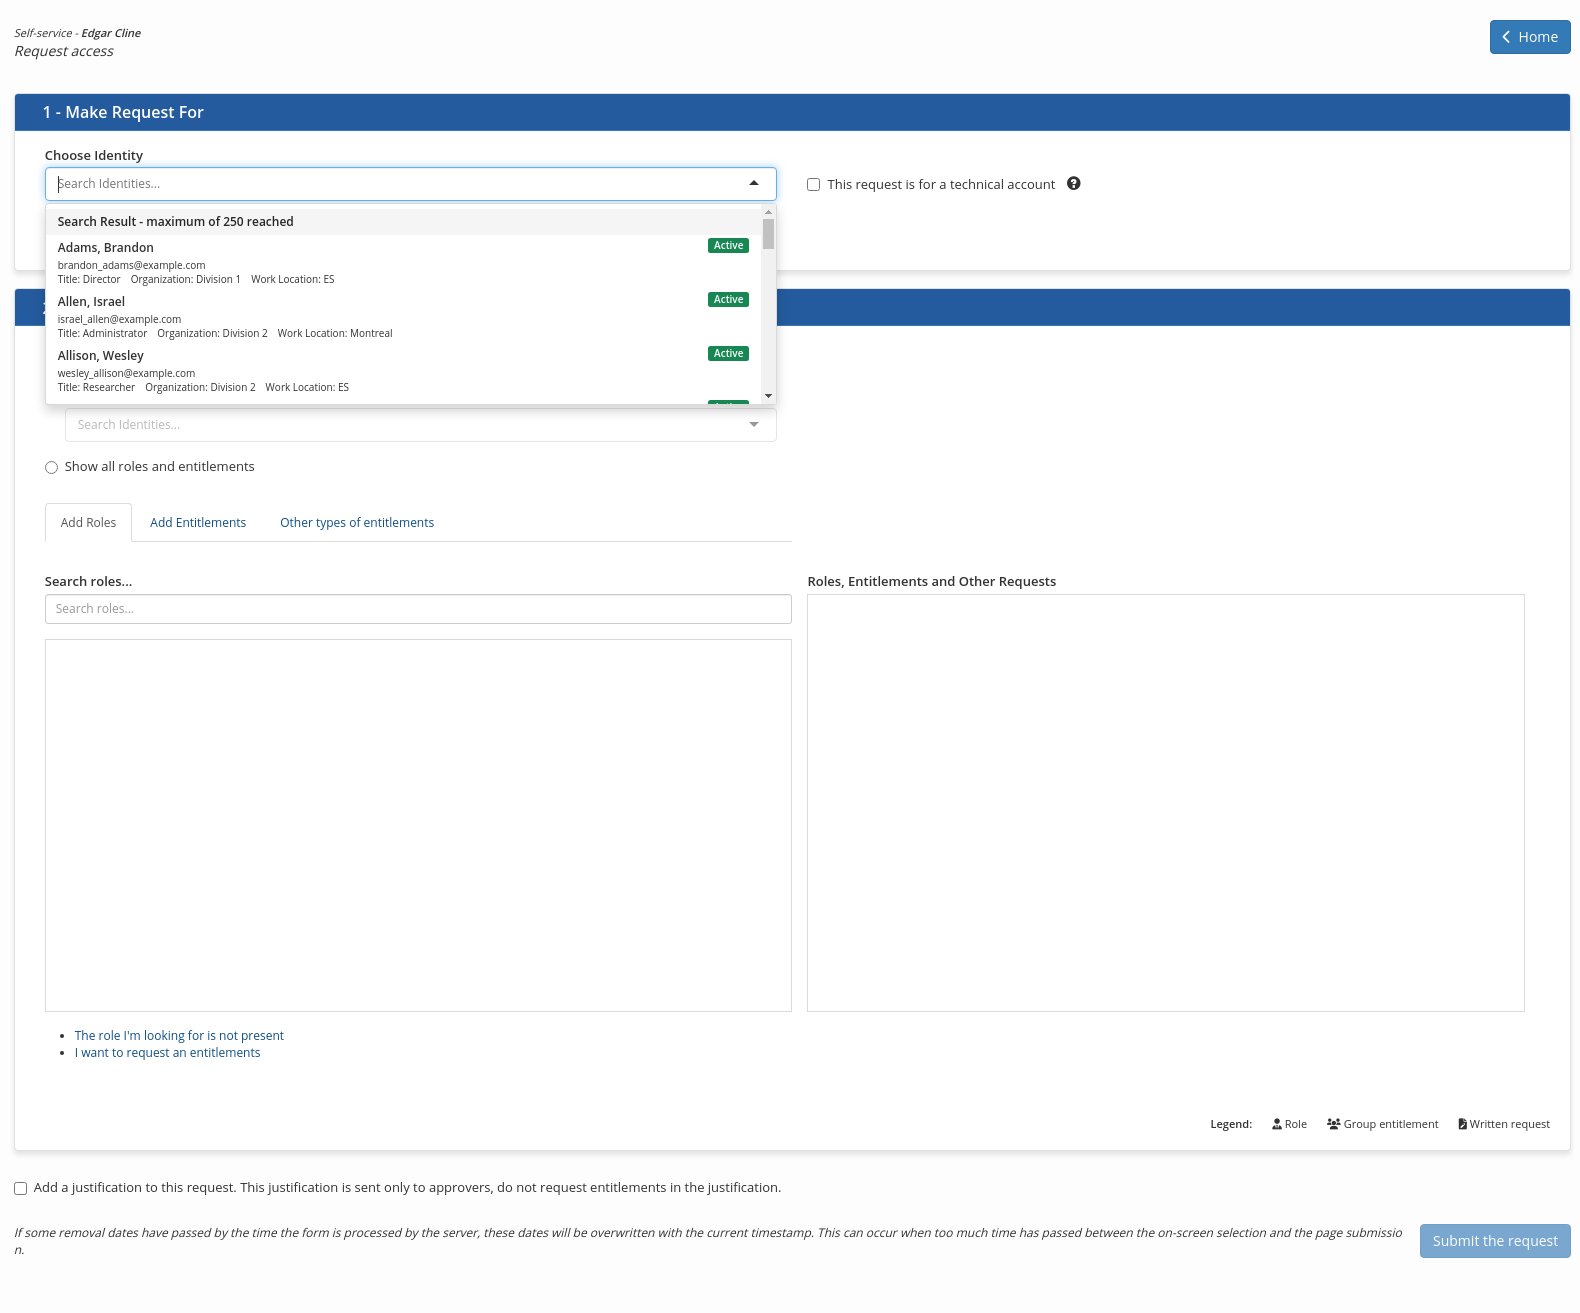
To request access for an identity:
In the 1- Make Request For section
In the drop-down list in the Choose Identity field, enter a few letters of the name of the identity for which access is requested and select the desired identity from the list displayed
Check the box Employee Transfer if this request is to report a transfer or a move.
Note
The default behavior on a transfer or move is to remove all currently held accesses that are not explicitly requested in the request. This avoids the accumulation of rights because existing accesses and rights are systematically removed unless explicitly requested.
In section 2- Add To Request,
Choose one of the following options:
- Show only roles and entitlements assigned in your organization. This option is selected by default and only displays the list of roles and entitlements that are currently assigned to identities in your organization. If the requester is a manager, only the roles and rights assigned to the identities under his/her responsibility are displayed.
- Show only the roles and entitlements of identities with a notification group of which you are a member to display roles and accesses based on identities that have a notification group of which the currently logged-in identity is owner or member.
- To display roles and accesses available on demand
- RAC/M Identity will use the currently authenticated identity to retrieve all delegation groups it owns or is a member of.
- A search is then performed to find all identities that have this delegation group assigned as a notification group.
- Finally, all identities returned are used to retrieve the roles and accesses these identities possess.
Note
This specific option must be activated by an system administrator to be visible. See file config.properties and modify the configuration self.service.display_entitlement_list_based_on_notification_group
- To display roles and accesses available on demand
- Show roles and entitlements based on the following identity to display the roles and entitlements for a specific identity. This allows the requester to choose which roles and accesses to request based on an identity that can be used as a reference while avoiding the same as problem of requesting all of the roles and accesses held by one identity in a single step without validationg their relevance. In the drop-down list, enter a few letters of the name of the reference identity and select the desired identity from the list displayed
- Show all roles and entitlements to display all roles and entitlements available in your organization.
Note
All roles and entitlements selected in an access request must be approved according to the relevant approval flows which ensures the security of the process even though any roles and entitlements can be requested.
The area immediately below on the left contains tabs that display the roles and entitlements that can be requested depending on the option chosen, while the third displays a free field that can be used to make a special request that cannot be filled by the choices displayed.
To add a role to the request:
Select the Add Roles tab
In the Search Roles drop-down list, enter a few letters of the role you are looking for and click on the Add button to add it to the application.
The added role is listed in the section on the right, which contains the list of roles and rights to be added.
You can view the details of the entitlements contained in the displayed roles by clicking on a role. A window similar to this one will open and display the contents of the role.
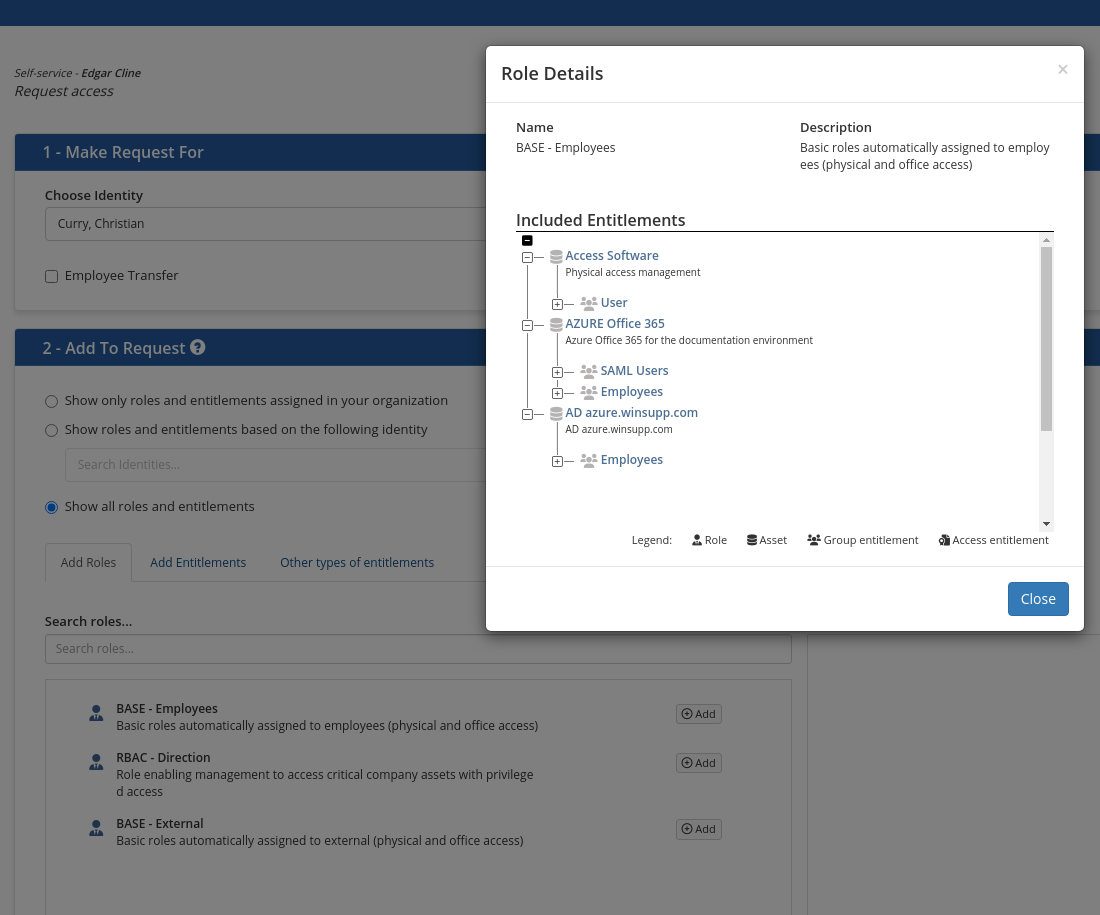
To add an entitlement to the request:
Select the Add Entitlements tab
In the Assets drop-down list, enter a few letters of the asset you want to add rights to and select it from the list.
In the drop-down list Search for rights, you can enter a few letters of the group you are looking for to filter the content of the list and click on the Add button of a group to add it to the request.
The added entitlement is listed in the section on the right, which contains the list of roles and entitlements to be added.
You can view the details of an entitlement displayed on the right by clicking on it.
Click on the calendar icon to add an end date and time to a role or entitlement. If a date and time is specified, the icon will be displayed in black and the role or entitlement will be removed automatically at that date and time. Do not specify a date if the role or right is not to be removed on a predetermined date.
You can add as many roles and entitlements as required.
If you don't find the roles you are looking for
Click on the The role I am looking for is not present link. This will change the option to Show All Roles to remove the filter and allow all available roles in the organization to be displayed.
If you still can't find the role you are looking for, click on the I want to request an entitlement link to open the tab that displays the access rights.
If you don't find the entitlements you are looking for
Click on the The entitlement I am looking for is not present link. This will change the option to Show All Entitlements to remove the filter and allow all available entitlements in the organization to be displayed.
If you still cannot find the right you are looking for, click on the link I cannot find the right I am looking for to open the tab that displays Written Request which allows you to request free text access.
Note
This link is available to provide a solution in exceptional situations and should not be used as a general mechanism for making access requests as these must be handled manually.
Business Rule Violation
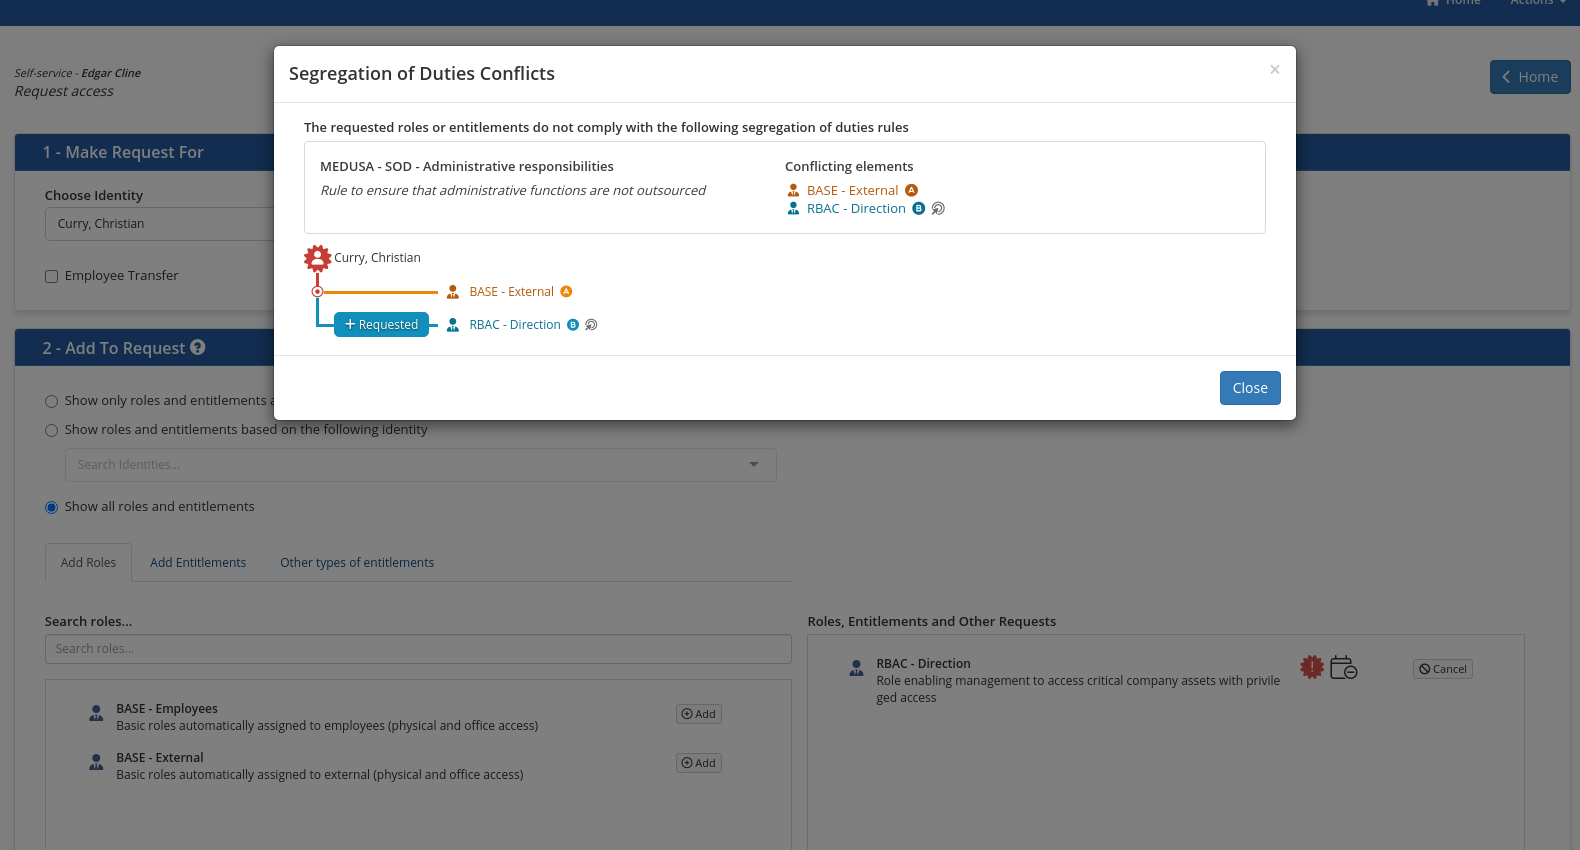
If an added role or entitlement causes the violation of a business rule such as a separation of duties rule, a red icon is displayed with the role or entitlement involved. Click the icon to display an explanation of the violation. You can take action to remove the role or entitlement that is causing the violation or you can decide to issue the request anyway. In this case, the violation will be detected by the approval workflow which will force a resolution step before the request can be approved and provisioned.
- Check the box Add a justification to add a text that will accompany your request. This text can contain an explanation or justification of your request that will be forwarded to the approvers.
- Click on Submit Request.
Revoke access for others
The access revocation tile allows you to request revocation of accesses for an identity.
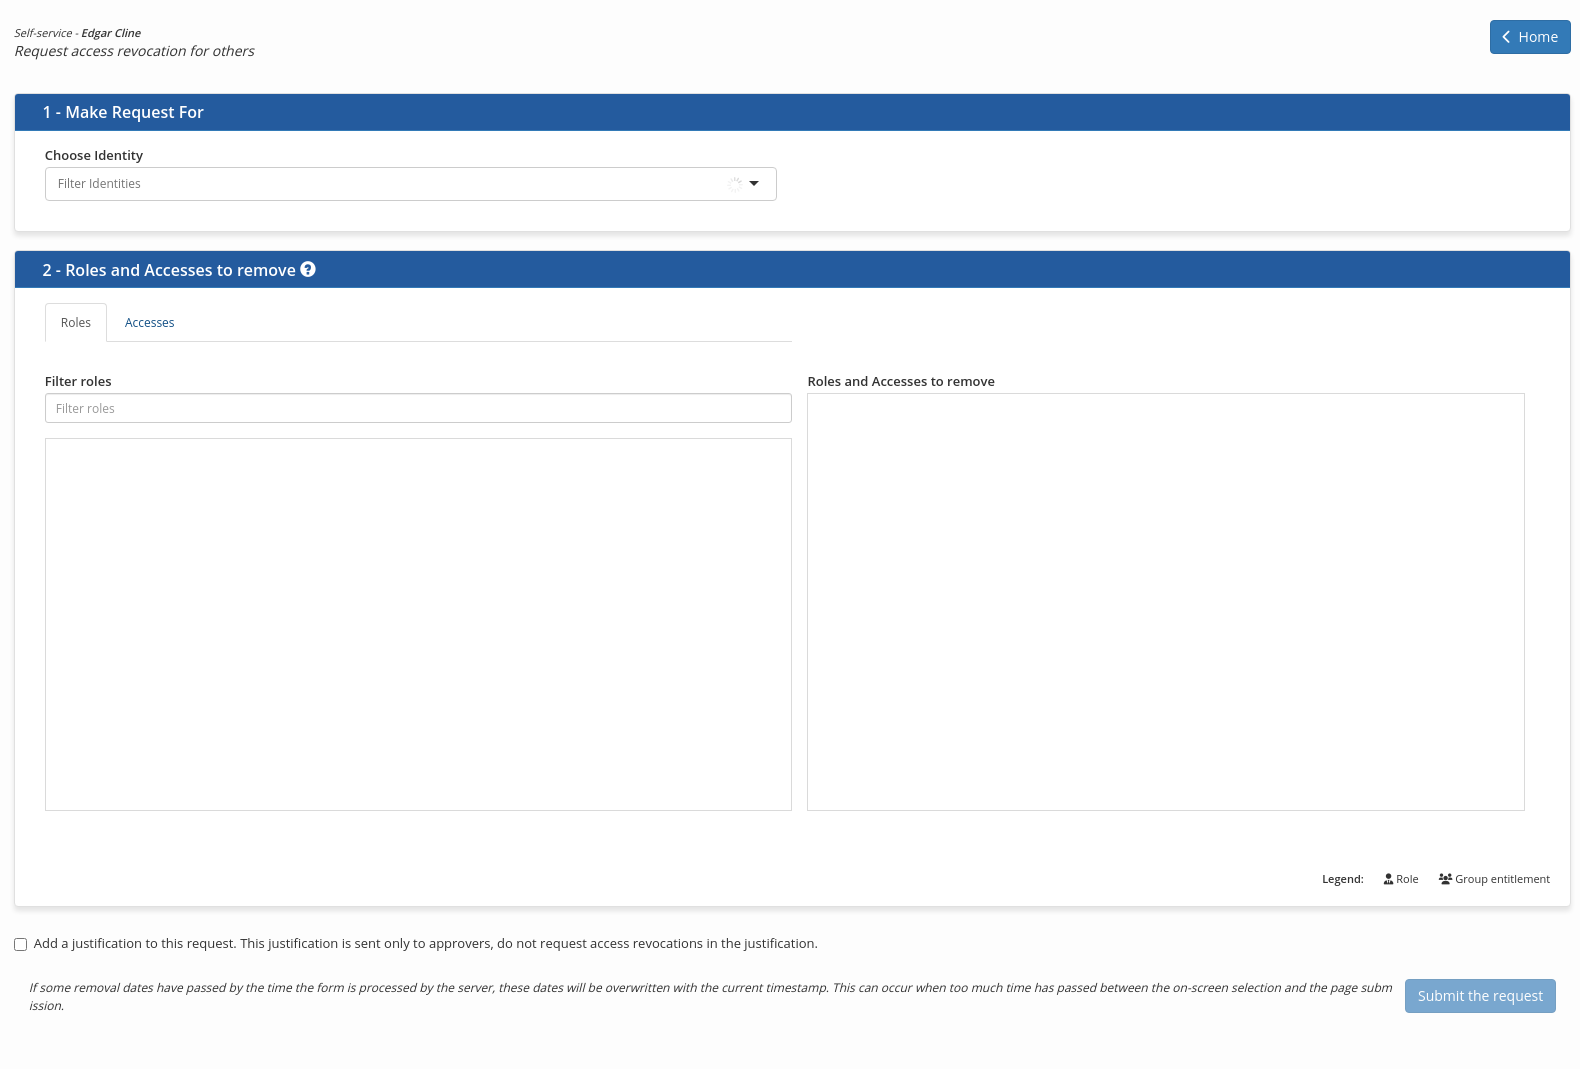
To request access revocation for an identity:
In the 1- Make Request For section
In the drop-down list in the Choose Identity field, enter a few letters of the name of the identity you want to remove access from.
Note
Since workflows are typically configured to remove accesses without requiring approval, strict controls have been put in place to prevent accidental or malicious removal of accesses. To this end, only identites for which the requestor is part of the Approver delegation group will appear in the drop down list.
In the 2- Roles and accesses to revoke section
The area immediately below on the left contains tabs that display the roles and entitlements that can be removed.
To add a role to be removed:
Select the Roles tab
In the Search Roles drop-down list, enter a few letters of the role to be removed, and click on the Add button of the role to be removed to add it to the request.
The role is listed in the section on the right, which contains the list of roles and entitlements to be removed.
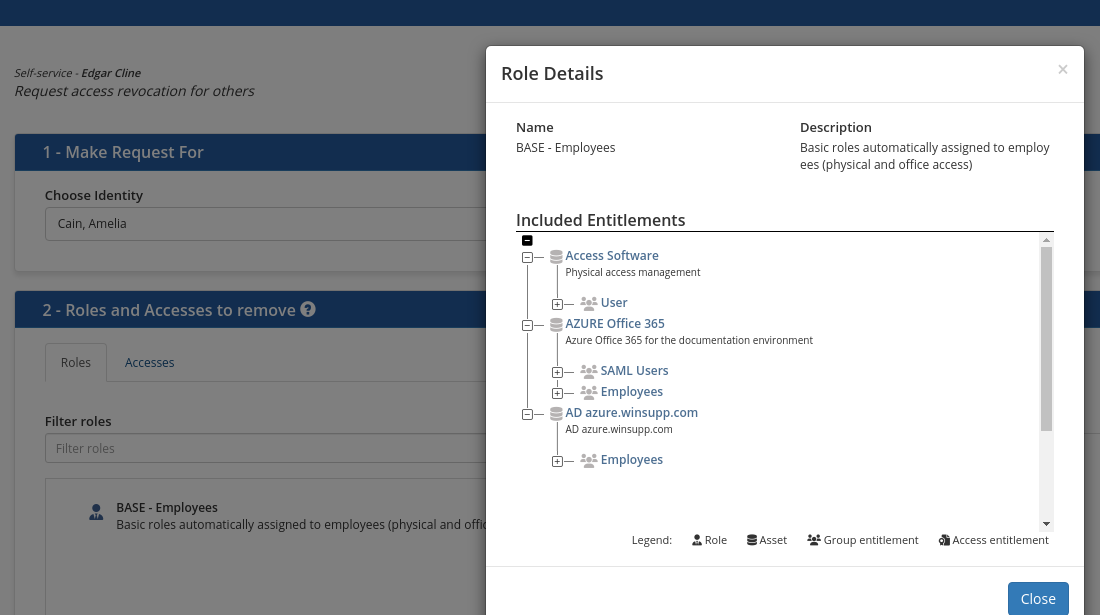
You can view the details of the entitlements contained in the displayed roles by clicking on a role. A window describing the contents of the role opens.
To add an entitlement to revoke:
Select the Access tab
In the Assets drop-down list, enter a few letters of the asset you want to add rights to and select it from the list.
In the drop-down list Search accesses, you can enter some letters of the group you are looking for to filter the content of the list and click on the Add button of a group to add it to the request.
The added group is listed in the section on the right, which contains the list of roles and entitlements to be revoked.
You can view the details of the entitlement displayed by clicking on it.
Click on the calendar icon to specify the date and time of revocation of a role or a right. If a date and time are specified, the icon will be displayed in black and the access be revoked automatically at this date and time.
Note
If a date and time are not specified, the roles or entitlements will not be revoked automatically or will be revoked at the original date and time.
You can add as many roles and entitlements to be revoked as required.
Check the box Add a justification to add a text that will accompany your request. This text can contain an explanation or justification of your request that will be sent to the approvers.
Click on Submit Request.
Account activation request
The account activation request tile allows you to request an account activation to an existing identity.

To request an account activation for an identity:
In the 1- Make Request For section
- In the drop-down list in the Choose Identity field, enter a few letters of the name of the identity for which the account activation is requested and select the desired identity from the list displayed
In section 2- Accounts to activate,
To add an account to the request:
Select the option Show only inactive accounts to filter which accounts are displayed.
Activating an account is normally only necessary for an inactive account. In certain situations (e.g. when an account has recently been deactivated and has not yet been reconciled), a user may wish to reactivate an account that appears to be active. In these cases, you need to remove the filter in order to display all accounts.
In the Assets drop-down list, enter a few letters of the asset you want to add rights to and select it from the list.
In the drop-down list Search for accounts, you can enter a few letters of the account you are looking for to filter the content of the list and click on the Activate button of an account to add it to the request.
The added account is listed in the section on the right, which contains the list of all accounts in the request.
Click on the calendar icon to add an end date and time to an account. If a date and time is specified, the icon will be displayed in black and the role or entitlement will be activated automatically at that date and time. Do not specify a date if the account should be activated as soon as possible.
You can add as many accounts as required.
Business Rule Violation
If an added account causes the violation of a business rule such as a separation of duties rule, a red icon is displayed with the account involved. Click the icon to display an explanation of the violation. You can take action to remove the account that is causing the violation or you can decide to issue the request anyway. In this case, the violation will be detected by the approval workflow which will force a resolution step before the request can be approved and provisioned.

- Check the box Add a justification to add a text that will accompany your request. This text can contain an explanation or justification of your request that will be sent to the approvers.
- Click on Submit Request.
Request for onboarding an external contractor
This tile allows you to request the onboarding of an identity, external to your organization such as a contractor.
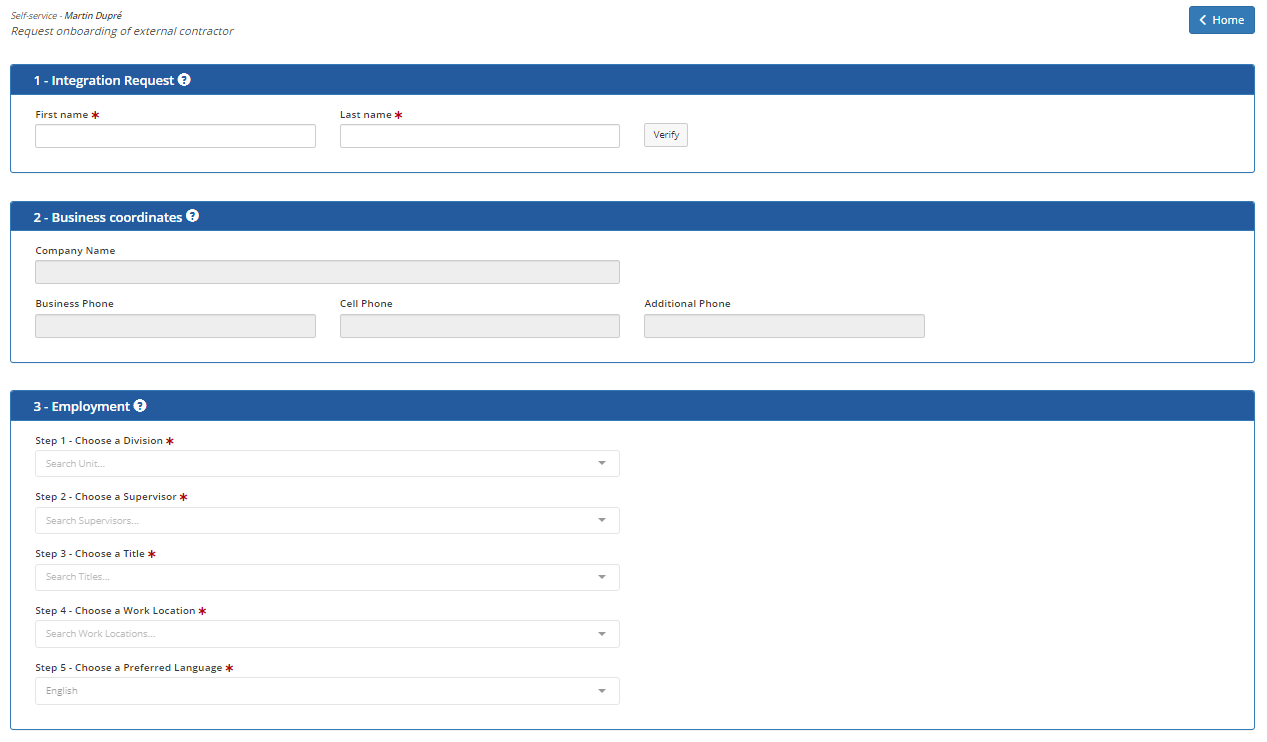
To request the onboarding of an external identity:
In section 1- Integration request
Enter the First Name and Last Name of the identity to be onboarded and click on the Verify button. This will determine if this identity is already in the repository. If it is, a list of matching identities will be displayed with additional information to distinguish them. The recommended practice is to select the matching identity for reuse and traceability.
In section Business coordinates, enter the Company Name and the corresponding phone numbers.
In section 3-Employment, enter the required information in the five mandatory fields.
In field Step 1 - Choose a Division, enter some letters of the organizational unit to which the external identity will be assigned and select it from the list displayed.
In field Step 2 - Choose a Supervisor, enter a few letters of the name of the person who will be responsible for the external identity and select it from the list displayed.
In field Step 3 - Choose a Title, enter a few letters of the person's title or position and select it from the list displayed.
In field Step 4 - Choose a Work Location, enter some letters of the work location to which the external identity will be assigned and select it from the list displayed.
In field Step 5 - Choose a Preferred Language, enter a few letters of the preferred language of the person to be integrated and select it from the list displayed.
In section 4- Add to request, enter the roles and entitlements to request.
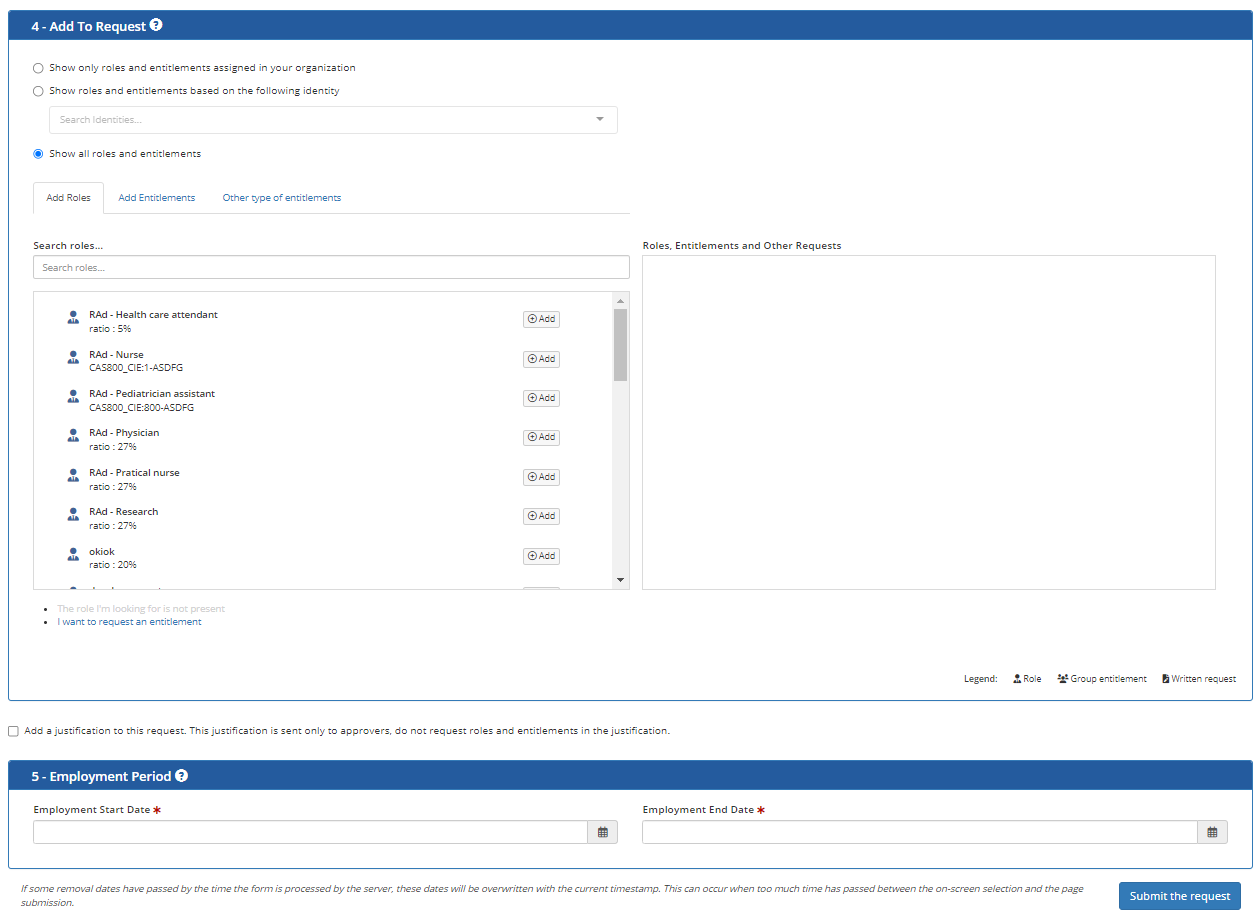
Note
If business rules and dynamic roles have been defined, it is possible that basic accesses and even business roles are assigned automatically during integration without you having to request roles and entitlements explicitly. In this case, you can go directly to section 5- Employment Period.
Choose one of the following options:
Show only roles and entitlements assigned in your organization This option is selected by default and only displays the list of roles and entitlements that are currently assigned to identities in your organization. If the requester is a manager, only the roles and rights assigned to the identities under his/her responsibility are displayed.
Show only the roles and entitlements of identities with a notification group of which you are a member to display roles and accesses based on identities that have a notification group of which the currently logged-in identity is owner or member.
- To display roles and accesses available on demand
- RAC/M Identity will use the currently authenticated identity to retrieve all delegation groups it owns or is a member of.
- A search is then performed to find all identities that have this delegation group assigned as a notification group.
- Finally, all identities returned are used to retrieve the roles and accesses these identities possess.
Note
This specific option must be activated by an system administrator to be visible. See file config.properties and modify the configuration self.service.display_entitlement_list_based_on_notification_group
- To display roles and accesses available on demand
Show roles and entitlements based on the following identity to display the roles and entitlements for a specific identity. This allows the requester to choose which roles and entitlements to request based on an identity that can be used as a reference while avoiding the "same as" problem of requesting all of the roles and accesses held by one identity in a single step.
In the search field, enter a few letters of the name of the reference identity and select the desired identity from the list displayed
Show all roles and entitlements to display all roles and entitlements available in your organization.
Note
All roles and entitlements selected in an access request must be approved according to the relevant approval flows which ensures the security of the process even though any roles and entitlements can be requested.
The area immediately below left contains tabs that display the roles and entitlements that can be requested depending on the option chosen, while the third displays a free text field that can be used to make a special request that cannot be filled by the choices displayed.
To add a role to the request:
Select the Add roles tab
In the Search Roles field, type in a few letters of the role you are looking for and click on the Add button to add it to the application.
The added role is listed in the section on the right, which contains the list of roles and entitlements to be added.
You can view the details of the entitlements contained in a role by clicking on it. A window similar to this one will open and display the contents of the role.

To add an entitlement to the request:
Select the Add Entitlements tab
In the Assets drop-down list, enter a few letters of the asset for which you want to add rights and select it from the list.
In the Search for rights, field you can enter a few letters of the group you are looking for to filter the content of the list and click on the Add button of a right to add it to the request.
The added entitlement is listed in the section on the right, which contains the list of roles and entitlements to be added.
You can view the details of a displayed entitlement by clicking on it.
Click on the calendar icon to add an end date and time to a role or entitlement. If a date and time is specified, the role or entitlement will be removed automatically at that date and time and the icon will be displayed in red. Do not specify a date if the role or entitlement is not to be removed on a predetermined date.
You can add as many roles and entitlements as required.
If you don't find the roles you are looking for
Click on the The role I am looking for is not present link. This will change the option to Show All Roles to remove the filter and allow all available roles in the organization to be displayed.
If you still can't find the role you are looking for, click on the I want to request an entitlement link to open the tab that displays available entitlements.
If you don't find the entitlements you are looking for
Click on the The entitlement I am looking for is not present link. This will change the option to Show All Entitlements to remove the filter and allow all available entitlements in the organization to be displayed.
If you still cannot find the entitlement you are looking for, click on the link I cannot find the entitlement I am looking for to open the tab that displays Written Request which allows you to request an entitlement by writing a free form request.
Note
This link is available to provide a solution in problematic situations and should not be used as a general mechanism for making access requests as these must be handled manually.
Check the box Add a justification to add a note that will accompany your request. This note can contain an explanation or justification of your request that will be forwarded to the approvers.
In section 5-Employment Period.
In the field Employment Start Date, enter the date and time when the hiring becomes effective and the accesses must be granted.
In the field Employment End Date, enter the date and time when the employment ends and the accesses must be removed.
Note
The exact process and actions taken upon termination are determined by business rules and may vary depending on several factors such as the hierarchical level or the nature of the responsibilities of the identity involved.
Role Modification Request
This tile allows you to submit a modification request for an existing active role.
To request a modification of a role:
In section 1 - Make the request for

- Select the role for which you wish to request a modification. Please note that the roles available in this list are contextual to the identities. Only the roles for which the identity is an owner are displayed. However, if you have permission to access the entire self-service, all roles will be available.
- It is also possible to choose a reference version. This version allows you to pre-fill the following sections by indicating the differences between a specific version and the active version of the role.
In section 2 - Modifications to directly assigned members
- Apply the required modifications to the direct members. To do this, you can remove or add a direct member. Current modifications are present in the central section. The left section lists the members available for addition, while the right section displays those that can be removed from the role.

In section 3 - Modifications to automatically assigned members

Apply the required modifications for the member assignment criteria. You have the option to configure the role to automatically assign members or not. If automation is desired, it is necessary to select or modify the assignment criteria.
At the bottom of this section, lists are presented. They allow you to visualize the modifications made to the automatic members based on the specified criteria, as well as the current automatic members of the active version.
In section 4 - Modifications to accesses

Apply the required modifications regarding the accesses associated with the role. An access can correspond either to a group or to another included role. You can remove or add accesses as needed. Current modifications are present in the central section. The left section lists the accesses available for addition and the right section presents those that can be removed.
This section allows for efficient management of the access rights associated with the role, ensuring that users have the appropriate permissions.
Check the Add a justification box to include text that will accompany your request. This text may contain an explanation or justification for your request that will be transmitted to the approvers.
Click on Submit Request. This action will validate the compliance of your request. If everything is in order, the request will be submitted and the page will be reset. In case of an error, corrective actions will need to be taken.

Issue in the hierarchy of roles
A request may not be processable if it introduces a conflict in the hierarchy of roles. For example, a role added as a child cannot be a parent of that same role or could become one if another pending request is approved. In this case, submission will be impossible and problematic accesses will be marked with an exclamation symbol. A filter is also available to display only the problematic accesses in the central section.

Employment Termination - External Contractor
The External Contractor Employment Termination tile is used to initiate the employment termination of an external identity such as a contractor.

To initiate the departure of an external identity:
In section Request
- In the Identity search field, enter a few letters of the name of the target identity and select it from the list.
- In the End Date field, enter the date and time when the departure is effective and the accesses must be removed.
Note
The exact process and actions taken upon termination are determined by business rules and may vary depending on several factors such as the hierarchical level or the nature of the responsibilities of the identity involved.
In the Additional Actions section, fill in the questions.
Note
The content of this section is determined by business rules configured according to the processes relevant to your organization. The items displayed and the options available may differ from the example used. See the section on question configuration for more details.
Employment Termination - Employee
The Employment Termination - Employee tile is used to initiate the employment termination of an employee.

To initiate the departure of an employee:
In section Request
- In the Identity search field, enter a few letters of the name of the target identity and select it from the list.
- In the End Date field, enter the date and time when the departure is effective and the accesses must be removed.
Note
The exact process and actions taken upon termination are determined by business rules and may vary depending on several factors such as the hierarchical level or the nature of the responsibilities of the identity involved.
In the Additional Actions section, fill in the questions.
Note
The content of this section is determined by business rules configured according to the processes relevant to your organization. The items displayed and the options available may differ from the example used. See the section on question configuration for more details.
Assigned tasks
In this section, you will find information on the administrative tasks that may be assigned to you.
Access and revocation requests made from the self-service portal are automatically handled by the approval and provisioning workflows.
As a manager, approver or person responsible for resolving business rule conflicts, you will receive email notification when tasks are assigned directly to you or to a delegation group to which you belong.
You will see your assigned tasks in the Tasks section of the RAC/M Identity Self Service Portal. You can approve or reject access change requests or resolve conflicts associated with a request.
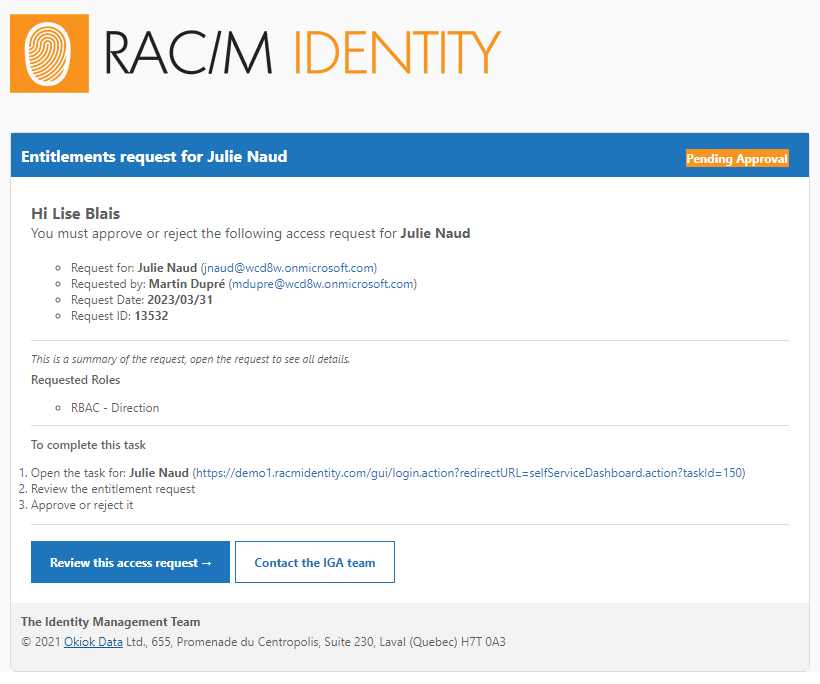
The tasks displayed may have been assigned to you specifically or to a delegation group to which you belong. In this case, depending on the setting of the delegation group, all members of the group may receive the task and, as soon as one member of the group completes it, the task is removed from the list of all other delegates.
Note
Several delegation strategies are possible. These are determined by the settings of the delegation groups.
See also
- About delegation groups for more information.

To complete the tasks assigned to you
- In the Tasks section, click on the number or description of one of the displayed tasks.
The Task Details page opens and displays relevant information about the request. In particular, the roles and entitlements requested and those currently held by the subject identity are displayed to provide as much contextual information as possible to the person who must approve the request.
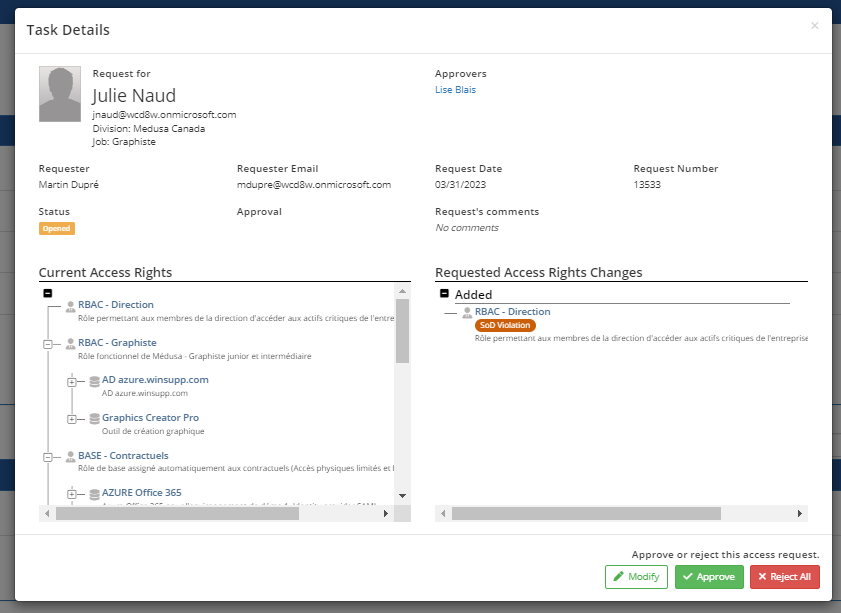
Approve, reject or modify a request
In the example above, the approval task is for a Separation of Duty (SOD) rule violation, indicated by a red badge associated with the request in the right section.
Click on the red badge to view the details of the violation.
You have three options for completing an approval task, either Modify the request, Approve the request, or Reject the request.
To modify the request
1- To modify a request, click on the Modify button
An icon is displayed to the right of the role or entitlement to be modified. Click on the icon to open the drop-down menu and select the desired option.
- Select Approve to approve the role or entitlement.
- Select Temporarily Approve to approve the role or entitlement for a specified period of time. In this case, a calendar will open to allow you to determine the date the access will be removed. A new request will automatically be created to remove the access on the specified date.
- Select Reject to reject the role or entitlement.
To approve or reject the request
1- To approve or reject a request, click on the Approve or Reject button.
An email is sent to the subject indicating that the request has been approved or rejected.
You, as the requester, as well as the subject for whom the request was made, can track the progress of the request as it moves through the approval and provisioning workflows in the self-service portal.
Tracking requests
As a requestor or subject of a request, you can track its progress through the approval and provisioning workflows.
To view completed requests, check the View Completed Items box.

To view a request
- In the Access Requests section, click on the number or description of one of the displayed tasks.
The detail page opens and displays relevant information about the request.
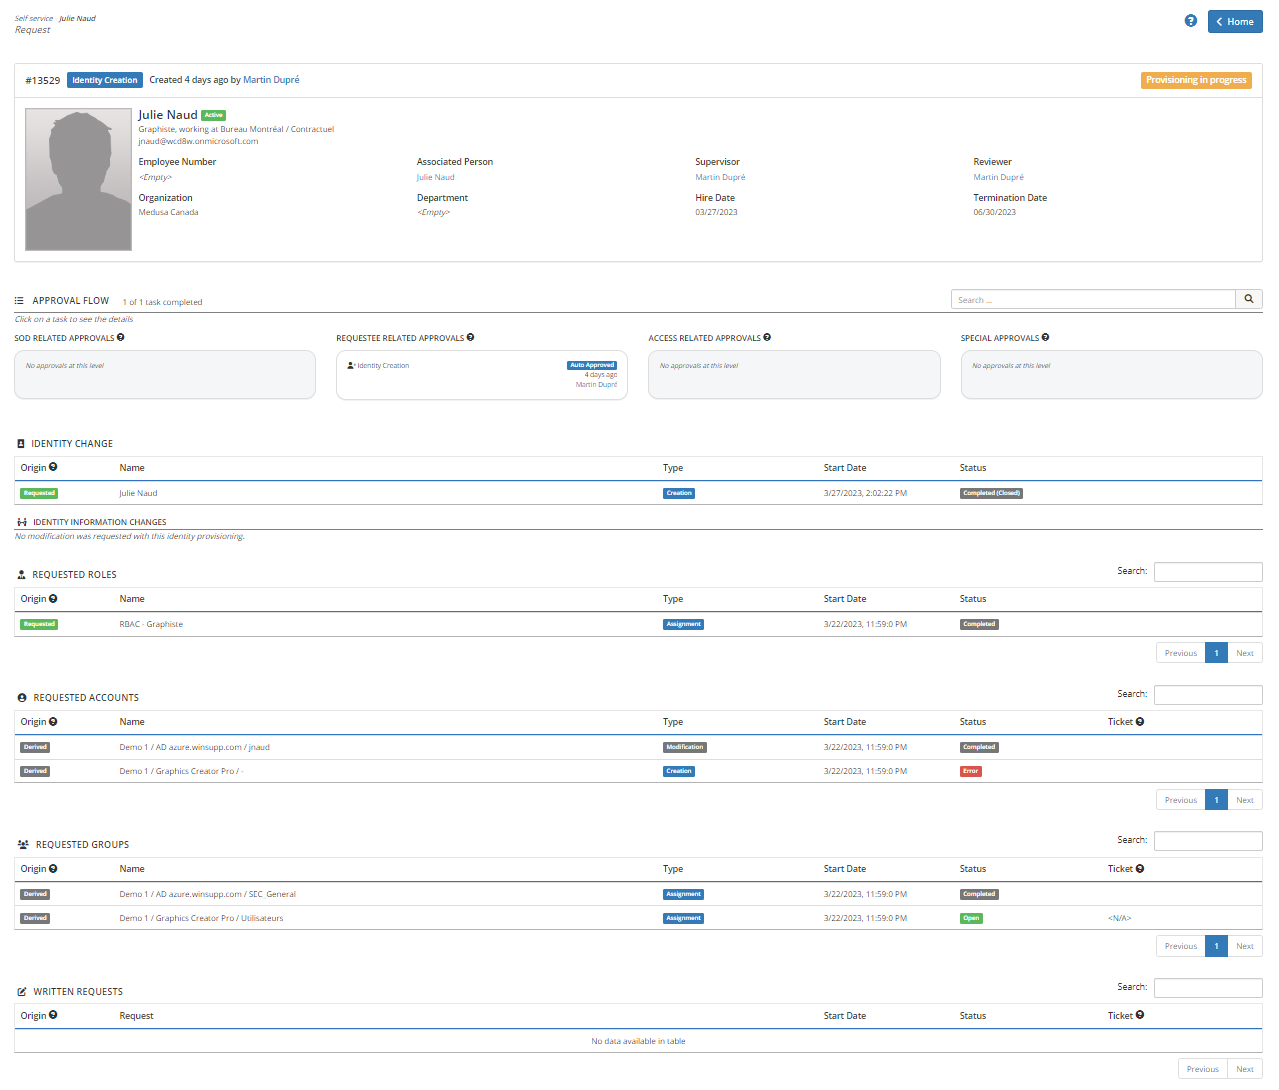
General information
The top section displays general information about the subject of the request.
Approval flow
The Approval Flow section illustrates the progression of the request through the four possible stages of the approval workflow. The first step is used to approve a request containing a violation of a business rule such as Segregation of Duties (SOD).
The second step is used if the approval workflow related to the requested roles or rights requires the approval of the manager or the person responsible for the subject.
The third step is used if the approval workflow requires the approval of the owner or holder of the subject asset.
The fourth step is used if the approval workflow requires special approval, usually reserved for high privilege or high risk entitlements.
In the following sections, the Origin, Type, Date and Status fields reflect information relevant to the various queries displayed. The field:
- Origin, reflects whether the request was issued directly by the requester or derived from a request.
- Type indicates the nature of the request such as creation, addition, modification or removal of accounts, roles and entitlements.
- Date indicates the creation date of the query.
- Status reflects the status of the request in relation to its life cycle. It can contain the following values:
- Open means that the request is in progress.
- Completed means that all processing steps have been completed, but the result has not yet been confirmed by importing the information from the target application. For example, a request that has been provisioned, i.e. automatically created in a target application, or that has opened a ticket in a ticketing system to create or modify access manually is considered completed.
- Completed (closed), means that the change has been confirmed by importing and reconciling the information from the intended target application.
- Error, means that the request was not completed, possibly due to an error in processing. For example, an error status will be entered if a connection to the target application cannot be established because the RAC/M Identity credentials are invalid or expired, if the application is unavailable, or if a network or technical problem disrupts the system.
Identity Change
The Identity Change section contains the list of requests related to the subject's identity.
Any requested changes to the identity fields are indicated just below if any.
Requested Roles
The Requested Roles section contains the list of role requests associated with the current request.
Adding and removing roles may result in the creation of multiple subqueries to add or remove rights.
Requested Accounts
The Requested Accounts section contains a list of requests to create, modify or revoke accounts associated with the current request.
In the above example we see two requests to modify and create accounts in two different assets.
Requested groups
The Requested Groups section contains a list of requests to assign, modify or remove groups associated with the current request.
In the above example we see two group assignment requests, in two different assets.
Written requests.
The Written Requests section contains the text of free form written requests that are typically entered and resolved manually by opening a ticket in a ticketing system.
The Ticket field contains the ticket number associated with the request if available from the ticketing system through a bi-directional integration.
Access review campaigns
In this section you will find the information necessary to execute the access review campaigns assigned to you.
During an access review, you, as the certifier, must review all accesses to determine if they are still valid or if they should be deleted. This way the accesses are certified as valid.
The nature of the items to be reviewed and the level of detail of the campaigns depends on the campaign configuration, as determined by the campaign manager.
Note
Before proceeding with the access review, it may be helpful to take a short training session or view a presentation to familiarize yourself with the key concepts.
Please contact your technical support department for information on available training material.
See also
The Review Campaigns section of the Self-Service Portal home page displays a list of Access Review campaigns that have been assigned to you or to a delegation group of which you are a member.
Check the View closed items box to view completed campaigns.
If your name appears in the Assigned Certifier column, it means that the campaign has been assigned to you directly. If a name other than yours appears in this column, it means that you are a member of a delegation group associated with the person indicated and that the campaign has been assigned to this delegation group.

To review accesses
1- Click on the name of the campaign you want to execute. The list of items to review will appear.
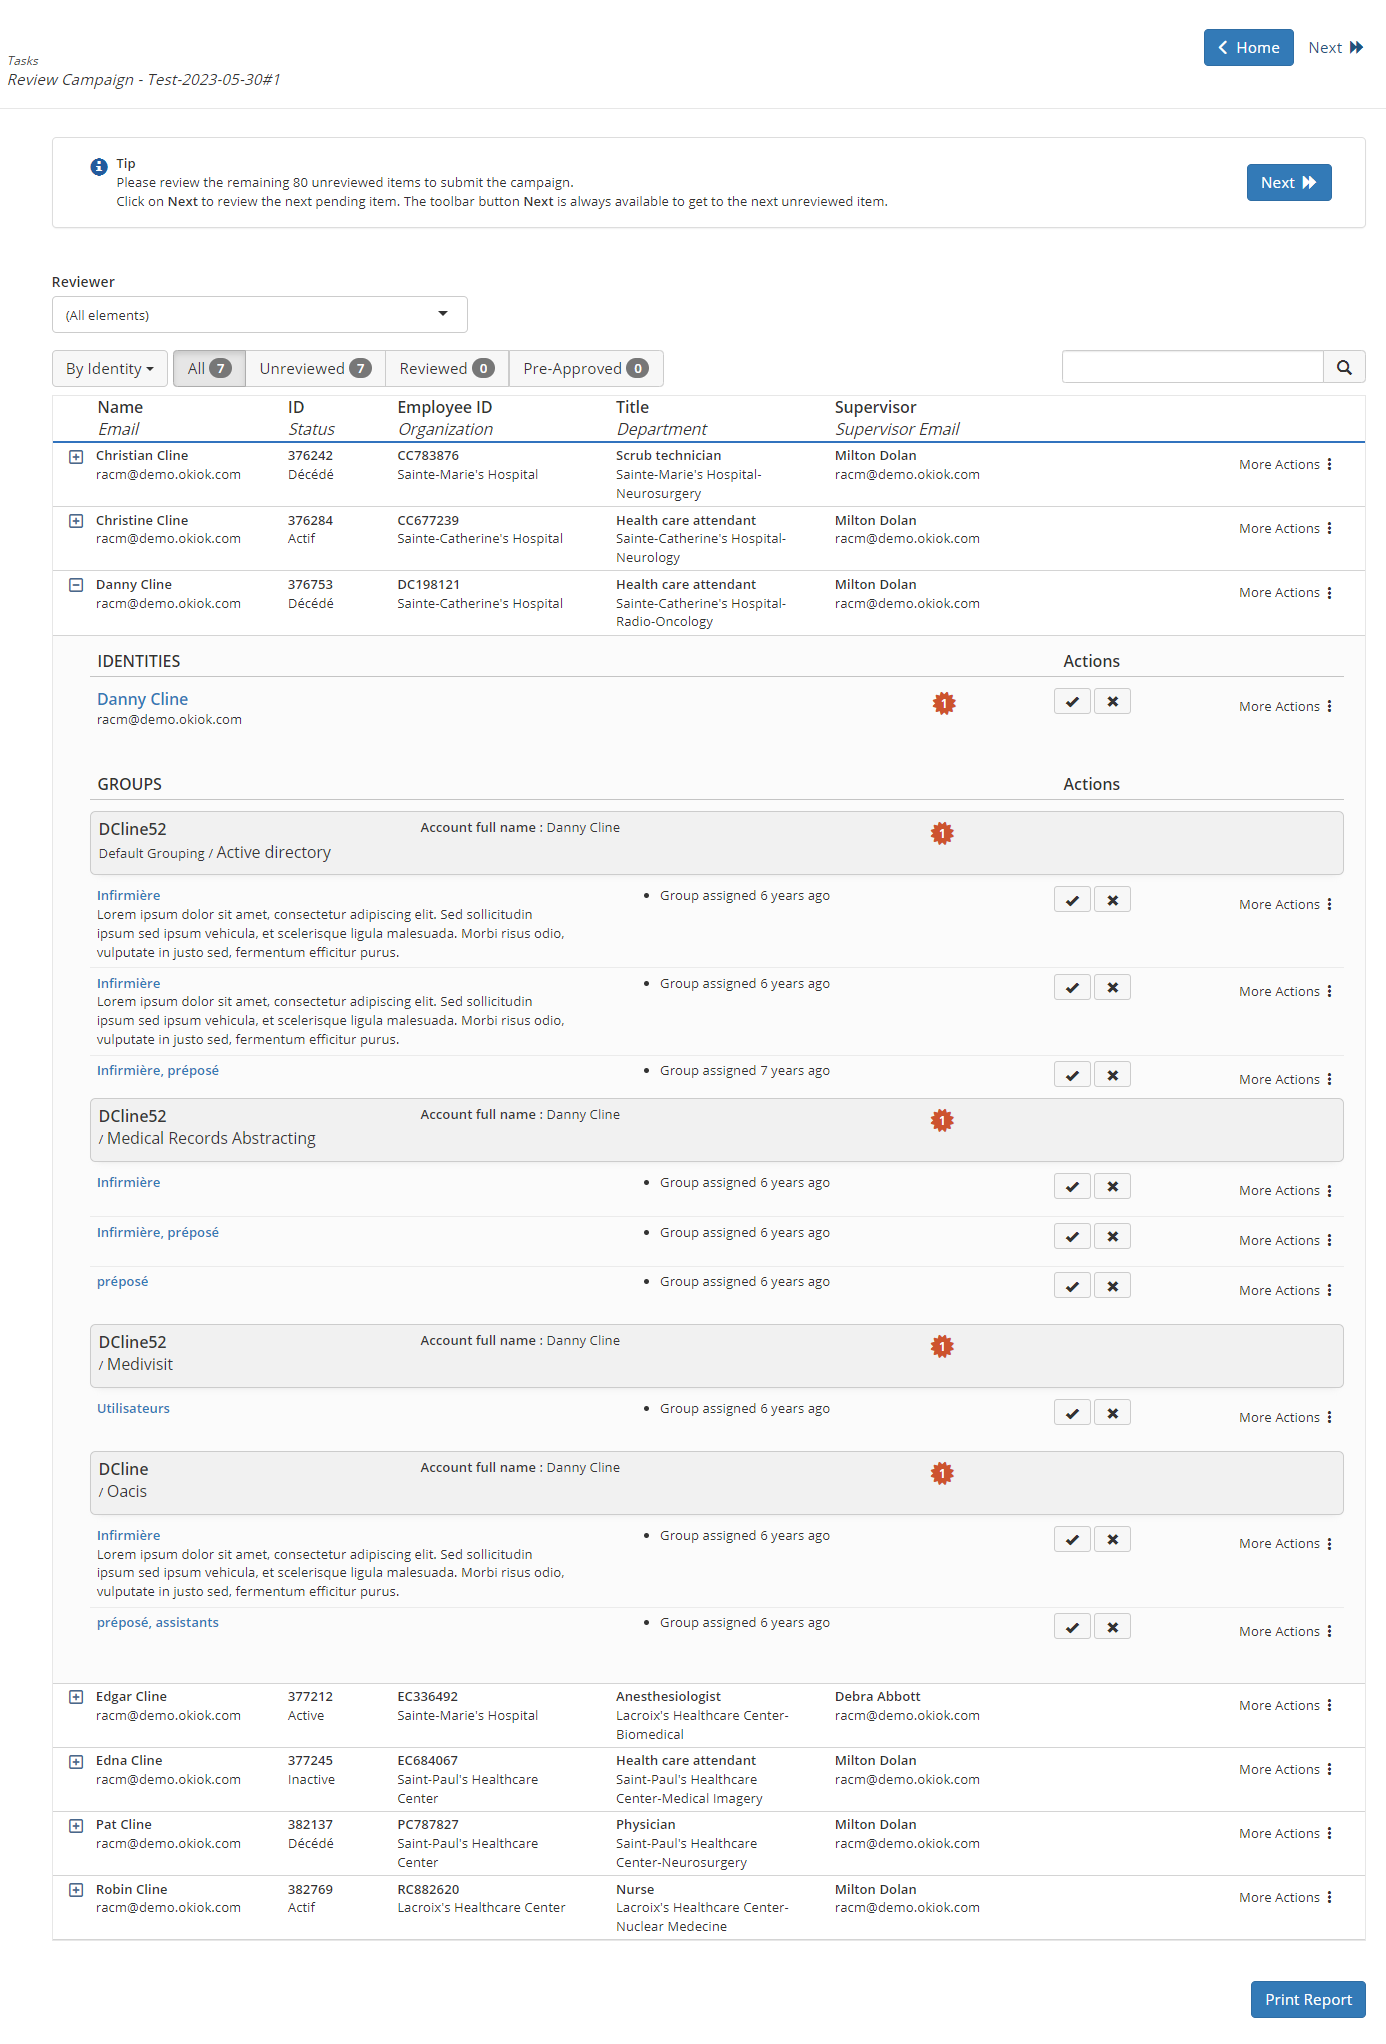
The items to be reviewed are organized according to the selected reviewer and tab.
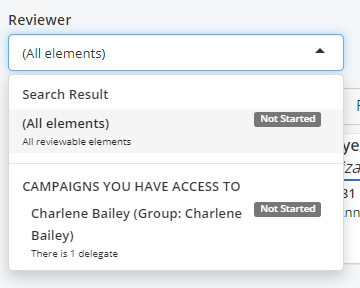
Selecting the reviewer displays the other campaigns to which you have access.
The first tab allows you to organize the list of items to review by Identity, by Item, by Group or by Role. This tab is selected by default on the By Identity option and presents a complete view of the items to review organized alphabetically by identity. The number displayed next to the options indicates the number of items to review.
The tab
- All Allows you to return to the list selected by the first tab.
- Unreviewed displays the list of unreviewed items.
- Reviewed displays the list of reviewed items.
- Pre-approved displays the list of pre-approved items. Pre-approved items appear only in incremental campaigns.
The different options allow you to organize the list of items to be reviewed in different ways.
Approve or revoke items
- Click on the
button to open the item to review.
When the list is organized by identities, you can approve or revoke roles and entitlements in bulk by clicking on the or
buttons corresponding to the identity.
You can approve or revoke roles and entitlements item by item by clicking on the buttons corresponding to each item.
More actions
Several other options are available by clicking on the More Action button located to the right of each item.
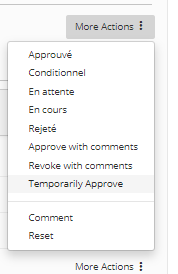
- Accepted same effect as clicking on the Approve button
- Conditional indicates that the acceptance is conditional, a comment can be added to indicate the condition.
- Pending indicates that the acceptance is waiting for an event, a comment can be added to indicate the condition.
- In progress indicates that the acceptance is being processed, a comment can be added to indicate the condition.
- Rejected same effect as clicking on the Revoke button
- Approve with comments same effect as clicking on the Approve button but with a comment. A panel opens with a free text field to enter the comment.
- Revoke with comments same effect as clicking on the Revoke button but with a comment. A panel opens with a free text field to enter the comment.
- Approve temporarily allows you to approve the item but with a deadline. A panel opens allowing you to indicate a start date and an end date for the approval period as well as a free text field to enter the comment.
- Comment allows you to enter a comment.
- Reset allows you to cancel all changes and return the item to its original state.
Items in the review campaign are considered under review until a decision has been made on them. Once all items have been reviewed, the campaign must be completed by clicking the Complete button.
Until the campaign is Completed, changes can be made to review decisions. When the campaign is Completed, changes made to the roles and entitlements will be initiated by launching the approval and provisionning workflows.
